Technique Tuesday New Release Countdown: Day 2

Hi, gang!

I’m back with the Technique Tuesday Design Team today in counting down to the September release of new goods.

I’ve got two cards to share with you today. Both of these cards feature the new Wendell the Whale stamp set, which will be available here with all the new goods on September 1st.

Blue-Swale-Card-Teri-A-Technique-Tuesday

For this first card, I paired Wendell with a fish from the Olive the Octopus stamp set. It’s always fun when you can mix and match stamps together.

The little water droplets on the card? I created those with Glossy Accents. The hardest part? Being patient while waiting for them to dry. 😉

A stamped whale card by Teri | terisplace.wordpress.com

By the way, I wanted Wendell to be extra goofy on this card so I added a wiggle eye. I also wanted him to really pop so I cut a second whale mat from craft foam and adhered it under him. That’s why he looks like he’s more raised than the little fish.

For this second card, I created a little scene by pairing Wendell with the Waves on the Border die. I just love this die. It works well with all the underwater critters in the Animal House collection of animal stamps.

Pink-Whale-Always-Love-You-Card-Teri-A-Technique-Tuesday

To the make the waves stand out against the patterned paper background, I did mount them to vellum and use my scissors to fussy cut away the excess vellum. I think it just add the right “something something” to the card.

Alright! That’s it for now. I’ll be back later.

Check out the Technique Tuesday blog to see who else from the design team is sharing projects today. Also don’t forget to comment on their Countdown and/or Sneak Peek blog posts for a chance to win a $20 TT gift certificate! Someone’s got to win it. It could be you!

Sea… er… see you again soon!

New-Release-Countdown-Day-2

Technique Tuesday New Release Countdown: Day 1

Hi, gang!

It’s New Release time at Technique Tuesday! New products arrive on their website on Sept. 1st, and the design team is blog hopping today. We are sharing some projects made with the new goods.

I’m excited to share with you two cards I made with the new Lovely Lavender stamp set and dies.

A stamped flower card by Teri | terisplace.wordpress.com

This is lovely stamp set, featuring some hand-drawn stems of lavender. For this first card, I stamped and die-cut the image twice, colored them in with markers and the laid them on top of each other. You’ll see I let just a little bit of the flowers from the bottom die-cut peek out, but I sure love that layered look! Love-You-Friend-Lavendar-Card-Teri-A-Technique-Tuesday

The lined “love you” phrase is included with the stamp set’s mat dies It’s a good, all-around die phrase I think that could be used with lots of different stamp sets, not just this one (although the mat with the die set is for this one). I cut it from white cardstock and then added some color with markers to match the colors I used to color in the lavender.

I used the same trick on my second card with the lined “love you” phrase. Patchwork-Love-You-Lavendar-Card-Teri-A-Technique-Tuesday

For this card, I colored the lavender in with different markers than the first. It’s kind of fun just messing with different colors markers to see how you can make an image look different from the first time you colored it in.

I felt like the stems needed something for this card so I tied a little bow from twine and added it to the bouquet. I think it looks so cute!

Patchwork-Love-You-Lavendar-Card-Close-Teri-A-Technique-Tuesday

Alright! That’s what I have for today. Be sure to hit the Technique Tuesday blog to see who else from the design team is hopping today. You’ll also find they’ve got a chance to win a $20 gift certificate over there for commenting on their sneak peek and countdown blog posts!

Oh yes! And be sure to hit the Technique Tuesday website to see all the new goods on September 1st.

New-Release-Countdown-Day-1

A Thrilling Birthday Card

Hi, everyone!

How is your day going? Hoping well.

I’m back with another stamped birthday card to share with you.

A stamped birthday card by Teri | terisplace.wordpress.com

Created this guy the other day when I was in need of a little “creative therapy” time. All the images and words are from the Lawn Fawn’s Coaster Critters stamp set. They were cut with the coordinating dies. ThrillingBirthdayCard-2-teri

So I just cut a bunch of elements to color in with markers. There’s just something calming about marker coloring. 😉 If you look really, really close, you’ll see I added a few extra details with Nuvo Crystal Drops and a white gel pen to the balloons, cotton candy and large roller coaster car. I also added a few white dots to the sky too.

The sky background was created with cardstock, ink and a cloud stencil from My Favorite Things. It is one of those crafty things I would argue any scene loving stamper needs. It’s a great little tool.

The papers at the bottom? They are just scraps from my stash of papers. If you are ever wondering what my deal is for selecting patterned papers to use on my cards, here are a couple tips. I typically like to use small patterns (or ledger or graphic paper). And I like to use colors that work together. It’s like picking cardstock colors that work together. You just have to train your eye to do it with patterned paper. It becomes easier the more you do it, like everything in crafting.

Alright. That’s it for today. I’ll be back again later, friends.

Seen Elsewhere Today

Hi, guys!

I’m up today on the blog for Scrapbook Adhesives by 3L, sharing a fun way make to an interactive Peek-a-Boo card.

Here’s a little sneak peek of the card.
TeriAnderson-InteractivePeekabooSliderCard-1TeriAnderson-InteractivePeekabooSliderCard-8

The magic is right there in that circle. Using one of the foam products (hint) from Scrapbook Adhesives by 3L, I’m got a super easy way for you to make that open and slide.

Check out their blog for the quick tutorial… and the answer to what product I used to pull off this super easy, super fun technique.

Sea You Soon Card

Hi, guys!

Here today with a quick little card I put together the other day to send to a good buddy just for the fun of it.

A stamped card by Teri | terisplace.wordpress.com

Created this guy mostly with products from Jillibean Soup.

I picked up the scallop die (from Jillibean’s Square die set) from a stamp store as it was closing awhile back. I just loved it, plus it was super affordable. Like $4. Can’t beat that. SeaYouSoonCard-2-teri

The little critters (and words and wave) were stamped with a couple sets – Octopus and Whale Done. I’m a big fan of mixing and matching stamp sets together so really enjoyed that these little sea critters could play together…. so speak.

To add the dots to my windows, I pulled out my white gel pen. And then I just added the dots… slowly and surely. It took a little patience to add so many dots, but I think the final result makes it worth it.

Alrighty! That’s what I have. Ok. Maybe I have a little more… but it’s super duper later and I’m super duper tired…. so I’ll be back again later. Thanks, as always, for stopping by. I sure appreciate it when you do.

Ps. If you are on Instagram, don’t miss this awesome giveaway Jillibean Soup has going on. You could win a lot (and I mean A LOT) of stamps from them. Seriously good stuff. Be sure to comment on their post.

A Little Something Planner. A Little Something String Art.

Hi, guys!

Back again. Today’s project isn’t a card. I know… shocking. (Wink, wink!)

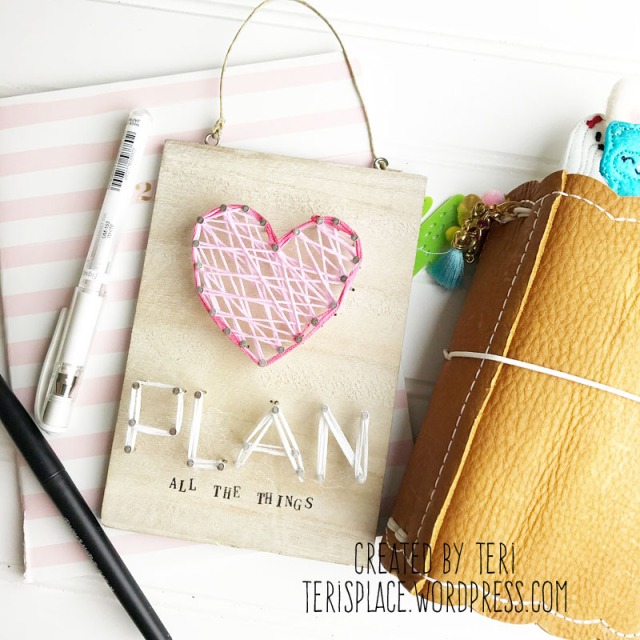
Today’s project is a little something planner. A little something string art. I present to you, today’s project!

Planner Girl String Art by Teri | Terisplace.wordpress.com

I made this little sign with a couple of my planner friends in mind.

It was pretty easy to make. I created a little heart piercing pattern and temporarily adhered it to a wood panel. (You can pretty much use any wood panel for string art! As long as it can take nails, it’s good. In fact, my next string art project is going to use some reclaimed weathered fence boards. I’m so excited!) Planner Girl String Art by Teri | Terisplace.wordpress.com

Anyhoo, I just whacked small nails through the pattern with my $1 store hammer. True story.

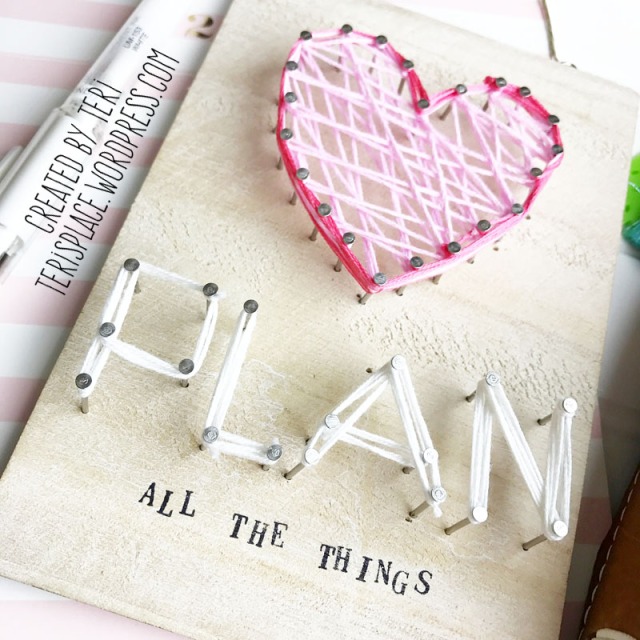
And then to do the “plan” word, I used some old scrapbooking letter stickers as a template on where to add nails. I certainly could have sketched out the letters on my board, but, having a pile of unloved letter stickers, certainly has its benefits. 😉
Planner Girl String Art by Teri | Terisplace.wordpress.com

Once I added the nails for the letters, I removed the letter stickers and tore off the heart template. And then I went to town, adding string around the nails over and over… over again.

I finished my project off by stamping a few additional words, “all the things.”

Planner Girl String Art by Teri | Terisplace.wordpress.com

Keep in mind, I made this with a couple planner friends in mind. They are super duper active planners and totally could appreciate the “plan all the things” phrase.

I think it turned out pretty fun, and I can’t wait to make another one! See you again soon, friends.

A Tag for a Birthday Gift

Hi, guys!

Are you like me? Always have big dreams of making all. the. things. to give as gifts but run short on time? Yeah. I know.

So here’s an idea. Instead of making a handmade gift, make a sweet stamped tag and tie it onto a store-bought gift.

BrightestBirthdayCandlesTag-TeriA-TechniqueTuesday

I’m up on the Technique Tuesday blog today sharing a step-by-step tutorial for making a tag like this. It’s incredibly easy to make with their Many Candles stamp set, cardstock, ink and a few basic crafting supplies.

One thing I super loved about making this tag? Adding color outside the lines! When is the last time you’ve done that? If you haven’t lately, I’d like to encourage you to be rebel and go for it. It’s liberating. 😉

BrightestBirthdayCandlesTag-Close-TeriA-TechniqueTuesday

Anyway, hope you will check out the post!

See you again soon.

Thanks Little Bees

Hi, guys!

I’m here again with a couple thank you cards that were just plain fun to make.

Meet card #1.

A stamped thank you card by Teri | terisplace.wordpress.comhoneybeestamps-hexistencils-2-teri

Meet card #2.honeybeestamps-hexistencils-3-teri

And meet card #3.honeybeestamps-hexistencils-4-teri

I created the backgrounds for each of these cards using some stencils from Honey Bee Stamps. Take a look and you’ll see each one is a little different.

The first card uses an entire stencil the old fashioned way: Set it down and apply ink.

On the second card, I used one of the stencils to apply a dark layer of yellow ink. Then I moved it over the left and applied a lighter layer.

On the third card, I did some layering with different stencils. It’s hard to tell but look real close and you’ll see it.

Stamped Thank You cards by Teri | terisplace.wordpress.com

All the words and images on these cards are from Honey Bee Stamps too. I didn’t quite have phrase to use with the thanks word so I took a phrase from their Forest Friends set and masked off part of it when I inked it so only part of it would stamp on my cards.

Alright! That’s what I have for you.

Supplies from Honey Bee Stamps used for these cards:

Ps. Check out The Scrap Review for a recent review I did about the Hexi Patterns Background Stencils from Honey Bee Stamps. They are just lovely.

A Little Something Decor’ish

Hi, gang!

I’m bringing a little something home decor’ish to the blog today.

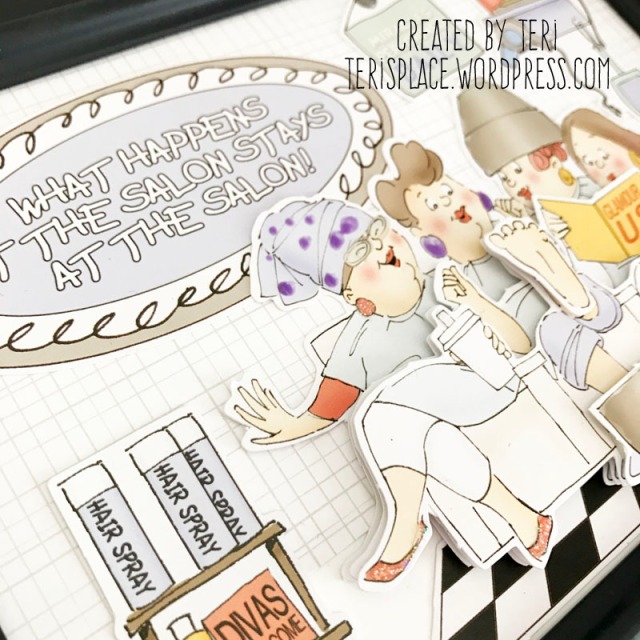
I had the chance to attend Art Impressions’ Warehouse Sale last year and picked up a pack of some printed Pop-Ups elements they had for cards. I pulled them out the other day to make a card and decided to do something different.

I have a few “hair” ladies in my life who I thought would get a good kick out of them so I made this little frame with the Pop-Ups.

A frame for a hairdresser by Teri | teriplace.wordpress.com

The images just cracked me up!

Since I used lots of Crafty Foam Tape to piece the parts together, I removed the glass from the frame. I really wanted the bulk and pop to be there.

I simply made a little mat of cardstock and patterned paper and added all the elements to it.

hairframe2

To give them even more pop, I added some Glossy Accents, glitter glue and Nuvo Crystal Drops to the cut-outs.hairframe3

I like how the little details just add a little something. 🙂

Hopefully, the hair ladies in my life will enjoy this as much as me.

Thanks for stopping by.

A Hug from Under the Sea… in Card Form

Hi, guys!

Let me tell you a secret: I make cards all the time. You’d think the ones I send the most are for birthdays and special occasions.

Confession time. I always am late to the game when it comes to that. So truly, the cards I send most are cards to friends who I’m just thinking of.

So meet today’s card. This is one I made with a couple friends in mind, that I was just thinking of. Big-Hug-Olive-the-Octopus-Seahorse-Card-Teri-A-Technique-Tuesday

One of things I enjoy most about Technique Tuesday’s Animal House stamps is mixing and matching the different critters together. I’d been anxious to create some kind of scene with their most recent sea creatures so this card was my reason to do it!

And let’s chat for a minute about realism and cards. So there’s probably not a gigantic seahorse (stamped with the Simon & Sandy Seahorse stamps and dies) in the sea, but it’s kind of fun to imagine there is one as almost as big as Olive the Octopus. 😉 Anything can happen in the stamping world! That’s what I’m sayin’.

A stamped octopus and seahorse card by Teri | teriplace.wordpress.com

I wanted to really build on the notion of a hug so I added all the other little critters to scene. (All the other little creatures were stamped and cut with the two stamp sets, by the way.) I also added a few die-cut hearts.

I don’t often use a lot of soft colors when I color in images with markers but I decided to for this card. It was nice change.

Also I added a few “drops of water” to the underwater scene with my old friend, my trusty bottle of Glossy Accents. Always a fun addition.

Alright! That’s it for now. I’ll be back again later, gators. Thanks, as always, for stopping by. It’s a real treat when you do.

Technique Tuesday products in this post:

Ps. I’m totally sending a shout-out to my friend, Dana Joy! She created an awesome card with the Olive the Octopus stamp set and Technique Tuesday’s Waves on the Border dies. She’s got a video on her blog, showing how she made the wavy scene. You should check it out.