MFT Creative Challenge: Halloween Happenings

Hi all!

This is my maiden voyage taking part in a Creative Challenge with the My Favorite Things design team. Every month, the crew puts up some kind of challenge with team.

When they announced this month’s theme was Halloween Happenings, I was like… all in. 🙂

So I’ve got a couple projects to share with you today. Brace yourselves. Not a single one of these projects involves a card. Yes, like I said, brace yourselves. Each of these things are little things to give out on Halloween so let’s do it.

Up first is this little jar package of treats. I filled up a little plastic tube with gumballs and then made a little tag to put on it.

Print

The base of the tag is MFT’s Just a Ticket Die-namics die. I stamped the pattern on top and then used the Spooky Scene Die-namics to … well… create the spooky scene.

Are you ready for project number 2? It’s coming right at you right now.

Print

Ta-da!

So I once again whipped out the Just a Ticket Die-namics to make a couple tags. I stamped the polka dot pattern on top and then stamped the words from the Spooky Sentiments stamp set onto one of them and the little monster guy from the Trick or Treat set onto the other.

Print

Oh, and how about that lid? I cut from a piece of felt with the Pinking Edge Circle STAX Die-namics. The jar itself is just an old jar turned into a gumball container. 😉

With that, here is treat container no. 3.

Print

I found these tubes the other day at Dollar Tree and thought they would sure be fun to use for some Halloween treats. I filled this guy up with candy and then fashioned a circle to put inside it to use as a lid.

I created the ghosts by die-cutting them with the Spooky Scene Die-namics and then adhering them to toothpicks. To give ’em a little extra personality, I tossed on some enamel dots and bow.

Print

Lastly, I’ve got one more treat container to show you. It’s not really a treat. Instead it’s more a Halloween favor. One of my neighbors’ sons is not really a candy fan so I thought I always try to give him something trinket like.

Print

These are just little bottles of bubbles decorated up with the Spooky Scene Die-namics.

Of course, I just had to live on the edge and throw on a couple wiggle eyes to make the ghosts a little goofier.

By the way, you might be wondering where I found the bubbles. Well, I found them in the wedding supply aisle at Michaels. I’ve seen small packs of them at the Dollar Tree too.

Here’s a list of all the MFT supplies I used to make my projects today:

So that’s what I have!

Thanks for swinging by today. Be sure to hit the MFT Blog to see which other design team members are taking part in this month’s Creative Challenge.

Go-to Gal Designer Challenge: Winnie & Walter

Hi all!

It’s time again for another Designer Challenge with the Go-to Gals.

We’ve challenged each other this time to make something with the fine products from Winnie & Walter.

What’s the deal with these challenges? Well, every so often we challenge each  to make something (really, totally. just for the fun of it) with a specific manufacturer’s products. Sometimes, we all play. Sometimes, we all don’t. That’s OK because it’s all about having fun.

Here’s what I came up with.

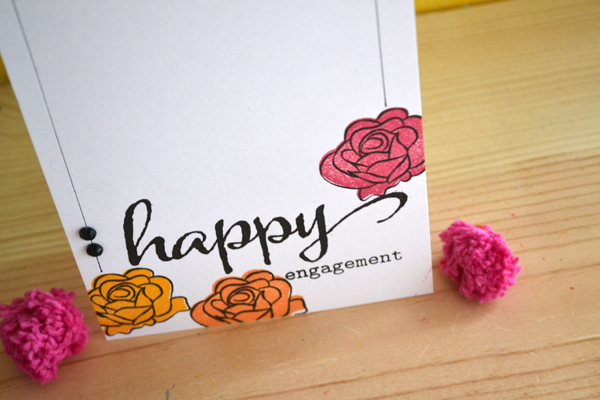
WW_HappyEngagement1_teri

I made this using a couple Winnie & Walter stamp sets – The Big, the Bold and Extras and The Big, the Bold and the Happy. One of the things I dig (a lot) is when different products can  be combined and easily used together. And, boy, Winnie & Walter has done an awesome job at making stamp sets that work together.

ww_happyengagement2_teri

Pretty much everything here is stamped, other than the frame that I drew with a black pen and, of course, the dots. 😉

So that’s what I have.

I’m anxious to see what the rest of the Go-to-Gal crew has cooked up.

Have a great day, all! Be back again soon.

A few things…

Hey all!

Just a quick post for today so let’s do it list style.

* I had a couple pocket style pages show up on the Simple Stories blog this weekend. Here’s a peek.

sept_rightclose_teri

Would be honored if you checked it out. you’ll find a ridiculously easy way to make a shaker in with a pocket page too. The back story? Well, I had a light bulb moment and figured how to to make a shaker, but how to keep it so I could still use the pocket when I went to use the backside of the page. Check out the post for the scoop.

* Who won the Keep Smiling stamp set mentioned in my Technique Tuesday Blog Hop post? That would be Tsurutadesigns (9/19 at 3:49 a.m.). I’ve just sent you an email! 🙂 Thanks to everyone who stopped by and commented on my post (and the posts from the rest of the team).

* Do you make cut files? I’m looking for cut files makers who like to share their work to feature over on Moxie Fab World in the future. If you are, leave a comment for me so I can check out your stuff.

* Finally, got some new stuff coming soon from Technique Tuesday. Here’s a sneak peek of something from one of the somethings. (Watch their Facebook page for more peeks from their next release.)

2_Snowman_techniquetuesday

So that’s what I have. I’ll be back later.

(PS. I was nominated by my friends Mendi and Jingle to share a little bit about me so you might be looking for that post. I’m a little behind. Not to disappoint. I’ll share in a few days.)


MFT: Release Rewind

Hi guys!

I’m back with one more lot of cards created with some products from the September release from My Favorite Things.

Print

So many fun products in this release.

So let me show you what I have got for you today.

This is card #1.

Print

I stamped the background paper here with the Mini Chicken Wire Background stamp. I’m such a fan of that tone-on-tone look so I stamped it with Gumdrop Green ink on Gumdrop Green cardstock. One of the things I dig about MFT is how their products coordinate together easily. It makes crafting stress free.

I created the yellow rectangle by cutting one with one of the dies from the Pinking Edge Rectangle STAX Die-namics and then cutting into it a small rectangle. I thought it was fun and a little different from the same old, same old.

The fun is just getting started so say hello to card #2.

Print

Ta-da!

I wanted to just make a super flat, super mailable card so that’s what I did here. 😉

I folded the card from white cardstock. Then I inked up the Fine Check Background stamp with Lemon Drop ink and pressed the paper right onto it to transfer the pattern.

The sentiment was created by mixing and matching together dies and words from the Many Thanks Die-namics and the Thankful Thoughts stamp set.

Print

I think they look fun together.

This is card #3.

Print

I whipped out the Proof Positive Die-namics to create the background. I die-cut it from Blu Raspberry cardstock and then mounted it right onto white cardstock. Again, I used Mini Chicken Wire Background stamp a pattern. This time I did it on the rectangle cut with the Pinking Edge Rectangle STAX.

Those flowers? Can you believe I stamped them with a stamp from the Thankful Thoughts stamp set? I used Orange Fizz ink so they stood out a bit from the cardstock.

Print

And I used my (beloved) Sequins Die-namics to cut a sequin to place in the middle of each one.

And, finally, please give it up for card #4.

Print

I created the background here with the Proof Positive Cover-up Die-namics. If you look close you’ll see I put a strip of pink cardstock behind it as well as a strip of orange cardstock.

Print

Oh and that flower? I die-cut that guy with the Fresh Cut Flowers Die-namics.  Flowers always make for a nice accent!

Here’s a list of the MFT supplies I used on my projects today:

And be sure to hit the MFT Blog! You’ll find a list to all the MFT design team members who are sharing projects today as part of the Release Rewind.

Have a great day, y’all!

Technique Tuesday Blog Hop

Hi all!

Tickled today to be joining a few of my Technique Tuesday pals for a small blog hop today.

We’re each sharing something made with some of TT’s newest products. You can see the newest stuff on the New for 2014 page on the TT Web site.

So meet today’s card.

2_Hop_KeepSmiling1_teri

Just a simple little one.

The words are from TT’s Keep Smiling stamp set. The set has just two phrases so I decided to go hog wild and pair them both together. 😉 I think they kinda just work well together.

2_Hop_KeepSmiling2_teri

By the way, be sure to check out the blogs of everyone taking part in today’s hop:

Each of us are giving away a Technique Tuesday stamp set.
So… you might be wondering which one I am giving away?
Well, that would be the Keep Smiling set.


Technique-Tuesday-Keep-Smiling-Clear-Stamps-Medium

Just a leave a comment for me by midnight EST on 9/20. I’ll pick one of you to score the stamp set.

Happy hopping!

MFT: Product Launch

And we have lift-off!

Hooray, the new September release from My Favorite Things is now available!

Print

And I am super excited to share with a couple more cards primarily made with the Lunchbox Die-namics dies and Packed with Positivity stamp set so let’s get to it.

Give it up for card #1.

mft_914launch_smartypants1_teri

Totally playing on the old school look with one. I wanted a school’ish background so I stamped the card front with the Writing Tablet Background stamp.

And that blue piece of paper on the lunchbox? Didn’t come with that pattern on it. No, sir. I made it myself by stamping it with the new FineCheck Background stamp.

mft_914launch_smartypants2_teri

Card #2 is coming at your right now.

mft_914launch_youreastar1_teri

This one has somewhat similar feel than the last one but I wanted it to be a little more girl-like so I whipped my most favorite Razzleberry cardstock and went to town here.

I also added a few sequins cut with MFT’s Sequins Die-namics. They have quickly become one of those tools always near my craft table. They make for a quick little something to add to a card design. And it’s super nice that cut flat so you get nice, easy to mail sequins.

mft_914launch_youreastar2_teri

And this is card #3.

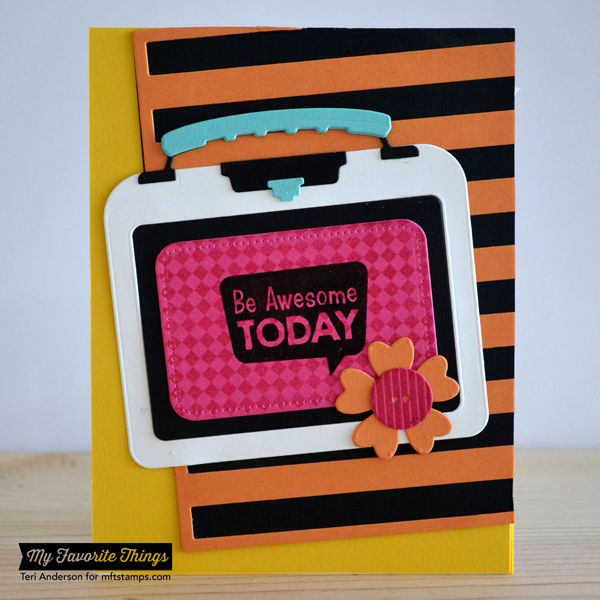
mft_914launch_beawesometoday1_teri

I brought out my  friend, the Stripes Cover-Up, make the background here. Just cut it once from Orange Fizz cardstock and then mounted some black cardstock behind it.

mft_914launch_beawesometoday2_teri

And last but certainly not least, meet card #4.

mft_914launch_doinggreat1_teri

I’d been hankering to play with the Scattered Diagonals Stencil so I used that to sponge a little ink on my card base here.

mft_914launch_doinggreat2_teri

So there you have it!

Here’s a complete list of all the MFT supplies I used on my projects today:

And, once again, be sure to hit the MFT Blog! You’ll find a list to all the MFT design team members who are sharing projects today.

Have a great day, y’all! Thanks for stopping by.

MFT Countdown: 1

Hi there!

Almost. There. A.L.M.O.S.T. to the big September release day for My Favorite Things.

I hope you can handle the fun because I’ve got one more round of projects to share with that I’ve made with some products from their September release.

NewReleaseCountdown_Day1

On your mark. Get set. GO!

Say hello to card #1.

mft_916_heyfoxy1_teri

What can I possibly say, but oh MY  GOSH, you guys! I howled (and howled) when I opened up the Miss Tiina Cute Critters stamp set that this little fox is from. It is such a cute set. (Not just is there a fox, but there’s some other cute critters!)

I wanted to make  boy fox and girl fox for my card so I die-cut the fox twice and stamped on it both times. To make one look like a girl, I added some die-cut glasses (cut with the Miss Tiina Cute Critters Die-namics from pink cardstock and then added a pink bow.

mft_916_heyfoxy2_teri

And meet card #2.

mft_916_thankslabel1_teri

This one is a little more graphic than the last.

The label is from the Blueprints 19 Die-namics and the “thanks” word is from the Many Thanks Die-namics. I die-cut the word twice and then used a marker to darken the second word so I could get the shadow effect you see.

mft_916_thankslabel2_teri

And this is card #3.

mft_916_thanksleaves1_teri

It’s sort of a continuation of my “leaf loving parade” from yesterday’s post.

Once again, I die-cut the leaves with my metal shim in the machine so the lines would really show. And I sponged on some extra ink to really give them some added dimension.

mft_916_thanksleaves2_teri

So, so fun!

And once again. Here’s a complete list of MFT supplies I used to make these cards:

Thanks again for stopping by today! And don’t forget to stop again by the MFT blog to see which other MFT Design Team members are sharing projects today.

MFT Countdown: 2

Hello again!

Just a couple more days until the September release is available from My Favorite Things.

And I’m happy to be back with a few more projects made with some of the new stuff.

NewReleaseCountdown_Day2

Shall we get started? Alright. We shall. 🙂

Please give it up for card #1.

mft_915_thankfulforever1_teri

Boy, talk about a fun one to make! Are those leaves cool or what?!

I cut those bad boys with the new Falling Leaves Die-namics (which land on the 16th at MFT). I used my metal shim with my Big Shot to cut them so that the lines really showed up. And to make them look a little more realistic, I sponged on some yellow and red inks.

mft_915_thankfulforever2_teri

I decided to kinda live on the edge (well, so to speak) and add a jute bow to them. Just a fun little touch.

And with that, meet card #2.

mft_915_gratefulforyouleaves_teri

I used some of the same supplies on this card as the last. But look real close at the background. I cut the new Proof Positive Cover-Up (also from the Sept. release) from white cardstock and then set it on my card. Love that it looks dry-embossed, even though it was not.

Finally, meet card #3.

mft_915_gratefulthanks1_teri


Again, for this one, I used some of the same supplies as the other two cards.

I did adventure a little here though and combine words from two different Die-namics sets —- Words of Gratitude Die-namics and Many Thanks Die-namics. I thought “grateful thanks” sounded nice together… and looked cute too!  😉

mft_915_gratefulthanks2_teri

So there you have it.

Here’s a complete list MFT supplies I used to make these cards:

Thanks again for stopping by today! And don’t forget to hit the MFT blog to see which other MFT Design Team members are sharing projects today.

MFT Countdown: 3

Ta-da!

Here we are again!

Another day closer to the September release from My Favorite Things.

NewReleaseCountdown_Day3

I’ve just one card to share with you all today.

So meet today’s card.

914_hello1_teri

This was pretty fun to make!

The little girl and the “You’re so sweet” phrase are from the super cute (and new) Pure Innocence Peanut Butter & Jelly stamp set. (And, yes, there’s a coordinating die to go with it! YAY!) I used my trusty color pencils to color in and then did some blending with Gamsol.

The yellow paper isn’t patterned paper. No sir! It’s a piece of cardstock I die-cut with the new Pinking Edge Rectangle STAX Die-namics and then stamped on top with the Fine Check Background stamp.

\914_hello2_teri

Here’s a complete list of the MFT supplies I used to make this card:

Be sure to hit the MFT blog to see who else is sharing projects today.

And I’ll be back once again tomorrow.  Have a great day, y’all!

MFT Countdown: 4

We meet again, y’all!

It’s another day of September Release countdown action with the My Favorite Things crew. If you are just turning in, the new release lands at MFT on the 16th. And for the next few days, I’ll be joining the crew with sharing some projects made with some of the new stuff.

NewReleaseCountdown_Day4

Gosh, guys. Somehow I feel like we are just getting started!

Deep breath. Let’s do this. Let’s get to business.

Meet card #1.

mft_913_thanksverymuch1_teri

mft_913_thanksverymuch2_teri

And meet card #2.

mft_913_thanksforeverything1_teri

mft_913_thanksforeverything2_teri

For both of these cards, I totally used a stencil! In fact, I used the new Diagonal Bars stencil (arrives at MFT on 9/16).

Here’s what I did.

I started with a panel of cardstock. You’ll notice that I put a little tape on the paper and the stencil to hold it down.

Now I wanted my stencil pattern to be at an angle so I set it down at a bit of an angle.

mft_913_step1_teri

And then I just sponged on ink. The rule I generally follow when it comes to applying multiple ink colors is to start out with the lightest color and then work my way up to the darkest. So, in this case, I went yellow to orange to blue.

mft_913_step2_teri

When I lifted the stencil, I got this cool looking pattern. Sorta. Kinda. Love it. (A lot.)

Here’s a complete list of MFT supplies I used on today’s cards:

Here’s a complete list of all the MFT supplies I used on these cards:

So that’s a wrap… for today.

Be sure to hit the MFT blog to see who else is sharing projects today.

And I’ll be back (again) tomorrow. I hope to see you then.