October Paper Smooches DT Blog Hop

Hello all!

It’s Pep Rally week yet again in the Paper Smooches world, and the Design Team is banding together to share a sampling of the NEW Paper Smooches November release with you!  FOUR new stamps and EIGHT new dies will be available to purchase tonight (October 30th at 9 pm Pacific time…or midnight Eastern time). Once our release goes live, you will find our new products HERE.  

To add extra fun to our blog hop…we are offering up a prize! 

The prize – a $25 gift code to choose what you like at the PS online store.

Here are the details:

  • FOUR winners will be chosen at RANDOM from any of the design team blogs and the PS Blog to win the $25. prize.
  • Just leave a comment on any of the design team blogs listed below or the PS blog for your chance to win!  (you do not need to comment on all blogs to qualify but it increases your changes)
  • Deadline: You have until midnight MT on Sunday, November 2nd to leave a comment.
  • Please check the Paper Smooches blog on Monday, November 3rd to see if you are one of the FOUR lucky winners.

To increase your chances of winning:

  • Tell us that you Facebooked about our blog hop
  • Tell us that you Tweeted about our hop
  • Tell us that you posted on your blog about our blog hop

(which means that you have up to three extra chances to win on each blog…. hot diggity dog!)

OK. So enough chatter about hop details, let me share with you what I made.

ps_cooldudesicondies_teri

I created the cute little couple with the new Cool Dudes stamp set. It is… so cool… and cute, you guys. Think snowmen. Think snowy sayings. Think snowy happiness. And get you get a little thing called the Cool Dudes stamp set.

I also (cough cough) used the Cool Dudes Icons dies (also new) to die-cut their little bodies out. (And… cough… there just might be another sneak peek involved in this card. The words. The words! Cough. Cough. Yeah, yeah, don’t kill me, Kim. I couldn’t help myself.)

ps_cooldudesiconsdies2_teri

To color the cute little snow couple in, I used my handy dandy Prismacolor pencils. The I used Gamsol to blend the colors. I used the same method to even give them the cheek color.

So that’s what I have for you this time.

Thanks for stopping by, y’all! I appreciate all your kind words.

Go-to-Gal Designer Challenge: Stampin’ Up!

Hi guys!

It’s time for another Go-to Gal challenge. This time, we’ve challenged each other to make something with some of the cool products from Stampin’ Up!

What’s the deal with these challenges? Well, every so often we challenge each  to make something (really, totally,  just for the fun of it) with a specific manufacturer’s products. Sometimes, we all play. Sometimes, we all don’t. That’s OK because it’s all about having fun.

So here’s a card I cooked up to share with you.

g2g_su_snowflakes1_teri

I created the background by scribbling watercolor crayons on a stamping block, spritzing the colors with water and then pulling the color down my panel of paper.

The words and snowflakes from a sweet stamp set called Endless Wishes, which has all these gorgeous Christmas and holiday sayings + some really pretty snowflakes.

So that’s what I have today.

I’m excited to see what the rest of the Go-to-Gal crew has cooked up.

Have a great day, all! Be back again soon.

Today’s card

Hi all!

Ever have one of those days when you just need to take a break so you stop and make something for the fun of having fun? Not for deadlines? Not for anything work-related? Not for anyone in particular? Just for the fun of it.

Yeah. Dude. That’s me today. So a break is what I took. And here’s what I made.

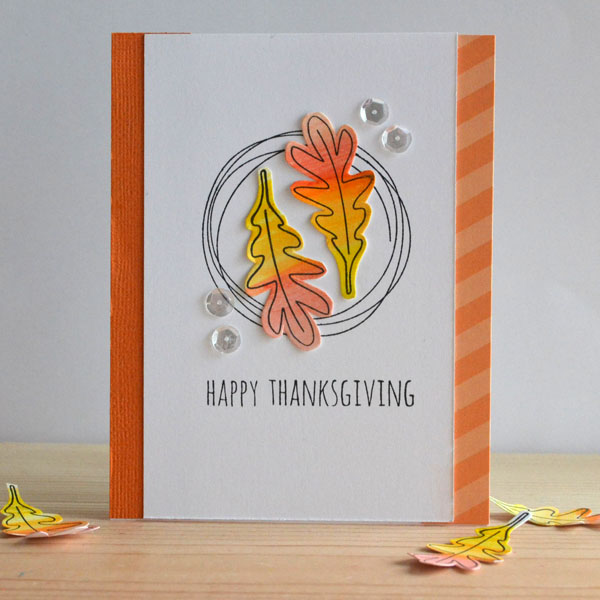
blog_happythanksgivingleaves_teri

Had a little fun here with a couple Essentials by Ellen stamp sets from Ellen Hutson.

I used watercolor pencils to scribble a little color on cardstock and then stamped the leaf from the Autumn Acorns by Julie Ebersole set a couple times on top. Then I just fussy cut those cute little leaves out.

The scribble-y circle? Yep. I LOVE it. It’s from the Bokeh Dots set (also designed by Julie).

blog_happythanksgivingleaves2_teri

Other supplies I used include some pretty sequins from Pretty Pink Posh, some cardstock and some patterned paper from Avery Elle.

Think I’m going to tuck this one away and save it to send to someone special.

By the way, I’m up on the Simple Stories blog today. Got a couple Halloween-themed Life Documented pages over there. Here’s a peek.

ss_oct_leftsuperclose_teri

Would be honored if you’d consider checking it out.

Be back again later, gators. Thanks for stopping by.

Today’s card or 2

Hey all!

Got a couple cards to share with you.

This is #1.

TT_MerryDayTrees_teri

And this is #2.

2_TT_JollyCard1_teri

Made both of these guys with the new Merry Day stamp set from Technique Tuesday.

Technique-Tuesday-Merry-Day-Clear-Stamps-Medium

And you know what? You just just might know who designed it. Yes. Yes. Yep.  (Cough. That’s my handwriting and my doodles on it.)

The set’s on sale now over at TT. Hope you’ll consider checking it out.

That’s all I have today for you.  Short and sweet post, right? 😉

I’ll be back again later. Thanks as always for stopping by

MFT: Release Rewind

Hello again!

I’ve got one more round of projects to share with you made with some of the products from the October release from My Favorite Things.

Print

So let’s get started.

Please give it up for card #1.

Print

I have been anxious to make something with the new Snowflake Fusion Cover-Up. I just love how the snowflakes blend together to create that lacy look. So pretty!

Print

I created the colorful background with watercolor paper and watercolor pencils. I simply (and rather randomly) scribbled a little color onto a piece of watercolor paper. It was really, really random. And then I spread the color with water.

The process looked a bit like this.

Print

Print

It doesn’t look super pretty when you get started, but it sure does look cool when all the color is blended.

I used the same technique to make my second card.

Print

Rather than blues, greens and purples, I stuck with shades of blues for this one. It’s a more subtle look, but I think it’s still really pretty.

Print

I created the sentiment with for this one by mixing together the peace word (die-cut with the Peace, Joy, Love Die-namics) and a couple stamped words from Merry Messages. I sure dig it when products mix together easily.

And here is another card for you.

Print

I once again whipped out those Peace, Joy, Love Die-namics and die-cut a few words to stack together for this guy. So hard to put those dies away, which (hee) explains why they are still on my desk as I write this post. But I digress.

I created the polka dot patterned paper simply by sponging on some ink with the help of the Jumbo Polka Dot Stencil.

Finally, I’ve got one more card. This card started with a couple coloring with markers errors on my part!

Print

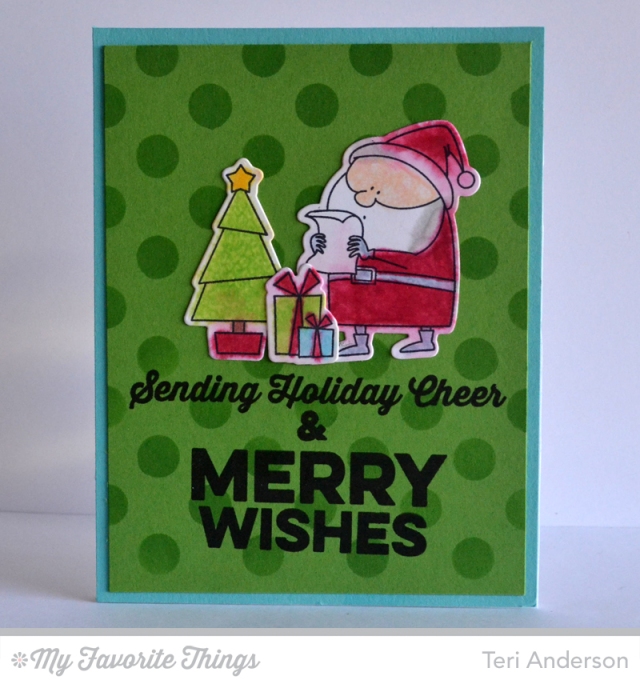
I had die-cut and stamped the Santa, tree and presents with the Jingle All the Way stamp set (and coordinating Die-namics). I had such grand plans. I  had colored them in and then got a little overzealous with my markers causing colors to go outside the lines and then … well… accidentally dropped some blending solution on them. So rather than throwing my hands in the air, I decided to run with it and use my blender pen to make them all look a little more messy, a little more artsy. And you know what? I have to say this: I like the look.  Not that I would do it a lot, but I think in moderation (with a pretty clean card), it looks pretty cool.

Here’s a list of all the MFT supplies I used to make these cards:

So that’s what I have for today. Thanks so much for stopping by!

And don’t forget to check out the MFT Blog once again to see who else from the design team is sharing projects today.

MFT: October Launch

And we have lift-off!

The new release from My Favorite Things is live!

And the crowd goes wilddddd! 😉 Woohoo!

Print

So I’ve got a few things to share with you today.

For all of these projects, I used the Many Thanks Die-namics. I really wanted to go to town with the new release and mix things up to make a bunch of holiday thank you cards. It’s one of those kind of cards I know I need but I never get around to making them until after Christmas.

So get ready for a bunch of cards because here is card #1.

Print

(Hooray!)

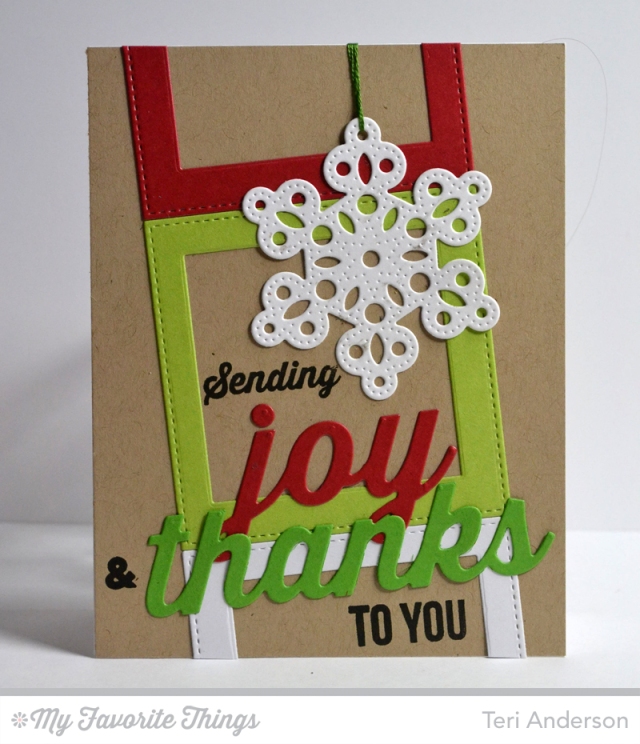
So I wanted to create a snapshot of sorts here so I cut three squares with the new Stitched Square STAX Die-namics and then cut a smaller square out of each of them.

The snowflake? It too is from My Favorite Things. It’s from the Pierced Snowflakes Die-namics. I’m a fan.

The sentiment was created by mixing together words die-cut with the Peace, Joy, Love and Many Thanks Die-namics and the Merry Messages stamp set.

Are you ready for another card?

Meet card #2.

Print

Woot! Woot! 🙂

I once again did a little mixing and matching. I created the sentiment by mixing together the Merry Die-namics with the Many Thanks Die-namics.

Take a good look at the Merry word. I just love the die I cut it with. See, all you need to do it cut a piece of cardstock and then take the die to it. It will cut the world out, leaving the entire piece of cardstock connected. It’s. So. Cool.

Coming right up is card #3.

Print

Yep. I totally did some sentiment mixing again. In addition to the dies I used on the last card, I also stamped a couple words with the Merry Messages stamp set.

Print


Fun, huh?

And, finally, here’s my final card for the day.

I really wanted to keep things clean and graphic with this one so that’s what I did here.

Print

The polka dot paper?

Well, I made it myself. (Go, me! Hee!) I used a little Gumdrop Green Ink + the Jumbo Polka Dot stencil to pull off the look.Print

Here’s a complete list of MFT supplies I used to make these cards.

And don’t forget to check out the MFT blog. Several other MFT design team members are sharing projects on their blogs today in honor of the new release.

Thanks, as always, for stopping by. You guys rock’th.

MFT Countdown: 1

It’s almost time.

It’s almost time for the October release from My Favorite Things.

NewReleaseCountdown_Day1

And are you ready for this? Yep. I’ve got a few more cards to share with you that I just happened to have made with some of the new products.

This is card #1.

Print

The tree is so fun! I cut it with the Christmas Tree Cut-Out Die-namics. I simply cut a rectangle with the Stitched Rectangles STAX Die-namics and the anchored the tree onto it and cut it out.

It was super cool but I felt the need to sauce it up a little more so I added some circles (cut with the Mason Jar Die-namics) and a star (cut with the Tag Builder Blueprints 1 Die-namics. I also poked a couple holes and added some floss to the tree. Just a little detail to add a little something something.

Print

I tend to always put words on the front of my cards but I broke the norm for this one and saved it for the inside.

Print

I went with a somewhat similar design scheme, although I did cut a tree (with the Tag Builder Blueprints 2 Die-namics) into the white rectangle here. Big tree on the outside + little tree on the inside = kinda fun in my book.

All the words were stamped with the new Merry Messages stamp set.

And this is card #2.

Print

I used that fancy Christmas Tree Cut-Out Die-namics dies again to cut a tree out of a rectangle. This time, I used Merry Messages stamp set with the Peace, Joy, Love Die-namics to build my phrase. I love how they mix so well together.

Print

You might be wondering about that star? I pulled out my old friend, the Tag Builder Blueprints 1 Die-namics to cut it. I always like a tree with a star so that’s what I did.

Finally, here is card #3.

Print

I had this card in my head for a couple days and decided to go for it.

I used the Jumbo Polka Dots stencil to stencil the polka dot pattern onto the green paper. And then I used some of the new Die-namics dies to cut the elements to decorate the card with: Stitched Square STAX Die-namics; Pierced Snowflake Die-namics and Peace, Joy, Love Die-namics.

To that snowflake a little extra kick, I added a gem right to the middle of it. Not that you’d see a red gem in the middle of a real snowflake, but… in this crafty girl’s world… it happens. 😉

So with that, this concludes today’s post.
Here is a complete list of MFT products I used to make these projects:

I’ll be back again tomorrow. Hope you will stop by.

And, once again, don’t forget to stop by the MFT blog to see who else from the DT is sharing projects today.

MFT Countdown: 2

Hey there!

We are so, so, so close to the October release from My Favorite Things. (<—- Oct. 14! Oct. 14th! Oct. 14th! Hurry! Hurry! Hurry!)

NewReleaseCountdown_Day2

I’ve got a couple more projects made with some of the new products so let’s get on with the show.

Say hello to card #1.

Print

Sometimes, you make a card and are like, “Did I make that? Wow!”

This was totally just a fun one to make.

How did I make that background paper? Well, I stenciled the pattern with the Herringbone Bricks Stencil with Gumdrop Green ink onto Gumdrop Green cardstock. If you are new to the ink sponging thing and aren’t quite ready to invest in one of those fancy schmanzy Distressing Tools, let me let you in on a secret. Cosmetic sponges are my secret ink sponging friend. 😉

I cut the snowflake with the Pierced Snowflakes Die-namics and the square with the Stitched Square STAX Die-namics.

The sentiment was created by mixing and matching words from the Many Thanks Die-namics and the Thankful Thoughts stamp set.

And this is card #2.

Print

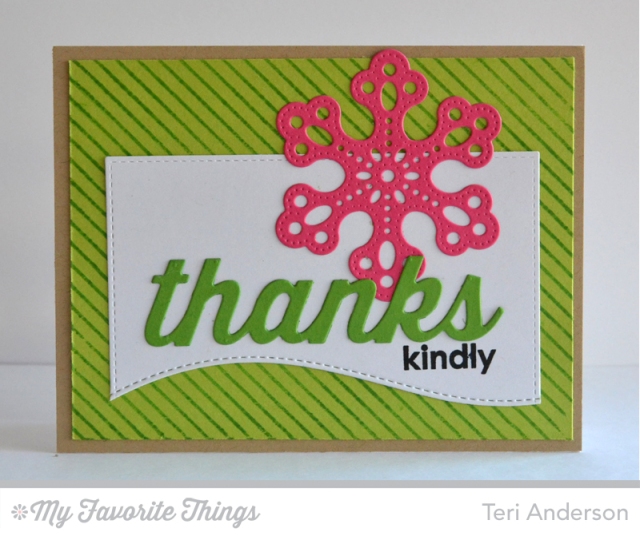
How did I made that white element? Well, this is a fun one. I die-cut a rectangle with the Stitched Rectangle STAX Die-namics. Then I took one of the Snow Drifts Die-namics dies and cut a line across the bottom. I thought it turned pretty cool!

One again I created a sentiment by mixing and matching the Many Thanks Die-namics with the Thankful Thoughts stamp set.  Love it when things work together.

Print

So that’s all I have today.

Here is a complete list of MFT products I used to make these projects:

So that’s what I have for you today. I’ll be back again tomorrow. Hope you will stop by.

And don’t forget to stop by the MFT blog to see who else from the DT is sharing projects today.

MFT Countdown: 3

Hello!
It’s time to share another project made with some of the new products from My Favorite Things’ October release.
Word to the wise: Save your pennies. Lots of good stuff!
NewReleaseCountdown_Day3
So here’s the card I made to share with you today.
Print
Isn’t she the cutest?! Just love her.
What’s she from? Well, friends, she is from the new Christmas Banner stamp set. (There will also be a coordinating die available! Hooray!)
Once again, I stepped out of my element and got some help from my old friends, my pile of markers. 😉 I played it simple, opting to only use a total of three colors to color her in.
That patterned paper? Well, I created the pink patterned paper with the help of MFT’s new Snowfall Background stamp. Even though it’s snow, I think it just makes a nice pattern in general to add to a card. I imagine I could have stamped it with a pink or brown ink and got an equally pleasing paper to use on my card.
Print
I also created a really simple inside for this card.
I used a very similar design, just changing out the cardstock colors.
Print
The sentiment is from the Christmas Banner stamp set. I purposely left the white rectangle fairly plain so I can write a message on it when it comes time to send this card out.
Here is a complete list of MFT products I used to make this card:

And that, my friends, is all for today.

Don’t forget to stop by the MFT blog to see who else from the DT is sharing projects today.

MFT Countdown: 4

Hello, hello, hello!

We meet again!

And guess what? We are a day closer to the October release (cough… Oct. 14th… cough) from My Favorite Things.

NewReleaseCountdown_Day4

So here we go. Cha-cha! (<—- Sorry, had to do it.)

Here’s card #1.

Print

I am such a fan of making little scenes so that’s what I did here. And I am a big fan of stamps and dies that work together so I did some high levels of mixing and matching here. Took a stamp from here. Added a stamp from over there. A little bit of this. And a little bit of that. And so on.

I cut and stamped the snowman with the most adorable Christmas Cuteness stamp set and coordinating Christmas Cuteness Die-namics dies. There’s a tree in that set (and it’s ADORABLE), but I decided to pair the snowman up with a tree from the Jingle All the Way stamp set. Remember the trees from this post? It’s like those. 😉

If you look at the sentiment, you’ll see I went kinda crazy there too.

Print

I stamped the words from the Many Merry Messages stamp (you’ll be hearing lots more about this set in couple days) with Sno Cone ink and then again but slightly off-set over them with black ink. The peace word was die-cut with the Peace, Joy, Love Die-namics (which … surprise… you’ll be also hearing about in a couple days).

Like I said, I love it when you can mix and match things together. MFT’s October release is FILLED products that allow you to do that. (This crafty girl says, “Thank you, MFT product designers. Thank you.”)

And meet card #2.

Print

I wanted to do something clean and a little unusual with MFT’s new Stitched Snow Drifts Die-namics. Sure, you can make snowy hills with them like I did with the first card. But I think they make really cool design elements too. So, yeah. I took three pieces of cardstock and then used one of the dies to cut the pattern at the bottom. Sorta kinda love how they look all stacked up together.

I finished the card off by die-cutting a snowflake with the new Pierced Snowflakes Die-namics and then chopping it in half and slapping a “thanks” word (cut with the Many Thanks Die-namics) in the middle of the two pieces.

Here is a complete list of MFT products I used to make these products:

So that’s what I have for you today. I’ll be back again tomorrow.

Oh yeah, and don’t forget to swing by the MFT blog to see who else from the DT is sharing projects today. I have a feeling you are in for seeing some really, really cool stuff! (And by the way, did you see Melissa Phillips is guesting this month for MFT? Long time fan right here!)