Technique Tuesday Countdown: Day 2

New-Release-Countdown-Day-2

Hi, gang!

I’m back to share a couple more stamped cards made with some of the new products Technique Tuesday will release on June 1st.

Meet card no. 1.

Youre-A-Real-Peach-Happy-Fruits-Card-Teri-A-Technique-Tuesday

This first one uses the new Funny Fruits stamps and dies. I also used the new Jam Jar Labels dies to create a label to stamp the sentiment (from the stamp set) onto.

Youre-A-Real-Peach-Happy-Fruits-Card-Close-Teri-A-Technique-Tuesday

I just had fun with this one, stamping the fruit and then giving some of them stamped faces. I colored them in with markers (although, I did use a white gel pen to color in the mouths of the ones with open mouths).

And meet card no. 2.

A stamped card by Teri | terisplace.wordpress.com

This is just a simple little card created with the Duck Swan Goose stamp set and coordinating dies. Yes, the bugs are part of the set too!

I just did some simple coloring with markers and created the little scene.

The label the words are stamped on? Yep. It once again was cut with the Jam Jar Labels dies. Such a good, practical label shape.

Alrighty. That’s all I have. Be sure to hit the Technique Tuesday blog for links to all the other design team members sharing projects today. And be sure to stop by Technique Tuesday’s New Products page on June 1st to snag all the new goods that “need” to come home with you. 😉

Grab Life by the Beans Card

29541159_10216244462694822_8004581139974979584_n

Hi, all!

Back again with a quick card to share! Couldn’t resist making a coffee-themed card in honor of the Spring & Summer Coffee Lovers Bloghop. I always enjoy seeing all the coffee-themed cards that are shared because of this hop.

coffee-bythebeanscard-teri

Pulled out a couple Paper Smooches stamp sets (Hot Conconctions and Cyber Cafe) to make this one.

It was pretty simple to make. I stamped the cups and spoon on cardstock and then simply colored them in with markers. Once I did that, I whipped out my scissors and fussy cut them so I could put them on my card. Yep. Nothing fancy here.

A stamped card by Teri | terisplace.wordpress.com

The patterned papers I put on my card to make the background are from Lawn Fawn and Doodlebug. I always love when you can mix and match different patterns together and have them look like they were meant to be.

Once I added the cups and spoon to the card, I stamped some “steam” and a heart. I also stamped the sentiment right onto the card.

I finished the card off with a few dots or drops of Nuvo Crystal Drops.  Always a good finishing touch.

Alright! That’s all I have for now. I’ll be back again later, gators. Thanks for bopping on by!

Technique Tuesday Countdown: Day 1

New-Release-Countdown-Day-1

Hi, friends!

It’s almost release time again at Technique Tuesday, and I’m excited to share with you today a card made with some of the new products that will debut on June 1st.

Hello-Friend-Resist-Strawberry-Card-Teri-A-Technique-Tuesday

This card features the new Strawberry stamp set, as well as the new Jam Jar Labels dies.

I went out of the box with this one. I was inspired to do some embossing by Amy, who has created some really eye catching cards where she had embossed images with white ink and then added color to them.

I heat embossed the Strawberry plant with white embossing powder onto watercolor paper. (Of course, the first thing I did was brush over the panel with an embossing buddy.) And then I used my Zig Quick Color Markers to add a little bit of color to the panel. Then I used a water pen to spread the color around.

A stamped card by Teri | terisplace.wordpress.com


The panel looked kinda ugly as it drying, but what a difference a few hours makes! It sure looks pretty now.

Once I plopped the panel on my card, I added some patterned paper strips along the side. And I added the stamped label, sequins and gold thread. Wondering where that gold thread is? Look under the label. It’s subtle but adds just the right hint of sparkle.

You’ll find the Strawberry Stamp Set, plus the label dies, on the New Products page on the Technique Tuesday website on the 1st. Be sure to stop by their blog today, too, to see the full reveal of some of the new products and to find links to the rest of the design team members sharing projects today.

Be back tomorrow.

Thinking of You Card Challenge: Day 3

Hi, guys!

Back again with another take on the Thinking of You Card Challenge with Ashley!

1-ibs-hellobears-teri

I have been on a bit of a scene kick lately so, of course, I once again have a card with a stamped scene. This one features stamp from Ink Blot Shop’s get tired of a Flopsy Forest Friends and Tiny Bubbles stamp sets. (They are both available at Simon Says Stamp! as well.)

I went old school by doing a lot of fussy cutting to put this scene together. I stamped the bears, hearts and trees on a piece of cardstock  and went to town by coloring them in with markers. I went more with a specific look when I did the coloring, rather than subscribing to any traditional marker blending philosophy.

Lean in close for a minute, friends. I feel the need to confess something to you. I detest a lot of stuffy rules in card making and scrapbooking and really prefer to do my own thing, seeing where creativity takes me. And sometimes that means saying, “You know what. I don’t care about your (insert: marker blending) rules. I like the look I’ve got going on and am going to run with it for MY card.”

A stamped card by Teri || terisplace.wordpress.com

To give the bears (and the hearts too) a little extra pop, I applied some Nuvo Crystal Drops to them. It’s amazing how just a little something can add such pop.

Alright! That’s it for today. Be sure to swing by Ashley’s blog for her latest take on the challenge. Be back again tomorrow.

Seen Elsewhere Today

Hi, guys!

I’m up on the blog for Scrapbook Adhesives by 3L today, sharing a set of friendship cards.

TeriAnderson-3DSmileFriendCardSet-5

These cards were extra fun to make as they use lots of 3D Foam Products. They have lot of depth and dimension.

Get the scoop on how I did it in the post over there. You’ll also find lots of more pictures.

Be back again later, gators.


Thinking of You Card Challenge: Day 2

Hi, guys!

Back again with another take on the Thinking of You Card Challenge with Ashley.

1-ibs-hellofox-teri

Today’s card features some images from the Flopsy Forest Friends stamp set from Ink Blot Shop. It’s a new one. (It’s available over on Simon Says Stamp! too.)

The words are from the Hello Lovely stamp set, also from Ink Blot Shop.

Hello Friend stamped card by Teri || Terisplace.wordpress.com

I once again used my awesome cheap markers I found on Amazon to do the coloring.  I also did a little creative masking to merge the mouse and stump together, so to speak.

The papers are all from my box of scraps. Always love mixing and matching patterned papers together and seeing what I come up with.

To add a little extra detail to the scene, I used Nuvo Crystal Drops in orange, pink and black. (The black is on the fox’s nose. It’s kinda hidden, but trust me, it’s there.)

That’s what I got. Once again, don’t forget to check out Ashley’s blog to see her latest take on the challenge. She’s got the cutest card today… in my “professional” card loving opinion and all. (Wink!)

Thinking of You Card Challenge: Day 1

Hi, guys!

Back again with another challenge card. This time Ashley and I are challenging each other to make Thinking of You cards.

The idea behind this challenge? We wanted to do something in the spirit of Happy Mail and make cards to send to our friends and loved ones. (By the way, my friends, Jennifer McGuire and Kimberly Crawford, both do a FANTASTIC job of encouraging card makers all the time to send out their stamped cards! You should check them out. Jennifer’s motto is “Share Handmade Kindness” and encourages others all the time, while Kimberly encourages folks to “Mail It Monday” and get those cards out. Not to mention, both are always sharing their creativity!)

Anyway, back to the card.

1-ibs-billymissyou-teri

I created this sweet little scene with some stamps from Ink Blot Shop’s Billy Silly Goats stamp set. Such a fun set with so many adorable goats. (It’s available through Ink Blot Shop, as well as Simon Says Stamp!)

I created the background by sponging some green and yellow ink on cardstock. Then I stamped the little scene. I also sponged a little black ink below the goats to ground them, so to speak. (Oh yeah, and I added some color to the fence, hearts and flowers with markers.)

I stamped the goats a second time on another piece of paper, colored them in with markers and fussy cut them out with my scissors. I used 3D Foam Squares to adhere them to my card so they’d pop up… and really stand out.

I Billy Miss You Goats stamped card by Teri || terisplace.wordpress.com

I completed the card by adding some extra details with liquid dots, a strip of patterned paper and a stamped sentiment. I think it turned out pretty good, if I do say so myself.

Alright! Be sure to swing by Ashley’s first take on the challenge. It’s amazing.

See you again soon. Thank you, as always, for stopping by!

Today’s card (5-21)

Hi, gang!

Here again with a card to share with you. Because… that’s what I do.

Take it away, Today’s Card.

1-ibs-chewbabe-teri

And the crowd goes wild! Wink!

Created this guy with the Billy Silly Goats stamp set that was just released by Ink Blot Shop. (It’s also available right here over at Simon Says Stamp!) My friend, Tifany, (the sweet soul behind Ink Blot Shop) let me play with the stamps a little early and this little card is the result.

There’s all kinds of silly goat-y goodness in the stamp set. All kinds of cute little boy and girl goats.

This little one cracked me up so, you know, had to make a card.

A handmade stamped card by Teri || terisplace.wordpress.com

I stamped the little guy on cardstock. I used some (I swear to you, people, I could not make this up if I tried) cheap-o markers (and freaking awesome markers) I picked up on Amazon for a whopping $20 to do the coloring and then did a little fussy cutting. I sponged a little blue ink onto a card and stamped the little fella again. I adhered the fussy cut goat on top (with 3D Foam Squares from Scrapbook Adhesives by 3L, which are my go-to dimensional adhesive).

And then I stamped a couple more cans, some hearts and those words. I did a little more coloring and added some white dots around the image. I also added some patterned paper and some staples (for good measure). 😉

Anyway, in the end, it turned out pretty good, if I do I say so myself.

Alright! That’s what I go. Be back again soon, friends.

Technique Tuesday meets My Sweet Petunia

techniquetuesday

Hi, friends!

Super excited to be joining in today on the Technique Tuesday and My Sweet Petunia blog hop.

It’s the perfect combination. Technique Tuesday’s stamps and dies + My Sweet Petunia’s awesome MISTI tools (and other accessories).

My blog is the first stop on the hop. Here’s the whole line-up:

Teri Anderson (<–You are here)

Ilina Crouse (<—- NEXT STOP on the hop! Take it away, Ilina!)

Latisha Yoast

Jeanne Streiff

Daniela Dobson

Kia Gibson-Clapper

Kymona Tracey

Ceal Pritchett

Heather Hoffman

Giovana Smith

Emily Leiphart

Stephanie Severin

Jill Hawkins

Susan Wymer

Amy Kolling

Chris Dayton

Dana Joy

Lydia Fiedler

My Sweet Petunia

I’m excited to share with you a card I created for the hop. I wanted to make a birthday card because… birthday cards are something I’m always needing.

A handmade birthday card for Technique Tuesday || Terisplace.wordpress.com

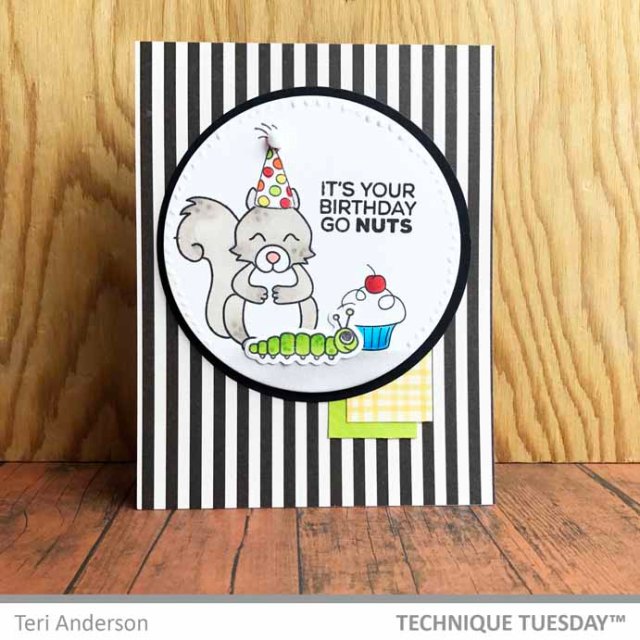
The Mini Misti tool was perfect for making this card because I wanted to give Sammy the Squirrel a birthday hat. I stamped the hat (from the Sassy Birthday 2.0 set) once on a sticky note, fussy cut it out with scissors. I stamped the hat a second time on a piece of cardstock.

A little tip for all you, Misti lovers, out there. I use a Mini Misti most of the time. (In fact, I actually take this positioner with me when I hit the road and travel to craft with friends. It’s the perfect size!) I cut several pieces of cardstock to fit in the Mini Misti ahead to fit inside it. That way I can grab and go on a stamping binge without any cares or worries. 😉

Anyway, back to the card. This is where the Mini Misti came in as super helpful. I covered up the cardstock stamped hat with the mask. And then I stamped Sammy over it.

IMG_3899

I removed the mask and ended up with Sammy in a birthday hat!

Cute, right?

Then I went to town putting together the rest of the card. I completed the scene with the cupcake (also from Sassy Birthday 2.0) and the worm (also from the Sammy the Squirrel set).

Squirrel-Birthday-Nuts-Card-Close-Teri-A-Technique-Tuesday

I colored the images in with markers. Cut them out with a circle die. Added some dots with Nuvo Crystal Drops. Add a pompom to the hat (inspired by Jenn Brown, one of TT’s ambassadors, who does that quite often).

Then I completed the card with some patterned paper and a stamped sentiment. And yep. That’s it.

Alright! That’s all I have for you! Happy hopping! (Don’t forget, Ilina is your next stop! Take it away, Ilina! I promise that you are going to LOVE what she is sharing. She has such talent)

Oh, and be sure to comment as you hop. There are some prizes up for grabs: a $50 shopping spree at www.mysweetpetunia.com and a $50 shopping spree at TechniqueTuesday.com. Leave your comments on all the hop stops no later than Monday, May 28th, at 11:59 PM Central time and winners will be announced on Tuesday May 29th, on the Technique Tuesday and My Sweet Petunia blogs.

A Cool Card for Summer

PHP_sparkle-Hop-banner

Hi, gang!

I’m super excited to be joining the folks from Scrapbook Adhesives by 3L and Paper House Productions for a blog co-hop that’s been happening all week!

I am sharing a card perfect for Summer on the blog for Scrapbook Adhesives by 3L!

TeriAnderson-PalmTreesPoppedUpCard-2

Check it for a better look and for some tips for using Crafty Foam Tape with patterned paper, as well as some additional tips for using other products from Scrapbook Adhesives by 3L with the Sundrenched collection from Paper House Productions. (Hint FAUX brads… they are so cool… and easy to make!)

To see the project with my post, go here. To see all the posts on the Scrapbook Adhesives by 3L blog, go here to start with Day 1’s post! (And, trust me, when I saw you are going to want to check each day’s posts out! Awesome projects + some great giveaways!)

Be back again soon!