Hi, everyone! Back again to share another card with you. This is one I never got around to sharing, but I made it a few months ago for a neighbor who celebrated her 80th birthday.
She’s not a big fan of bright and bold or super cute stuff so I tried to make something a little more inspired by her decor style in terms of colors and style.
The fancy papers (the vellum, the shiny stuff, the papers the circle was cut from) are all from a Your Paper Insider paper kit. Their kits are a mystery kit of sorts where you get a surprise assortment of papers each time. The kit I got had these in it.
The leafy stem was cut with a Simon Hurley Spellbinders die, while the embossing in the background was done with a Sunny Studio embossing folder. While I was recovering, I made a ton of backgrounds and embossed a ton of paper panels to work with on future projects. This is one of them. I couldn’t really sit for a long time at my desk but I could keep my hands busy making backgrounds and paper panels to use on future projects. It was a good way to keep the brain and hands active.
The sentiment is from a Simon Says Stamp set.
Anyway, that’s about it. Nothing really fancy about this card. But I know my neighbor really liked it and was happy to be thought of on her birthday. That was the best. And I sure hope when I’m 80 that I’ll be as kind and active as her.
Hi, everyone! Back again with another card to share with you. Made a few more color blocked backgrounds when I made this recent card. So, of course, I used one to make today’s card. Wink!
Created that background with a lot of masking and lot of inking. It sounds all super hard but it only took a couple minutes, and I made several backgrounds like it since I had the supplies out on my desk. The beauty of backgrounds like it are no single one is alike.
The die was cut with a Simon Hurley die from Spellbinders. I cut it a few times and stacked the die-cuts up to make the leaf. I added a hearty layer of Stickles on top, just to give it a bit of razzle dazzle.
The sentiments were stamped with stamps from Pretty Pink Posh and Simon Says Stamp. Finished the card off with a few sequins to add a little bit more razzle dazzle.
That’s it for me. Short and sweet today. I’ll be back later, gators.
Hi, all! Super happy to be joining some of my favorite crafters in celebrating the latest release from Hero Arts. The Winter release is amazing, and I’m just tickled to be sharing a few cards made with the new goods.
First, if you are hopping along, you should have arrived here from Nina-Marie’s blog. (Thenext stopafter mine is the blog of the lovely Wanda Guess!) If you just happened to have stopped by, welcome! Please join the hop! Lots of inspiration to be found, plus the chance to win one of three Hero Arts gift cards by leaving comments during the hop. Enter by leaving a comment between now and Sunday, September 6th at 11:59pm Pacific on this post or any of the other hop posts, and the winner will be announced on the Hero Arts blog the following week.
So let’s get to it. I have four (!!!) projects to share with you, plus quite a lot to say! (Wink, wink!)
Each of my projects use the new Love Ornament Fancy Die. Hero Arts included several cool ornament dies in the new release. I picked one for today’s post and challenged myself to show several ways to use it. (Pressure. Is. On.Let’s do this.)
The Traditional Ornament Cards
Meet card no. 1.
For this card, I created a simple shaker with the die. I paired it with a circle die to cut a window from a transparency, as well as the white background of the shaker.
I was kinda fancy with the shaker’s beads, only putting green seed beads above the word and red ones below it.
And meet card no. 2.
I once again created a shaker card. This time, though, you can see the inside of the card. Say what? How...
Here’s what I did. I created the background with the Circle Pattern stamp and then I temporarily adhered it to my card. I opened the card up, set a circle die on it and then ran it through my die-cutting machine, which created a circle window. I removed the stamped panel. I placed vellum on the card and permanently adhered the circle panel to the card. Easy peasy, although looking back at what I just wrote, it sounds way more (way, way, way more) complicated than it was.
Then I built the ornament shaker, using the vellum window opening as the shaker base. Again, it’s really cool to see the inside of the card with this one.
Even though these cards were made different, they have a similar feel about them. They look pretty cool next to each other too.
A Stamped Card Made With the Die
Ok, so let’s just jump to card no. 3.
I really wanted to stamp something under the “love” word so that’s what I did here. I stamped the images with the new Cozy Town set (plus a few hearts and a “sending” word from the previously released Acts of Kindness set) on a circle of cardstock.
Now, let’s just slow down for a minute and be real, real as can be. I could have just used the circle as it was and stacked several love words on top. No, friends. Why do it the easy way, Teri? Get ready for this. I got all complicated and die-cut the image with the love word and then did some tedious inlaid die-cutting/assembly work. Learn from me. Maybe do it the easy way.
I felt like this card could easily be used as a holiday card or a “just thinking of you” kind of card so I purposely did not use the ornament hanger with the “love” ornament. I wanted to have the option to send this card whenever I felt like it…. late November, December or February or March… or whenever!
A Thinking of You Card
Moving on. We’ve made it to card no. 4. Hope you are still with me.
I wanted to simply make a card with the Love Ornament die that had no holiday or winter feel to it at all. None! So I made this quick “thinking of you” card.
I simply cut the ornament from cardstock and then used my markers to add color.
This design was really easy to pull off and would be easy to recreate. I could see changing up the coloring scheme and adding some hearts to the design to mass produce some Valentine’s Day cards.
Alright! So that is it for this stop on the blog hop! I hope you have enjoyed the cards. Don’t forget that the next stop on the hop is the blog ofWanda Guess. Plus you’ll find all the blog hoppers on the Hero Arts blog.
It’s blog hop time! I’m super happy to join my Paper Smooches teammates in sharing some projects made with the NEW Paper SmoochesMARCH2020 release with you!
The new release is available for purchase now! There are THREE new 3 x 4 stamp sets and ONE new stencil.
To add extra fun to our blog hop…there is a chance to win a prize! What’s the prize you ask? Well, friends, it’s a $50 gift code to use in the PS online store. (Just think of the goodness you could add to your crafty stash with that! Oh yeah!)
Here are the details:
TWO winners will be chosen at RANDOM from any of the blogs below
Leave a comment on any of the blogs listed (you do not need to comment on all blogs to qualify but it will increase your chances of winning)
Deadline: You have until midnight Central time on March 8th to leave a comment.
Please check the Paper Smooches blog on March 9th to see if you are one of the TWO lucky winners.
Tell us that you posted on your blog about our blog hop
Alright! So let’s get on with the project!
Created this card with the new Rainbow Sherbet dies. I cut a line in the typewriter and then cut a piece of cardstock to fit in it so it would like the sentiment really was typed.
The words are from a couple different stamp sets: Noteworthy and Delightful Greetings. They were part of larger sentiments so I did a little masking by covering up the unneeded words with washi tape while I inked the stamps.
The papers on the card are also from Paper Smooches. They are from the previously released Rainbow Sherbet paper pack. I really like the color combo.
Alright. That’s it for me. I’ll be back later, friends. Thanks for hopping today and stopping by my blog-a-roo!
PS…. Do you love making stuff with Paper Smooches’ products? Well, don’t forget to check out the fun challenge PS offers each month? Keep an eye on the PS blog for details.
Just wanted to give you a little peek at a couple cards I shared this week over on the blog for Scrapbook Adhesives by 3L.
You’ll the scoop on how I made them… and some tips for using their 3D Foam Frames in my post over there. Such a fun foam shape to use to make stuff.
By the way, I was super excited about these card with the color scheme. I don’t often use purple on my cards (or really on anything for that matter). It sure was fun to step out of my creative box.
Anyway, hope you’ll check out the post! See you again soon!
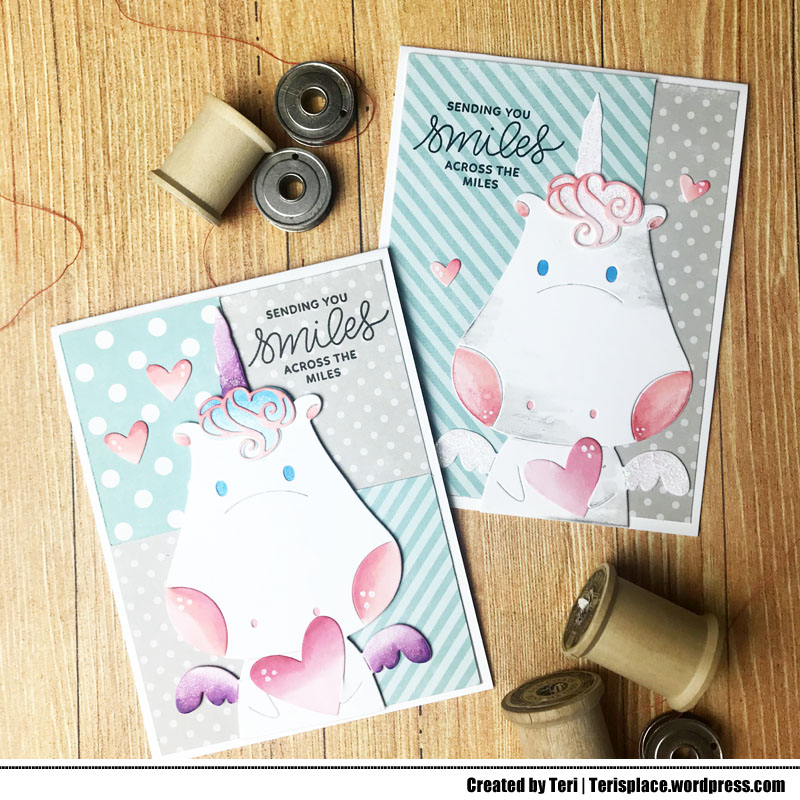
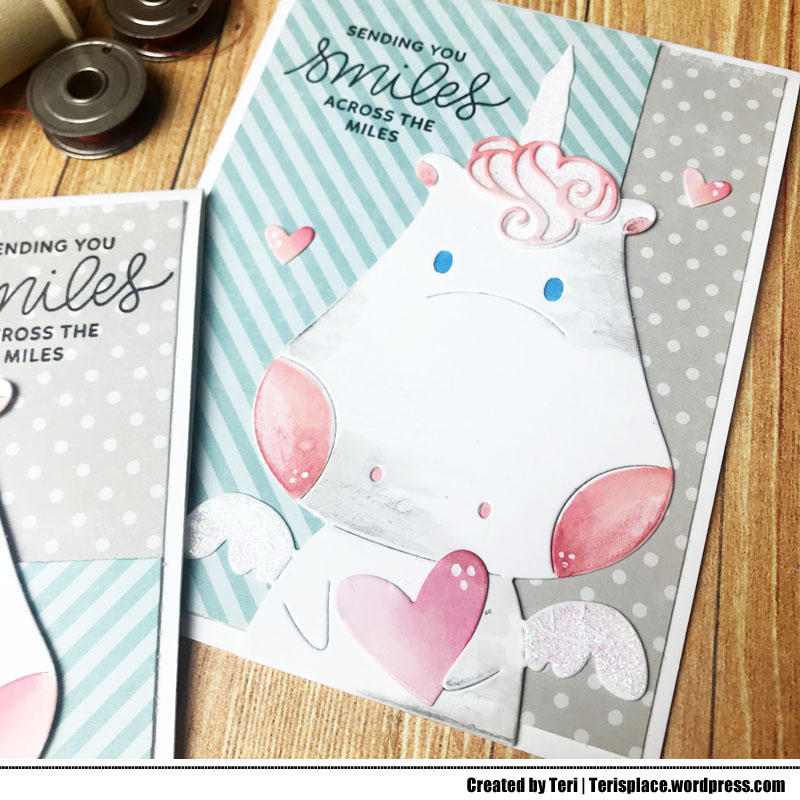
Got a couple cards to share with you today! Made these two critter cards last week and just getting around to sharing them.
Is the unicorn not the cutest ever? My friend, Nina, sent the unicorn die over to play with for the fun of it. It’s from Waffle Flower Crafts, and I truly imagine making a ton of cards with it. It. Just. Plain. Makes. Me. Happy.
I used it somewhat the same and somewhat different. I added a heart (diecut with dies from Lawn Fawn) to each unicorn, plus added color with markers. (I also added hearts in the background.) For one of the unicorns, I added sparkle with glitter glue (that’s the white one). For the other unicorn, I added some sparkle with a Wink of Stella pen. It’s subtle but so, so pretty.
The sentiment on both cards is from the Encouraging Greetings set from Pretty Pink Posh. It’s quickly become one of my favorites to use for creating cards for friends. It’s pretty much on my desk all the time… wink!
Alrighty! That is all I have for you. Be back later, gators.
Hello again, friends! It’s the best day of the month. It’s Paper Smooches Blog Hop time. And the gang is banding together to share a sampling of projects made with thethe NEWPaper SmoochesAUGUST 2019 release with you!
2 NEW STAMPS
4 NEW DIES
2 NEWSTENCILS
Eight new products will be available to purchase here at 10 am Central time on August 7th. Yeppers! That is tomorrow! Woo-to-the-hoo!
To add extra fun to our blog hop…there is a prize! The prize – a $30. gift code to use at the PS online store.
Here are the details:
Leave a comment on any of the blogs listed below (you do not need to comment on all blogs to qualify but it will increase your chances of winning)
FOUR winners will be chosen at RANDOM from any of the blog below
Deadline: You have until midnight Central time on August 8th to leave a comment.
Please check the Paper Smooches blog on August 9th to see if you are one of the FOUR lucky winners.
Tell us that you posted on your blog about our blog hop
(which means that you have up to four extra chances to win on each blog…. can I get a woohoo?)
Alright! So let’s get on with the project.
I had a blast creating the cactus plant for this card with the new Cacti dies. These dies allow you make all kinds of cactus.
I’m not from a cactus-friendly place so be kind to any creative liberties take with this cactus. (Wink!) In card land, everything is possible, right?
I created the custom sentiment for the card by pairing together words from two stamp sets – Kindness Sampler and Delightful Greetings. The little heart? It, too, is from Delightful Greetings. It just… appropriate… for this card.
The background for this card was creating by mixing together a bunch of paper scraps from my never-ending bin of scraps. (Can you relate?)
Alright! That’s it for this card.
But got a question for you. Do you have a pile of Paper Smooches stamps and dies? Don’t forget there’s a chance for you share what you are making with them. Paper Smooches offers a fun challenge every month. Watch the blog for details. Kim LOVES and I MEAN LOVES seeing what you are creating!
Thanks so very much for checking out the hop today! I appreciate all your kinds words! See you again soon.
This card was quick to put together… and a lot of fun too!
To make the “rainbow”, I cut two sunray backgrounds from white cardstock with the Lawn Fawn die. I set one on my craft table and set the other (temporarily) on my card. Then I used that one as a guide to add the rainbow rays to the card with my colored pencils.
Once I had the rainbow completed, I adhere the second sun panel to the card. (I kept that first panel so I could make more cards like this one later.)
Then I stamped a sentiment from the Encouraging Greetings stamp set from Pretty Pink Posh on a strip of cardstock. I added a little bit of thread underneath it and then added it to my card.
This card is fine as it is, but you could always kick it up a notch if you wanted to. Just add sequins or crystal drops to the “rainbow” rays. Gems would be cool too.
Looking for even more card inspiration? Be sure to check this post out on the Scrapbook Adhesives by 3L blog! I’ve put together 3 window cards for the post. You’ll get the scoop, plus lots of tips to use adhesives in out-of-the-box ways.
I hope you will check it out. Thanks, as always, for stopping by!
Back again with another card to share with you. Today’s card features an encouragement card that came together quickly with the help of a stencil and a few basic supplies.
I created the background for this card with the Leaves stencil from Pretty Pink Posh. I have been on a bit of a stencil kick lately, and, when I saw that stencil, I knew I had to make a card with it. Such a fun one.
I stenciled the pattern right onto the card directly with Distress Oxide Ink pads and a makeup brush from Daiso. I love how bold the Distress Oxide Inks are and how well they blend together.
To keep the card from being really boring with just an inked background, I added a few dots with white Nuvo Drops. It’s such a simple and easy way to add some visual interest.
The sentiment is from Pretty Pink Posh as well. It came from the Encouraging Greetings stamp set. So many lovely phrases in it that are perfect for sending something to encourage a friend or loved one… or pick up their spirits.
Alright. That is all I have for you today. I’ll be back again real soon with another card to share with you.
By the way, looking for more cards from me? Don’t miss the interactive monster card I shared over the blog for Scrapbook Adhesives by 3L this week. It features a lot of fun details and elements that are easy to recreate on cards you make.
Happy World Card Making Day! I’m delighted to be joining the Technique Tuesday Design Team with some very special guests in blog hopping today.
If you’ve been hopping along, you should have arrived here from the blog of Ana Anderson. If you are just getting started hopping, welcome to the hop! The next stop on the hop is the blog of Latisha Yoast.
We’re celebrating the big day by sharing some cards created with the brand new You’re Owlsome stamp set that TT just released for WCMD. You can get the stamp set for free through Sunday with a $30 or more purchase on the Technique Tuesday website. Just pick $30 or more products on their website, then add the stamp set to your cart and enter coupon code WCMD18 at check-out which will make the stamp set free.
I’ve got one card to share with you today. It’s a little on the artsy side.
I created the multi-colored owl (and pink hearts) by creating a background paper with Distress Oxide Inks and water and then simply stamping and die-cutting them with the matching dies. I think it’s a cool look and a fun way to add color without actually using markers and pencils like we often tell ourselves we have to do.
The background on my card was created with Washi tape and good ol’ black cardstock. For fun, I took a paint brush and flicked on splotches of diluted white paint.
Turned out pretty good, I think.
Alright! Be sure comment as you hop today as Technique Tuesday will be picking one person to give a gift certificate to. The lucky person will be selected at random from one of the hop stops. The winner will be announced on the Technique Tuesday blog.
And here’s the compete list of hoppers. Don’t forget that Latisha is the next stop. She’d love for you to visit.