So….

So. Yeah. I have some news. 🙂

I’ve been invited to join the design team over at My Favorite Things.

Starting with their July release, I’ll be sharing projects as one of their design team members.

OH MY GOSH, you guys! OH MY GOSH!!!! 🙂

I can’t begin tell you how excited I am. I had such a fun time guesting with them in June, and just keep wanting pinching myself.

Thanks so much, MFT, for inviting me to be part of the team. I look forward to making lots of fun stuff!

By the way, here’s a peek of a card I made that’s up on the MFT blog today.

June30_celebratebig2_teri

Created with these My Favorite Things products:

* Accent It – Celebrate Die-namics

* Little Letters Die-namics

* Blueprints 16 Die-namics (for the star)

* Pierced Fishtail Flags STAX Die-namics

* Stripes Cover-Up Die-namics

Be back later, gators. 🙂

Here’s to a fun new adventure!

June Paper Smooches DT Blog Hop

Hi all!

It’s Pep Rally week in the Paper Smooches world, and the crew’s banding together today to share a sampling of the NEW Paper Smooches July/August release with you!  FIVE new stamps and EIGHT new dies are releasing soon.  Our new stamps and dies will release at midnight (eastern time) on June 30.  (12:01am on July 1st EST) You will find our new releases HERE.

To add extra fun to our blog hop…we are offering up a prize! 

The prize – a $25 gift code to choose what you like at the PS online store.

Here is the scoop on the price

  • FOUR winners will be chosen at RANDOM from any of the design team blogs and the PS Blog to win the $25 prize.
  • Just leave a comment on any of the design team blogs listed below or the PS blog for your chance to win!  (you do not need to comment on all blogs to qualify but it increases your changes)
  • Deadline: You have until midnight MT on Sunday, June 29th to leave a comment.
  • Please check the Paper Smooches blog on Monday, June 30th to see if you are one of the FOUR lucky winners.

And here’s our and all the blog hop stops:

To increase your chances of winning:

  • Tell us that you Facebooked about our blog hop
  • Tell us that you Tweeted about our hop
  • Tell us that you posted on your blog about our blog hop

(which means that you have up to three —- big honking —- extra chances to win on each blog)

Enough hop talk. Here’s what I made.

PS_Pawprint1_teri

I used two new stamp sets together to make this guy: Feline Friends and Charmed Cats. I also pulled out the previously released Hexalongs dies.

To make the middle cat stand out a bit, I tied a bow with blue floss and just added it to it. Just a little something thing.

PS_Pawprint2_teri


That’s all I have. I’ll be back again later… gators.

Thanks for stopping by!


Today’s Card

Hi all!

Just a card to share today.

2_gh_614_hellothere1_teri

Made this one with Technique Tuesday’s new Hello – Greenhouse Society stamp set, which debuts officially today.

Technoque-Tuesday-Greenhouse-Society-Hello-Clear-Stamps-Medium

I love all the phrases in the set, especially. So many different combinations to put together.

I ended with a kinda cool, kinda bleached look on the card.

2_gh_614_hellothere3_teri

I stamped the flowers on a light blue patterned paper. Then I outlined much of the flower with a light blue marker. I also added a little color in the middle of that big sunflower. It’s subtle but cool!

That’s all I have! Be back later, gators!


MFT Rewind

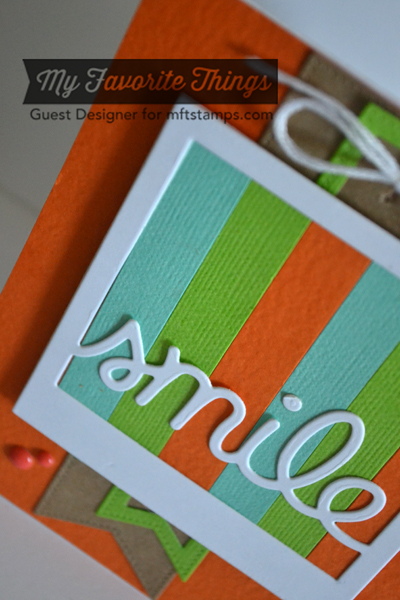
Boy, oh boy! What a fun experience the last week has been! I’ve loved joining the crew over at My Favorite Things for their June  release countdown festivities.  (Thanks again, guys, for inviting me to play! Totally honored! And totally had a blast-a-roo!) In honor of this month’s Rewind, I’ve got one more project to share with you. mft_9_smilemore1_teri I created the background by simply die-cutting the striped design with the Stripes Cover-Up Die-namics die from white cardstock and placing it on a green cardstock background. To make the file tab, I simply took a piece of cardstock and cut it with one of the  File Folder Edges Die-namics. mft_9_smilemore2_teri The words are from the Smile stamp set, while the star is from the Blueprints 16 Die-namics dies. The circle and clip are from the Office Supplies Die-namics dies. That’s all I have for you! Once again, be sure to check out the MFT Blog for links to all of their designers, who have shared projects made with this month’s release. You’ll find the release here. See you again soon!

June Studio AE Blog Hop from Technique Tuesday

(Note: Looking for my MFT Countdown post? It’s the one right below this one. You can get there by scrolling down or clicking here.)

It’s Studio AE Blog Hop time.  (Woo-hoo!)

And I’ve got a couple cards to share with you today that I made with the new Pure Magic by Ali Edwards stamp set.

Technique-Tuesday-Studio-AE-Pure-Magic-Clear-Stamps-Medium

Here’s card #1.

sae_july14_dreambig_teri

Besides Ali’s stamp set, I also used a couple Technique Tuesday dies — Photo Frame and Nested Stars. (The Nested Stars dies just started shipping on Monday.)

sae_july14_dreambig2_teri

And here’s card #2.

sae_july14_helloyou_teri

I cut all the stars with the Nested Stars dies. The sentiment is from Ali’s set.

sae_july14_helloyou2_teri

And here is everyone else who is blog hopping today.

Be sure to leave some love as you go. Someone who comments during the hop will score a $25 e-Gift Card to TechniqueTuesday.com. The winner will be announced on the Technique Tuesday blog on the 15th.

MFT Countdown: Day 7

And like that, we meet again!

I’ve got a couple more projects made with some fun, new stuff from My Favorite Things to share with you.

And 5… 4… 3… 2… go! 🙂

mft_7_hardwork1_teri

Oh. The. Pressure. (Hee!)

I created this one with a couple of MFT’s new products for June: At The Office stamp set and Office Supplies (paper clip and paper), File Folder Edges and Blueprints 16 (star) Die-namics dies.

I really dug all the different phrases in the stamp set so I thought it would be fun to just mix a bunch of them together. I dunno. It’s kinda busy but it kinda resembles my mind when I work. It is going a mile (ok… two miles… wait… five miles) a minute.

mft_7_hardwork2_teri

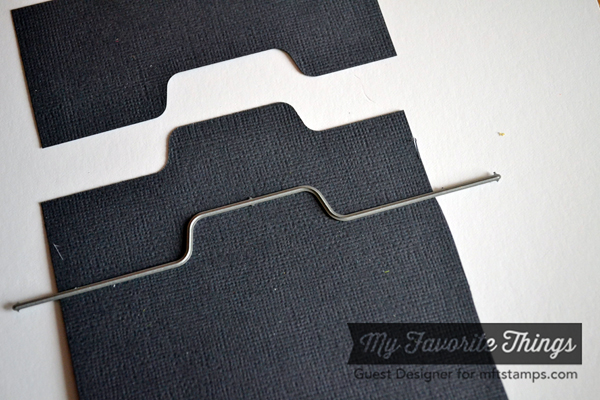
I made the file folder tab by taking a piece of cardstock and cutting it with one of the File Folder Edges Die-namics dies. The process looked a bit like this.

mft_7_step1

And here’s how things look all cut up!

mft_7_step2

I also made this card with some of same supplies: At The Office stamp set and Office Supplies (paper, circle and clip) and Blueprints 16 (star & flag) Die-namics dies.

mft_7_importantnews1_teri

The little circle in the middle of the star is from the Office Supplies Die-namics dies. I actually just wanted something to sauce up the star so I adhered it to the star and then added a gem on top. Easy peasy.

mft_7_importantnews2_teri

And you might be wondering about that notebook paper pattern. Well, I stamped it with the new Notebook Paper Background stamp. Fun stuff.

So that’s all I have for you today.

Don’t  forget to hit the My Favorite Things blog. You’ll find links to all the MFT designers who are sharing projects today.  They are a pretty fab group! (And don’t forget: The products from MFT’s new release land on June 10th.)

MFT Countdown: Day 6

Hello, hello!

Another day. Another something fun to share made with some fun new stuff from My Favorite Things.

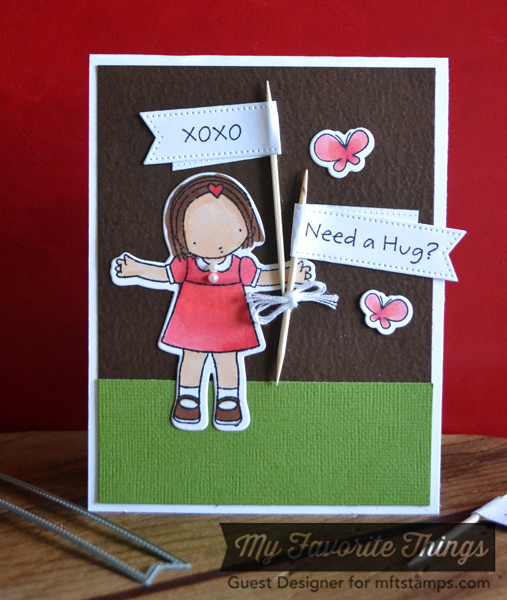
mft_6_hug_teri

I don’t fancy myself an amazing coloring artist, but I knew I wanted to try to make something fun with the new Sending Hugs stamp set and coordinating die.

I paired her up with a few butterflies stamped with the Every Day is a Picnic stamp (and coordinating dies).

mft_6_hug2_teri

So the flags. You might be wondering how did I made the flags.

The process went a bit like this.

I die-cut some flags using the Pierced Fishtail Flags Stax Die-namics dies. (Yes, if you have been following me the last few days, you might be feeling the need to stage a die intervention. Yes, yes. I’m a fan. Hee!)

mft_6_step1_teri

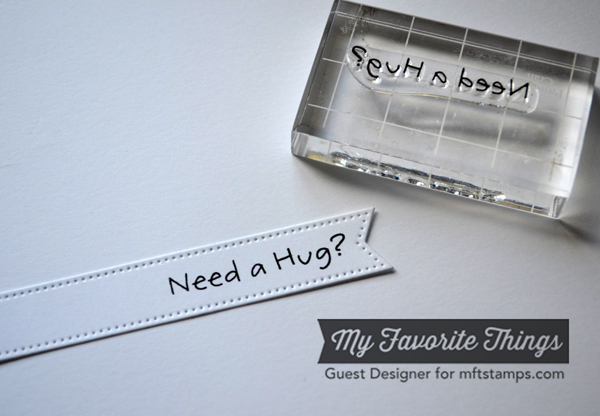
I stamped a sentiment on a flag. (The sentiments I used are also from the Sending Hugs stamp set.)

mft_6_step2

I used my scissors to snip off a little bit of excess.

mft_6_step3_teri

I added a bit of glue and wrapped the flag around a toothpick.

And I ended up with something like this.

mft_6_step4

Toothpicks aren’t your thing? Consider using long stickpins or corsage pins instead.

Once again, don’t  forget to hit the My Favorite Things blog. You’ll find links to all the super duper, extra fab (with cherries on top) MFT designers who are sharing projects today.  (And don’t forget: The products from MFT’s new release land on June 10th.)

MFT Countdown: Day 5

Hi all!

Me again! Hopefully, you haven’t gotten tired of me yet. 😉

I’m back with another project made with some of My Favorite Things’ new products for June.

Ok, here we go. And one…

mft_5_smile1_teri

Ta-da!

I once again whipped out the Pierced Fishtail Flags Stax Die-namics dies. (Gosh, I dig those things.) I cut all the flags with them.

And then I pulled out the new Smile stamp set and the new Peek-a-boo Hearts Frame Die-namics dies to help me with put together the rest of the card.

mft_5_smile2_teri

The hearts come with four different sizes of hearts. I used the smallest to cut heart pattern into my largest flag.

What’s neat about the dies is the holes are just the perfect size so you can sew floss, twine, ribbon or good old thread (like I did with the gold stuff) through them.

Just for kicks, here’s how my flag looked before I embellished the heart.

mft_5_step1_teri

I forgot to take my metal shim off out of my die-cut machine when I ran it through so I ended up with a bit of a happy accident here because it resulted in some debossing from the edges of the heart die.

Well, that’s all I have for today.

Don’t forget to hit the My Favorite Things blog. You’ll find links to all the MFT designers who are sharing projects today.  (And don’t forget: The products from MFT’s new release land on June 10th.)

Hope to see you again tomorrow!

MFT Countdown: Day 4

Hi everyone!

We meet again! I’m back with another project made with some of My Favorite Things’ new products for June.

On your mark. Get set. Here we go.

mft_4_smile_terio

You like? I hope so. It was really fun to make this one.

So (again) I pulled out those new Pierced Fishtail Flags Stax Die-namics dies. And I also used the new Transform-ables Smile Die-namics dies. They are so dang fun!

mft_4_smile2_teri

So how did I create that smile panel with the Transform-ables Smile Die-namics dies? Well, it went a little like this.

mft_4_step1_teri

I started out by cutting a base. Then I set the “smile” die on top. I used a little Washi tape to hold it in place.

mft_4_step2_teri

I ran it through my die-cut machine. (By the way, I am using a Big Shot these days.)

mft_4_step3_teri

And I got something like this.

mft_4_step4_teri

I cut a second base panel after that. I added a few strips of cardstock to it and then slapped the “smile” phrase right on top. And boy was that fun! I can’t wait to make another card with it.

I’ll be back again tomorrow. Thanks for stopping by!

Oh, and don’t forget to hit the My Favorite Things blog. You’ll find links to all the really cool MFT designers who are sharing projects today.  (And don’t forget: The products from MFT’s new release land on June 10th.)

MFT Countdown: Day 3

Hello again, everyone!

Thanks again for stopping by over the last few days.

I’m back again today with another little something made with some of My Favorite Things’ new products for June.

And here we go again. (Again, breathe. Breathe, Teri. Breathe.)

mft_3_always1_teri

Ta-da!

I made this bad boy with the new Bride & Groom Die-namics and the Amperand Die-namics dies and Always & Forever stamp set. (These dies and stamps, along with the rest of MFT’s June release go on sale on the 10th.)

The Bride & Groom Die-namic are especially fun. You can’t go wrong with a pretty pretty dress! And the tux and shirt have some impression marks on them so you get those cool lines when you die-cut with them.

mft_3_always2_teri

Even though I made a wedding card with the Bride & Groom Die-namics, I could easily see using these dies to make  a prom inspired project. Or even using them separately and making a more everyday project. Imagine making a retirement card with the suit. Just don’t use the bow-tie. You could also make a birthday card for a your favorite girl with the dress die. Lots of possiblities!

Going back to the card,  let’s talk about the dress for a minute. I got fancy schmanzy with it. Here’s what I did.

I die-cut it from vellum and cardstock.

mft_3_step1_teri

I took the vellum dress and folded it over like so. (Yep, I never ever snipped anything away with my scissors.)

mft_3_step2_teri

I slapped on a little adhesive on the folded over part (or is that under now) and then adhered it to the cardstock dress, which resulted in something like this.

mft_3_step3_teri

To really doll it up, I wrapped some fine gold thread around the waist.

mft_3_step4_teri

Just love that look!

Ok, pressure is on. 😉 I’ll be back again tomorrow. Thanks for stopping by!

Oh, and don’t forget to hit the My Favorite Things blog. You’ll find links to all the MFT designers who are sharing projects today. (They are a dang talented group.)