MFT Countdown: 1

Hello, hello!

We meet one more time, friends!

NewReleaseCountdown_Day1

And you guessed it! I’ve got  a couple more projects to share with that I whipped together with products from the September release from My Favorite Things. Let’s do this.

Meet card #1.

Miss You NYC by Teri

This was a fun one! I used the new New York Skyline Die-namics to cut a silhouette of the NYC skyline from black cardstock. This little panel of cardstock is what I had left. I thought it would look cool on a card so… I just plain ran with it.

Miss You NYC by Teri

The little graffiti pattern peeking out from behind was stamped with the Abstract Art stamp set from My Favorite Things. It’s just a fun set that really useful when you want to give something the artsy look.

And meet card #2.

Hello There London by Teri

I just had fun here by creating a little scene with the new London Mouse stamp set (and coordinating Die-namics). Notice: There’s no mouse in my scene. 😉 It just kinda happened that way. 🙂

The vehicles and Big Ben (and stars) are all from the stamp set.

Hello There London by Teri

By the way, if you look really close, you’ll see a blue circle pattern on the Lush Lagoon cardstock. I sponged additional Lush Lagoon ink on the cardstock and then stamped on top with the Snowfall Background stamp. I just kinda like the way the circles on that stamp are spaced. They are unexpected. Makes for a nice night scene.

Ok. So that, my friends, is what I have for you today.

Be sure to hit the MFT Blog to see what else the design team is sharing today.  (Hee hee! Don’t be sad. I’ll be back tomorrow.  Pinky swear.)

And for links to the MFT products I used, check out the list below. Links to the newest products will work once the September release is made live at 10 p.m. EST on Tuesday.

SupplyListBar

http://static.inlinkz.com/ppr.js

MFT Countdown: 2

Hi all!

This is going to be the world’s fastest post.

Like super fast.

NewReleaseCountdown_Day2

Because I’m back. I’m fired up. And I’ve got a couple more cards to share with that I whipped up with some of the new stamps and dies (and stencils too) from My Favorite Things. Check it.

Meet card #1.

Hello Friend Circles by Teri

Did a little stenciling and inking for this one. Created the pattern on the background paper with the new Concentric Circle Grid Stencil.

I simply set the circle onto white cardstock and then sponged ink over it. Then I moved it and changed out to another ink pad. I repeated that process until I completely covered the paper with ink.

Hello Friend Circles by Teri

I cut that circle with the Double Stitched Circle STAX. I created the phrase by mixing together a word die-cut with the Happy Hellos Die-namics and a stamped word created with the new Label Maker stamp set (and coordinating Die-namics).

Meet card #2.

Soda-lighted by Teri

Just having fun with this one. I created all those faux bottlecaps with the Bottle Caps Die-namics and new Soda Pop stamp set. Rather than go too crazy, I decided to just put them in a circle to draw attention to the sentiment.

Sodalighted by Teri

The sentiment was created by pairing together the new Soda Pop stamp set with the Label Maker stamp set (and coordinating Die-namics). It’s always a win in my book when you can mix different products together quite easily. I love that.

So that’s what I have for you today.

For a complete list of MFT supplies I used to make these cards, check out the list below. The links to the new goods will be live once the release is live on Tuesday at 10 p.m. EST.

And be sure to swing by the MFT Blog to find links to all the projects other design team members are sharing today.

SupplyListBar

http://static.inlinkz.com/ppr.js

MFT Countdown: 3

Hello, hello!

We meet again! Guess what? We’re still counting down the September release from My Favorite Things.

NewReleaseCountdown_Day3

On your mark. Get set. Go,

Please give it up for card #1.

Thinking of You by Teri

Ta-daaaaa! 🙂

So this bad boy was a lot of a fun to make. I once again whipped out the new Stitched Cover-Up Companion – Vertical to build the card around it. I put some Steel Grey cardstock and striped paper from the Dots and Stripes Neutral Paper Pack in the openings.

Thinking of You by Teri

The phrase was created with the new Label Maker stamp set (and coordinating Die-namics). And the bloom-thingys? They were made with the new Fall Florals stamp set (and coordinating Die-namics). There’s just something about the modern feel of them that draws me to them.

And meet card #2.

Hello Friend Stars by Teri

This guy is a tad bit more on the fun and cut side.

I cut the star blocks and stars with the new Star Strips Die-namics. I filled in some of the openings on the strips with stars and sequins (cut with my old friend, the Sequins Die-namics).

Hello Friend Stars by Teri

Be sure to visit the MFT blog to see who else from the design team is sharing projects today.

And be sure to check out the list below for links to all the MFT products I used to make these cards. Links to the newest goods are kinda like magic. They will work when the new release is made live at 10 p.m. EST on Tuesday.

SupplyListBar

http://static.inlinkz.com/ppr.js

MFT Countdown: 4

Hi all!

Another day. Another 24 hours closer to the September release from My Favorite Things.

NewReleaseCountdown_Day4

And you guessed it! I’m back with a couple more projects made with the new stuff.

Please give it up for card #1.

Hello You by Teri

This was a lot of fun. I die-cut skyline with the Paris Skyline Die-namics from watercolor paper. And then I went for the dip dye look, brushing watercolors onto the tops of the buildings.

Hello You Paris by Teri

If you look really close, you’ll see I created my own background paper with the blue cardstock by stamping the new Distressed Stripes Background stamp pattern onto it with blue ink.

And please meet card #2.

Wishing You Mouse by Teri

Yes. It’s so different from that last card! 🙂

The new Harvest Mouse stamp set (and coordinating Die-namics) is so, so cute! I just had to make a card with the stamps and dies. The mouse, bucket of apples and words are all from the stamp set.

Wishing You Mouse by Teri

I colored the mouse in with pencils and then used odorless mineral spirits to blend the color. It’s a coloring technique that I swear has been around forever and ever, but I still love it. It is so forgiving.

Once again, be sure to hit the MFT Blog to see who else from the design team is sharing projects today.

And check out the list below to see what products from My Favorites Things that I used to make these cards. The links to the new stuff will work after the new release is made live at 10 p.m. EST on Sept. 1st.

SupplyListBar

http://static.inlinkz.com/ppr.js

MFT Countdown: 5

Hi all!

It’s that time again! It’s time to start counting down to another awesome release from My Favorite Things. (Woohoo!)

NewReleaseCountdown_Day5

And I’m pretty excited to share with you a couple things I made with some of the new stuff.

Meet card #1.

Thank You Really by Teri

I built this card around the new Stitched Cover-Up Companion – Vertical. I cut it once from white cardstock and then I stamped the pattern (from the new Etched Flower Background stamp) onto pink and orange cardstocks. And then I used the Cover-Up to cut the rectangles. So I did just some basic stamping, but think how cool it would be add a little color with some pens or pencils to those flower lines. I might try that next time I pull the stamp out.

Thank You Really by Teri

And meet card #2.

You Made My Day by Teri

I once again used the Stitched Cover-Up Companion – Vertical to make this card. This time I flipped it horizontally and used it just as a design element.

You Made My Day by Teri

That white rectangle you see? It was cut with the Cover-Up. Again, I just flipped it… being the rebel I am and all. 😉

The flower, vine thingy-bobbers were cut and stamped with the Fall Florals stamp set (and coordinating Die-namics). I was going for a more modern look and I felt like they worked perfectly for this project.

Alright. So that’s what I have for you.

Check out the list below to see what supplies I used from My Favorite Things to make these cards. A word of caution: The links to the new stuff will work once the release goes live at 10 p.m. EST on Tuesday, Sept. 1st.

And be sure to stop by the MFT Blog to see who else from the design team is sharing projects today!  Be back again tomorrow, guys! Thanks, as always, for swinging by.

SupplyListBar

http://static.inlinkz.com/ppr.js

Paper Smooches DT Blog Hop

Hello all!

It’s Pep Rally week in the Paper Smooches world, and the gang’s all here today to share a sampling of the NEW Paper Smooches SEPTEMBER release with you!  TWO new stamps and TEN new dies will be available to purchase on August 31st at 8:00pm pacific time. Once our release goes live, you will find our new products HERE.  

To add extra fun to our blog hop…we are offering up a prize! 

The prize – a $25 gift code to choose what you like at the PS online store.
Here is the scoop the:

  • FOUR winners will be chosen at RANDOM from any of the design team blogs and the PS Blog to win the $25. prize.
  • Just leave a comment on any of the design team blogs listed below or the PS blog for your chance to win!  (you do not need to comment on all blogs to qualify but it increases your changes)
  • Deadline: You have until midnight PT on Sunday, August 30th to leave a comment.
  • Please check the Paper Smooches blog on Monday, August 31st to see if you are one of the FOUR lucky winners.

Alice Wertz

To increase your chances of winning:

  • Tell us that you Facebooked about our blog hop
  • Tell us that you Tweeted about our hop
  • Tell us that you posted on your blog about our blog hop

(…. which means that you have up to three extra chances to win on each blog)

So enough hop talk. Here’s the card I made to share with you today.

Happy Hanukkah card by Teri

I used the new Kibitzing Icons dies with the new Kibitzing Two stamp set to stamp the menorah and the sentiment.

The background was created by brushing color with a couple Clean Color markers onto a stamping block, spritzing the color with water and rubbing the block onto watercolor paper.

Happy Hanukkah card by Teri

To make the menorah stand out, I adhered it to the card with foam adhesive. I colored it in with a silver pencil and then used a Wink of Stella pen to add a little sparkle to it. It’s subtle, but I think it’s sure pretty.

OK, that’s what I have. Thanks for stopping by today. Hope to see you again soon.

Today’s Cards

Hi all!

Another day. Another couple cards to share.

Made both of these a bit back in response to a couple challenges over on Splitcoaststampers.

Rainbow Flowers Hello by Teri

For this one, I scribbled watercolors on watercolor paper to make the watercolor pattern. I let it dry, stamped the flowers on top and then die-cut it with the Stitched Rectangle STAX from My Favorite Things.

Hello Rainbow Flowers by Teri

I’ve always loved a rainbow scheme. Just something about the happiness it brings.

I Love Mew by Teri

This, too, was for a challenge. It was to make a little scene.

In my little scene, kitties and mice get along perfectly. They are besties! 😉

I Love Mew by Teri

The sentiment was created by mixing together a phrase from the I Knead You stamp set + the Happy Hellos Die-namics. As you know, I’m a big digger of mixing and matching things together.

So that’s what I have today. Be back again soon, friends!

You’ll find a list of supplies I used below.

SupplyListBar

Video: Custom DIY Patterned Stickers for Planners

Hi all!

Just a quick little something today.

I’ve been having so much fun doing the planner thing lately. What a warm, friendly and inviting community the planner folks are. I am so inspired by the friendliness of everyone.

Put together this quick little video Sunday night on making your own custom patterned planner stickers for the fun of it. All you really need is a few stamps, labels and inks. It’s way easy.

Anyway, hope you enjoy the video.

By the way, you’ll find links to the stamp sets I used in the description field of the video on YouTube.

Today’s Cards

Hi all!

Just a couple cards to share today.

Meet card #1.

Thankful for You card by Teri

And meet card #2.

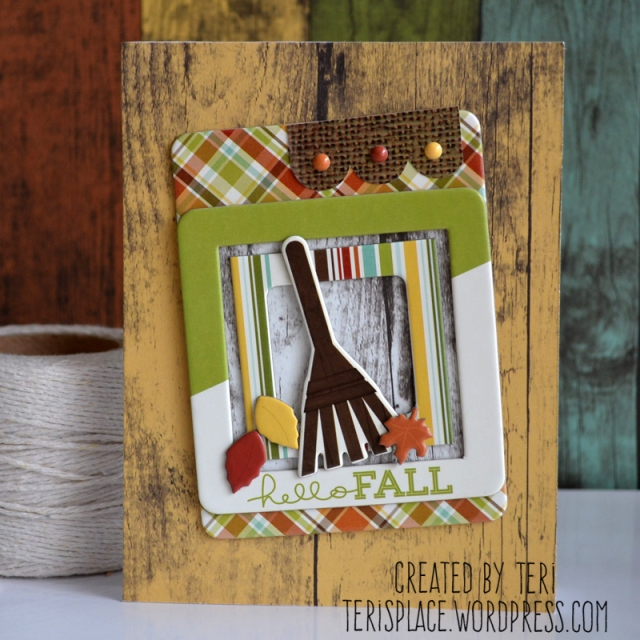
Hello Fall by Teri

I created both of these cards with the new Pumpkin Spice collection from Simple Stories. Was working on another project with the collection.  Completed it. Still had the goods sitting on my desk and just couldn’t stop playing! 🙂

The little piece of tape toward the top of the first card is actually a border sticker from this sheet of stickers. I just tore it to look like Washi tape.

Thankful for You by Teri

Really like that torn tape look, even though it’s been around for quick awhile.

On that second card, it’s a little hard to tell but look really close and you’ll see used three of the chipboard frames.  It’s kind of a puzzle (hee) but I just kinda stacked up together.

Hello Fall by Teri

The card is probably a little bulkier than most, but I think it’s still pretty mailable. Might cost an extra stamp, but it could still go through the mail… in the right envelope. 😉

Alright! That’s what I have. I’ll be back again soon, friends.

Thanks for stopping by!

MFT Creative Challenge: Paper Paradise

Hi guys!

It’s challenge time again with the My Favorite Things Design Team. And we’re going tropical this time.

Creative Challenge

Yep. We’re sharing projects made with a tropical twist and featuring projects with palm trees, fruity drinks and all kinds of tropical delights.

So let me show you what I’ve got. Meet today’s card.

Tree Hut Aloha by Teri

I went the scenic route here, creating a little scene with the Tiki Party stamp set and coordinating Tiki Party Die-namics.

I really wanted to stretch myself to do something different for me so I heat embossed the tree and hut and then did some watercoloring.

Tree Hut Aloha by Teri

Watercoloring looks all fancy, but I think it’s a pretty forgiving stamping technique as long as you apply colors lightly at first.

First, I colored the tree with light greens and browns. I let the colors almost dry and then I came in with some darker greens and browns. I thought the tree looked nice, but I felt like it just needed a little more so I added the blue sky and then the tan sand. For that sky, look really close. You’ll see I brought the color really close to my embossed lines. Because I used white embossing powder (rather than a dark color), it helped to make the images obvious than they would have if I’d left a little gap between the blue color and white embossed lines.

So that’s what I have for you today. Be sure to hit the MFT Blog to see who else from the team took a whack at today’s challenge.

Check out the list below for links to products I used available through My Favorite Things.

SupplyListBar

Thanks for stopping by today, guys!