Technique Tuesday Sneak Peek No. 2

Hi, guys!

I’m back with a couple more cards to share that features some new products for November for Technique Tuesday. Their new release of stamps and cutting dies goes live right here tomorrow.

Meet card no. 1.

This guy features the new Perfect Poinsettia stamp set and matching dies.

redpoinsettiaseasonsgreetingscard-teri

I think this stamp set really is pretty. I just love the big Poinsettia in it. It’s so wide open and so easy to color with markers. I colored the one of my card with markers and then added a little extra shading with pencils. Once I did all the coloring, I added a hit of glitter to the center of the flower. It’s subtle, but it is there.

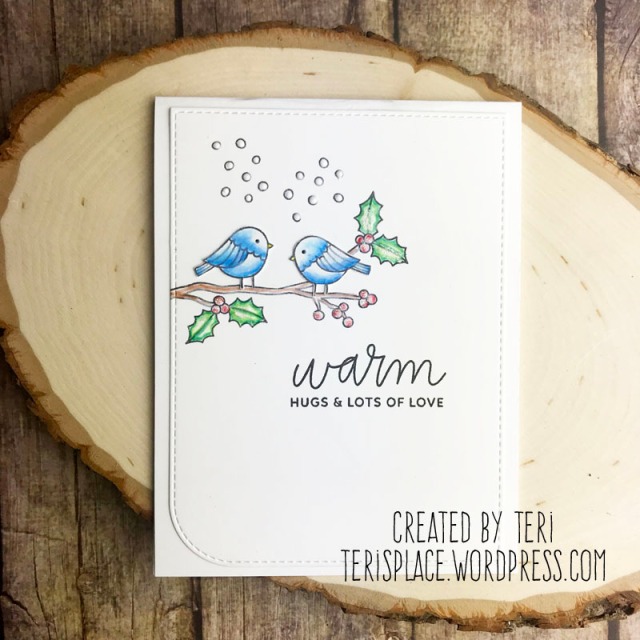
This second card features the new Hello Winter stamp set. What a fun stamp set it is.

warmerwinterclothescard-teri

It features a bunch of Winter-themed images, as well as some fun phrases. The stamp set was designed with scrapbookers in mind, but it is a set that is equally card friendly. I felt like everything in it could easily be used to make cards and scrapbook pages.

Alright, kids. That is what I have for you today. Be sure to hit the Technique Tuesday blog for a look at all the new products, plus you’ll find links to all the Design Team members, who are sharing projects on their blog today as well. Woohoo for cool new projects… and stamps and dies too. πŸ˜‰

Technique Tuesday Sneak Peek No. 1

Hi, guys!

Technique Tuesday is gearing up for their November 1st release of stamps and dies, and the design team is joining the fun today by sharing some cards they’ve made with the new goods.

I’ve got a couple cards to show you today.

This first card features the new Christmas Cocoa stamp set.

PeppermintChristmasCocoaCard-teri

To give the cocoa cups a little sparkle, I added a light dusting chunky glitter. I also “grounded” the cups by sponging a little black ink below them. It’s an easy thing to, and it adds so much.

PeppermintChristmasCocoaCardClose-teri

Card number 2 also features the Christmas Cocoa stamp set.

PeppermintMugCard-teri

To create this card, I stamped the cocoa cup with a light kraft ink onto the panel several times. I also stamped the little hearts. Then I stamped the cocoa cup on white cardstock, colored it in with markers and fussy cut it out with my scissors. (There are no matching dies for this stamp set, but the images are easy to cut with your scissors.) I completed the cocoa cup by adding a sprinkling of glitter to it as well. It’s all in the whip. πŸ˜‰

I finished the card by adding the sentiment (which could make this image pass for a peppermint mocha too) and a few sequins.

Alright! That’s all I have for you today. Be sure to visit the Technique Tuesday blog for a full look at this stamp set and some other products they are releasing on the 1st. All the new products will be available on Nov. 1st on their website.

You’ll also want to check out the blogs of my Design Team pals, who are sharing projects they’ve created with the new goods. You’ll find links to all their blogs on the Technique Tuesday blog.


One More Card for Halloween

Hi, guys!

I’m back with another stamped Halloween card to share with you.

Meet today’s card.

A stamped Halloween card by Teri | terisplace.wordpress.com

So yeah. It might seem a little similar to one of my other recent cards. In fact, you might call this one a bonus card of sorts as it is one more Halloween card that I made when I had Lawn Fawn’s Pick of the Patch stamps and dies out the other day.

I created the simple background for my stamped scene by rubbing orange and blue Distress Oxide Inks onto a panel of cardstock. Then I spritzed a little water onto the panel, patted it down with paper towels and let it dry completely. When it was dry, I stamped a few stars (from a stamp set I can not remember) with orange ink onto it with orange ink.

PumpkinsCarvedHalloweenCard2-teri

I created the sentiment by pairing together a couple sentiment stamps from the set. I purposely curved the top phrase when I put it on the stamping block to create an arch of sorts.

The pumpkins and squirrel were all stamped and die-cut with the stamps and dies… and then colored in with markers. Nothing really fancy there. (Wink!)

After I completed the assembly of the panel, I added a few “water-y” drops with Glossy Accents from Ranger Ink. As I think back about my long (dinosaur-worthy) paper crafting life, Glossy Accents are one of those tools that I’ve had forever… and go in spurts with me. I use them a ton and then I stop for awhile… and then I use them again and again. Are there any crafting supplies like that for you?

Alright. That’s it for now. I’ll be back again later. Thank you, as always, for taking time to stop by my blog. I appreciate you taking time to do so.

One Sealiously Fun Card

Hi, friends!

Got another stamped card to share with you.

Meet today’s card. It was … sealiously… fun to make. You to know that was coming, right?

SealiouslyCard-teri

Yeah. I know. Corny but fun.

I created fun little card with the Sealiously stamp set from Reverse Confetti. It’s a super cute set with a couple seals and some fun scene building elements (ice, cloud, water drops, waves), plus sentiments. The sentiments, especially, are great because you can make cards for a lot of different occasions with them.

One of the things that drew me to wanting to use these stamps is the seals are so open. They looked to me like they’d be lots of fun to color, plus I would not be complaining about not having a lot of space (as I sometimes do with stamped images). πŸ˜‰

I colored the seals and ice chunks in with markers. I also added a little bit of gray to the clouds. Look close and you’ll see it’s just a teeny tiny amount. I just wanted to give them a little highlight so they keep with the handmade feel of my card.

A stamped card by Teri featuring a seal | terisplace.wordpress.com

For the background, I sponged some light blue ink onto the card and then stamped the waves onto it. My ink pad was pretty dark so I inked up the wave stamp, stamped it on scratch paper and then stamped it onto the card so the ink would look lighter. I repeated that process several times.

I once again dug out my Glossy Accents for this card and added a few drops to the scene. Did it need it? No. But do I like the end result? You betcha! And since I was on an embellishing kick, I added a little glitter to the noses of the seals. It’s subtle, really.

Well, that’s all I have for you. I’ll be back again later. Thanks, as always, for stopping by, friends.


Colored Pencils for the Card Making Win

Hi, friends!

Surprise, surprise! I’m back again with another stamped card to share with you.

Do you ever buy a stamp set that you are so excited about, bring it home and then … quietly… not do anything with it for a long, long, long time? So begins the tale of how today’s card came to be.

Meet today’s card.

A handmade Christmas card by Teri | terisplace.wordpress.com

I picked up the Winter Woodland stamp set from Pretty Pink Posh quite a long time ago. I just loved cute critters in it. I didn’t do much with it and instead kept in my bin of stamps to use soon. Days became days and days, and days and days became… forever.. with the stamp set sitting and waiting to see some inky action.

Well, I took one look at the stamp set the other day and was like, “I need to use you, man. You are so cute!” And so I challenged myself to get off my card making hiney and make a card with this adorable set. And so I did.

All the images on this card are from the set. The words too.

I went out my regular zone and used colored pencils to color the images in rather than markers. If you look close, you’ll see I added a little sparkle as well to the holly leaves (with a Wink of Stella pen) and the berries (with glitter glue). I also added some with dots with white Nuvo Crystal Drops.

WarmWishesBirdsCard2-teri

That little rectangle panel was cut with a die from My Favorite Things.

Anyway, I think the card turned out pretty cute! I am totally challenging myself to make another card soon with the stamp set. It’s just so cute and happy… and fun. I sure like it.

I’ll be back again soon, friends. Thanks, as always, for stopping by.


Espresso + Magic = One Fun Card

Hi, guys!

I’m back again with another card. This one just happened the other day when I was messing around with my small stash of Studio L2E stamps.

Haven’t heard of Studio L2E? I’d totally encourage you to check them out. If you are a planner, Studio L2E has created lots of planner stamps that are just awesome. Not a planner? They have lots of planner and non-planner stamps that can be used on all kinds of craft projects. Some of that I have really geeked out over, especially, are the wizard-inspired ones: Wizard Life, Wizard Weekly and Planner Wizards: Tiffy + K.

Today’s card features some of those stamps. Let’s take a look.

A coffee wizard stamped card by Teri | terisplace.wordpress.com

I started this card by stamping six of the wizard coffee cups on cardstock and then coloring them in with markers. I fussy them out with my scissors. The cool thing is that the cup is really easy to cut. If you are fussy cut challenged, don’t be intimidated by this cup.

I created the white mat and gray scalloped mat with the help of a couple dies from My Favorite Things. I stacked them on top of each and adhered them to my card. Before I adhered the cups to the card, I placed a sticky note on it and sponged a little black ink on it and below it. This created the shadow you see under the the cups.

EspressoWizardCard2-teri

I felt like the cups needed a little extra “magic” to I stamped a wand (from the Wizard Weekly stamps) for the top one. I added a little sparkle to the middle of the wand with some glitter glue and then I added a bunch of dots around it with glitter glue and white Nuvo Crystal Drops.

I completed the card with the Espresso Patronum sentiment (from the Planner Wizards: Tiffy + K stamp set). It felt like it was the just perfect way to complete this little card.

Alright. That’s it for me. I’ll be back later, friends.

Thanks for stopping by.

A Halloween Card with Sparkle!

Hi, friends!

Ever need a little creative shot in the arm? I’ve always admired how so many offer challenges for this purpose in the card making community. There’s color challenges, inspiration challenges, sketch challenges and tons offered by manufacturers.

I came across the latest Lawn Fawnatics challenge (Bling It Out #39) to create something with Lawn Fawn stamps and a little sparkle. I immediately was like, “I can do that,” and set out to make a card.

Now, in full disclosure, know I don’t awesome go wild with the bling… and doing it with stamps, that’s not something I do often either…. so yeah. It seemed like a good challenge for me.

So meet my take on the challenge. Say hello to today’s card.

SmileHalloweenCard1-teri

I created the backdrop for my little scene by sponging some blue and green Distress Oxide Inks on cardstock and spritzing on a little water. I then die-cut the panel so it would fit onto a standard A2 card.

I stamped the pumpkins and squirrel with the Pick of the Patch stamps and dies. I colored them in with markers, and then I added a little extra shading to the green part of each one (the vine) with a pencil. It’s subtle, but, if you look close, it’s there. I gave each pumpkin a little sparkle on the vine with a Wink of Stella pen. The pen is great because it’s subtle but it just adds that right amount of shimmer.

To make that middle pumpkin really stand out, I coated his pumpkin body with glitter glue. I used a clear glitter glue, which took on a little of the orange coloring. I love that.

A stamped Halloween card by Teri | terisplace.wordpress.com

To complete my card, I stamped a few stars (from Lawn Fawn’s retired Critters in Costume stamp set) and added some white and glittery dots. I also used another Wink of Stella pen to add some color and subtle shimmer to the stars. Oh yes, and I added the stamped sentiment too. I wanted the sentiment to pop so I adhered it to the card with Thin 3D Foam Squares from Scrapbook Adhesives by 3L.

Alright! That’s it for now. I’ll be back later, gators. Thanks for stopping by.

Christmas + Cactus = One Fun Card

Hi, guys!

Have you started thinking about making Christmas cards? I’m a long way out from picking a design to make mass quantities of this year, but I’ve been having fun trying out some different stamp sets to make one-of-a-kind cards.

Yes, I say one-of-a-kind cards. Still playing around, trying to find “that” card that will be the one I make lots of. Today’s card is definitely a contender though for me making more like it.

Without anymore delay, meet today’s card.

merrycactuscard-teri

It’s a bit non-traditional for a Christmas card, which is a big reason why I love it.

The cactus and words are form the Christmas Cactus stamp set designed by Ann Corbiere-Scott for Scraps of Love, a fun scrapbook store I recently visited in Arizona. Ann created a whole collection ofΒ  hand-drawn stamp sets for them, a number of which have a sweet Arizona twist.

I couldn’t resist making a Santa-themed cactus with the stamps. I stamped the three cactus plant on white cardstock, plus one Santa hat, and colored them in with markers and pencils. I fussy cut them out and then pieced them together to make the little scene you see here. (By the way, I wanted the images to really stand out so I sponged blue ink on my card base, plus I added some extra detail to the large cactus by adding a few drops of Glossy Accents. Those drops really add something special.)

Merry Cactus stamped Christmas card by Teri | terisplace.wordpress.com

While I used a combination of markers and pencils to color in the cactus plants, I decided to do something different with the sentiment. I bypassed the markers and simply used colored pencils. I love how it looks.

I also added a few more drops of Glossy Accents to my overall card design, and I added some texture to the white spaces on Santa’s hat with the help of my white Nuvo Crystal Drops.

Anyway, I think this card turned out fun. I just might make some more like it.

Thanks for stopping by. I’ll be back again soon, friends.

A Sympathy Card

Hi, friends!

Sympathy cards are not my favorite card to make, but it seems like they are the one card I always need to have on hand… just in case the need sadly arises for one. I can make a lot of cards on demand, but sympathy cards are the one card that I just cannot make on the spur of the moment.

So today’s card came about because I felt the need to make a few to add to my card making stash.

holdingheartflowerscard-teri

The flowers and words are from the Cherished Memories stamp set from Altenew. It’s lovely stamp set, featuring some really pretty (and modern… yet classy) blooms and leaves. Plus, they are wide open and really easy to color in.

I stamped a couple blooms and leaves and simply colored them with my Copic markers. To give the leaves and blooms a little extra “umph”, I added a little bit of shadow red and green colored pencils. If you look close at the card, you’ll see it. Just look at the darkest spots on the flowers and leaves.

I sponged some blue ink on the card base and glued the leaves right to it. I used Thin 3D Foam Squares from Scrapbook Adhesives by 3L to affix the flowers. Now, confession time, I fussy the stamped flowers rather than cutting them with the matching dies. A tight budget means no dies for that stamp set for me. (Wink! Raise your hand if you can feel what I’m talking about.)

A handmade sympathy card by Teri | terisplace.wordpress.com

I picked this sentiment because I thought it was a lovely one for a sympathy card, but I do think this card could probably be used as an encouragement card too or as a card to just let a dear friend you are thinking of them too.

Alright. That’s it for now. I’ll be back again later, friends. Thank you, as always, for taking the time to stop by. I sure appreciate your kind words.

A Magical Card

Hi, guys!

I’m back with another card. It’s kinda… sorta… magical. πŸ˜‰

magicalunicorncard-teri

Well, you know, in a unicorn sense. Wink.

Made this card the other day just for the fun of having fun after picking up the Unicorn Stamp & Cut set of stamps and dies from Hero Arts. Let me tell you the story about how the stamps came to live with me. It was World Card Making Day and, well, you know, one should treat themselves on that day. Because… it’s what us stampers do, right? Anyway, I saw the set and magically tookΒ  a trip in time back to my second grade unicorn-obsessed self and was like, “Yeah. That’s fun. I need it.” And so the unicorns came to live with me.

Everything on this little card stamped with the stamp set. I thought it would be fun to make a herd of sorts of unicorns so I stamped and colored in three of them. I drew inspiration from my elementary school friend Jennifer’s My Little Pony collection (She had so many!) for the colors of the unicorns.

A Unicorn Stamped Card by Teri | terisplace.wordpress.com

To give the card a little glitz and sparkle, I stamped some stars around the unicorns. I colored them in with a yellow pencil and then added a few drops of glitter glue. Now, the glitter glue I used was clear. The cool thing about it? It took on the yellow from my colored pencil. I also added a few clear drops of Glossy Accents to the scene, near the stars. There’s just something I love about the look of Glossy Accents drops. The hardest part about putting them on a card? Simple. Waiting for them to dry. But the end result is so, so worth it.

Alright. That’s all I have for you today, friends. I’ll be back again later in the week with a a few more cards to share with you. Hope you’ll stop by.