MFT Countdown: 2

We meet again!

Just two more days until the June release is available from My Favorite Things. Hooray!

NewReleaseCountdown_Day2

And yep. You know me. I’ve got  a couple more things to share with you that I whipped up with the new release.

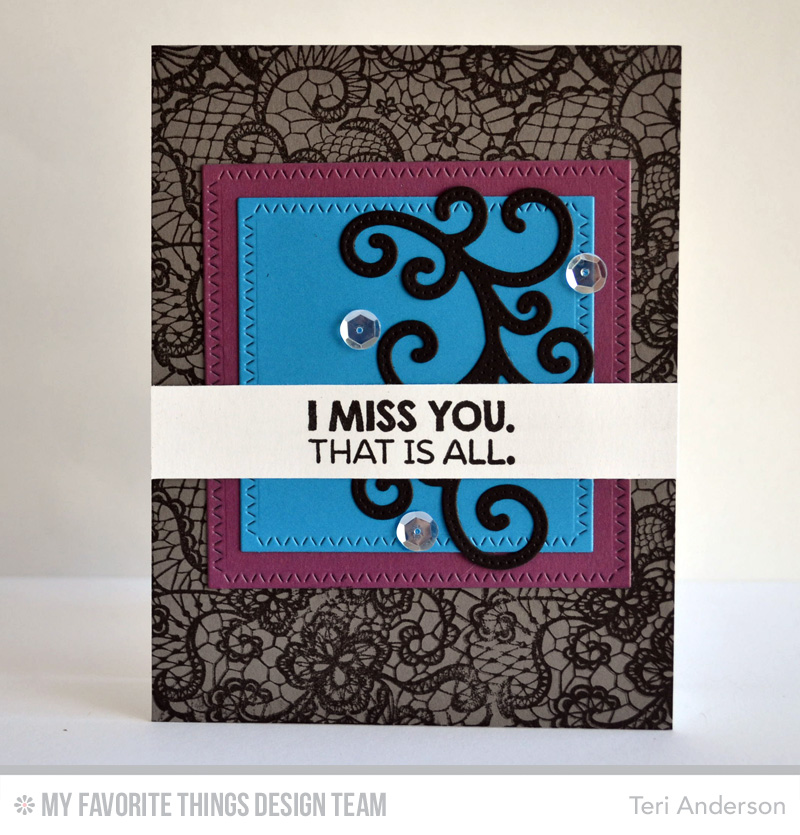
Please give it up for Card #1.

Gold Star card by Teri

And the crowd goes wild. (Kidding, kidding!)

See those stars? They started out as just plain old stars cut from white cardstock with the new Lucky Stars Die-namics. I was determined to use the sentiment (from the new Count the Stars stamp set) so I gave my stars the gold treatment. What’s that you ask? Simple. I colored over them with a gold pen. You could achieve a somewhat similar look by brushing over them with a gold ink pad.
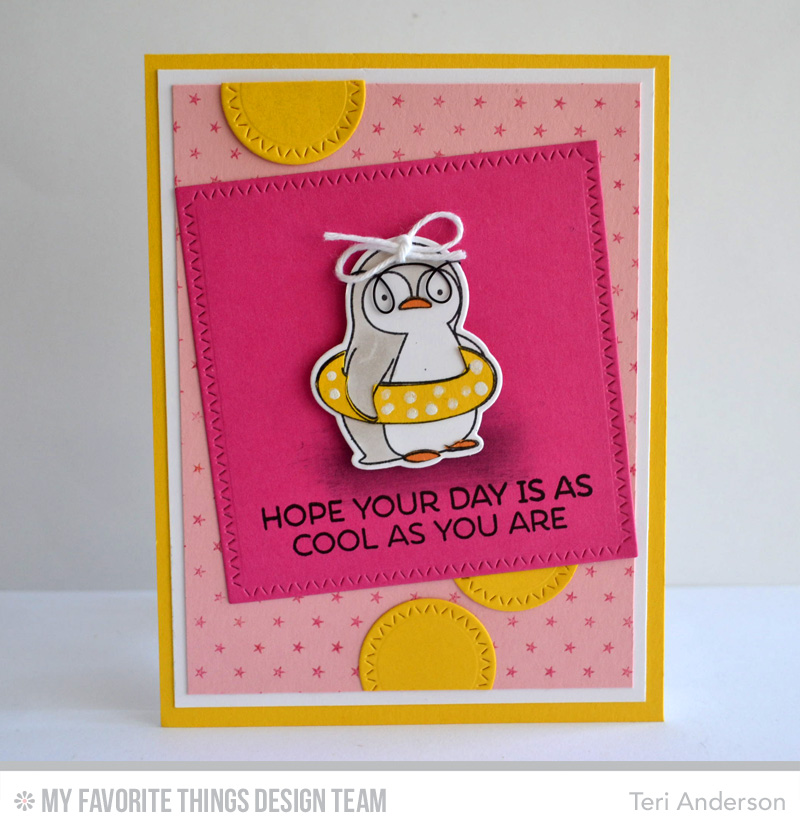
Gold Star card by Teri

And meet Card #2.

Shoot for the Stars card by Teri

I created the background paper with the new Tiny Stars Background stamp. I’m a fan of MFT’s Background stamps. They make creating patterned papers easy. Ink up the stamp. Set cardstock on top. Rub pattern onto the cardstock. And ta-da. Done. Like I said, I’m a fan. 😉

Shoot for the Stars card by Teri

To give the stars an artsy look, I randomly applied a little color to the circle and then applied the black die-cut stars (also cut with the Lucky Stars Die-namics) on top. Easy peasy!

Oh! And that sentiment? It was created by pairing together the Count the Stars stamp set with the Stars & Wishes Die-namics. They, along with the rest of the June release, arrive at MFT on June 2nd at 10 p.m. EST.

Be sure to hit the MFT blog to see who else from the design team is sharing projects today.

And for a complete list of MFT supplies I used to make these cards, check out the list below. Just a reminder that the links to the brand new products will be live when the new release is live. 😉

SupplyListBar

MFT Countdown: 3

Hi all!

Woo-to-the-hoo! It’s another day of counting down toward the June release from My Favorite Things.

NewReleaseCountdown_Day3

And I’ve got a couple more things made with the new stuff. On your mark. Get set. GO!

Say hello to Card #1.

Sending Happy card by Teri

I have been having a ton of fun playing with the new Abstract  Cover-Up Die-namics. It’s just a super fun background to use on cards and stuff.

For this one, I cut it five times (in a rainbow assortment of cardstock colors) and then stacked them up, slighting offsetting them as I adhered them to my card. It allows you to see just a bit of that rainbow.

Sending Happy card by Teri

And for giggles, I used a white pencil to doodle some random designs randomly into the design. I think it turned out pretty fun.

Meet Card #2.

Coolest Frame card by Teri

I again used that fun Abstract Cover-Up Die-namics die.  This time, I cut it out twice. I adhered one to a frame cut with the Stitched Rectangle Frames Die-namics. It was a perfect fit. Then I took a second Cover-Up, flipped it over and adhered it the frame too. This is how it looks when you flip the frame over.

Frame card close-up by Teri

After I adhered the frame to my card, I once again whipped out my trusty white pencil. I added a little bit of color into some of the openings. It’s a lot softer with the blue cardstock than the black, but it still adds a nice finishing touch.

Coolest Frame card by Teri

Finally, meet Card #3.

Miss You Lace card by Teri

I wanted to make something a little more on the classy than graphic side here so I whipped out the new Lace Background stamp and stamped the background. Then I added some layered elements (squares cut with the Zig Zag Square STAX Die-namics and a flourish cut with the Pierced Fancy Flourish Die-namics).

Miss You Lace card by Teri

Even though I added some sequins to this card, it is fairly flat.

Alright! So that what I have for you today.

For a list of MFT products I used on my cards today, check out the list below.

And be sure to stop by the MFT blog to see who else from the design team is sharing cool new stuff today.

SupplyListBar

MFT Countdown: 4

Hi all!

It’s another day of counting down to the June release from My Favorite Things. Save your pennies, guys. So. Much. Good. Stuff.

NewReleaseCountdown_Day4

And you know me! I’m here with a couple projects made with the new stuff. Let’s do this.

So please meet card #1.

Miss You Penguin card by Teri

This was sure fun to make. I love a good penguin stamp set and the new Penguins in Paradise is one of the cutest I’ve seen. Penguins + a beachy flair = something you can’t go wrong with it.

I played it short and sweet here, crafting a simple little scene with the stamp set and coordinating Die-namics.

Miss You Penguin card by Teri

The oval was cut with the new Zig Zag Oval Stax Die-namics. I cut two ovals (one from kraft cardstock and one from a blue). Then I torn the kraft one to try to mimic the look of sand.

And this is card #2.

Cool Penguin card by Teri

I went (totally) wild here! I used some of the same products to make this one, plus I used the Zig Zag Square STAX and Zig Zag Circle STAX Die-namics.

The penguin (or is that Mrs. Penguin?) started out pretty simple and cute. And then I went crazy embellishing her, adding polka dots to her tube, forming glasses from wire and adding a bow to her head.

Just for giggles, here’s a comparison from how she began to how she looks now. 😉

Cool Penguin card by Teri

It’s a little over the top, but she sure makes me giggle!

Be sure to check out the MFT Blog to see who else from the design team is sharing projects today.

You’ll find a list below of the MFT products I used on my cards today. By the way, the new stuff lands on June 2nd at MFT!

SupplyListBar

MFT Countdown: 5

Hi all!

Hooray! It’s time to start counting down to another AWESOME (more like “totally stinking” awesome) release from My Favorite Things.

NewReleaseCountdown_Day5

And yes indeed. I’ve got a couple new cards to share with you today that were made with (mostly) new stuff.

Shall we? We shall!

Meet card #1.

Miss You Circles by Teri

For this bad boy, I cut a bunch of circles with the new Zig Zag Stitched Circle STAX Die-namics and kinda just went crazy adding them to my card. I kinda went with the look of organized chaos when I set them down.

Miss You Circles by Teri

I stamped a phrase onto the large white circle with the new Written in Watercolor stamp set. So many great phrases in that set. Many of which are bigger than the one I used, but the “miss you” phrase fit the circle I wanted to use perfectly. Speaking of which, I can’t wait to send this card to one of my friends tomorrow. 😉

And meet card #2.

Miss You Artsy by Teri

I just had fun here with this one by mixing together a lot of different products from the new release. Might say I kinda lived on the edge here.

I stamped the star pattern onto the square (die-cut with the Zig Zag Stitched Square STAX Die-namics) with the Tiny Stars Background stamp. I did the same circle die-cut and stamp combo as I did on the other card for this one.

Miss You Artsy by Teri

And that background. Oh goodness! I die-cut the large pink frame with the new Abstract Cover-Up Die-namics. And then I adhered it to gray panel and then used my trusty white pencil to scribble in a little white color.

Kinda fun, right?

So that’s what I have for you today.

As always, be sure to check out the My Favorite Things blog to see who else is sharing projects today.

Oh, and the new stuff lands at MFT on June 2nd. You’ll find a list below of the products I used to make the cards I’ve shared today.

SupplyListBar

Paper Smooches DT Blog Hop

Woot! Woot!

It’s Pep Rally Week once again in the Paper Smooches world, and the design team (and friends) are here today to share a sampling of the NEW Paper Smooches JUNE release with you!  FOUR new stamps and EIGHT new dies will be available to purchase on May 31st at 8 p.m. Pacific Time. Once our release goes live, you will find our new products HERE.

To add extra fun to our blog hop…we are offering up a prize! 

The prize – a $25 gift code to choose what you like at the PS online store.

Here are the details:

  • FOUR winners will be chosen at RANDOM from any of the design team blogs and the PS Blog to win the $25. prize.
  • Just leave a comment on any of the design team blogs listed below or the PS blog for your chance to win!  (you do not need to comment on all blogs to qualify but it increases your changes)
  • Deadline: You have until midnight PT on Sunday, May 31st to leave a comment.
  • Please check the Paper Smooches blog on Monday, June 1st to see if you are one of the FOUR lucky winners.

A couple of our designers are taking a small hiatus to care for different things in their life. Julia Stainton is filling in for Emily and Kristina Werner is filling in for Pamela.  We are so excited to have them join us in June!

Alice Wertz

To increase your chances of winning:

  • Tell us that you Facebooked about our blog hop
  • Tell us that you Tweeted about our hop
  • Tell us that you posted on your blog about our blog hop

(… which means that you have up to three extra chances to win on each blog! Yay!)

Alright, so enough hop talk! Let me show you what I’ve got.

Sending You by Teri I used the brand new Notebook Paper Two stamp set to stamp the lines on the little piece of paper. I also stamped some of the words (“you” and “and”).

The rest of the words, as well as the stars and the little boxes were stamped with the new Clipboards Two stamp set. I’m always a fan when products work together, and those two sets work together well.

Sending You by Teri

The paper was die-cut with the Paper die. Just a really practical die. I’ve been using it a lot lately.

OK! So that’s what I have for you today. Thank you for swinging by!


MFT Die-namics Design Challenge: On the Border

Hi friends!

I’m back and taking part in another Die-namics Design Challenge with the My Favorite Things Design Team.

MFT_DienamicsDesign_SideBar

Our challenge this time was to focus on border designs. My Favorite Things has lots of great border dies, offering close to 30 different border Die-namics dies. From scallops to conversation marks to fence lines, there’s a little something for everyone.

I decided for this challenge to pull out the Stitched Scallop Edges Die-namics.  Scallops are such a classic border. What I really dig about the MFT dies is they have that extra stitching treatment added to them. It makes them extra fun to use.

Be Happy and Smile by Teri

For my card, I used the set’s three dies to cut  three different panels. Look really close and you’ll see one panel has  small scalloped edge, one has a large scalloped edge and one has a medium scalloped edge. The cool thing is that even though they are different sizes, they still look pretty cool when you use them all together.

I was really digging the stitch lines so I decided to add some more stitching to the card in the form of circles cut with the Cross-Stitch Circle STAX Die-namics. I cut into that larger circle with a circle from the Stitchable Dot Circle STAX Die-namics.

Be Happy and Smile card by Teri

Thought it turned out pretty fun!

So that’s what I have for you today. Be sure to hit the MFT Blog to see who else is played along and is sharing a project today.

SupplyListBar

MFT Creative Challenge: In the Background

Hi guys!

Got a card to share with you today! Took part in the latest Creative Challenge with the My Favorite Things Design Team. Our challenge was to come up with ways MFT’s products could be used to create eye-catching backgrounds.

Creative Challenge

So yeah. 🙂 Here’s what I came up with.

Friend Circles Background by Teri

I’m a big fan of My Favorite Things’ Cover-Up Die-namics. I use them a lot because they just plain make good backgrounds.

I whipped out one of my favorites for this card, the Jumbo Dots Cover-Up. I cut it from a gray cardstock and then put strips of cardstock behind many of the openings. Then to give the openings a little visual interest,  I added some small shapes from the Blueprints 8 Die-namics.

Friend Circles Background by Teri

I think the circles some ways it reminds me a little bit of the look of some of those Flair buttons folks make.

That Friend word? It too is from Blueprints 8.  I gave it a different look by adding a long strip of cardstock over the top of it. It sorta reminds me of the look of this Friend Die-namics die.

Make sure you swing by the MFT Blog to see who else tackled this month’s challenge.

And, you know, thanks for for swinging by here! I always enjoy seeing you did!

SupplyListBar

MFT: Inspired by Art

Hi all!

My buddies over at My Favorite Things have been having an inspiration celebration of sorts over their blog.

Print

The Creative Team is getting in on the party today by sharing a whole bunch of projects that were inspired by famous pieces of art. And I’m joining the fun too by sharing a little something that inspired me.

First, meet today’s card.

Hello Tweets by Teri

Got an idea what it inspired it? Yep. It was inspired by American Gothic by Grant Wood.

most-famous-paintings-15

I always loved this piece of art.

So I created my own farmer (ha) and his daughter (ha ha) with the Tweet on You stamp set and coordinating Tweet on You Die-namics. I didn’t have a pitchfork stamp or die so I ran with it and used a gardening tool from the Spring Garden Die-namics. It’s sorta the same thing, right? 😉

Hello Tweets by Teri

By the way, I thought it would be fun to just play on the whole farmhouse behind them concept so I hung the birdhouse. Must admit that it sure made me giggle as this card came together.

So that’s what I have today. I hope it makes you chuckle too. Be sure to hit the MFT Blog to see who else is art sharing inspired projects today!

MFT: Creative Construction with Blueprints

Hi all!

I’m joining up with my My Favorite Things Design Team friends for another challenge involving the Blueprints Die-namics today. This time, we are incorporating flowers into our projects made with the Blueprints Die-namics.

MFT_CreativeConstruction_SideBar

So let me show you what I made. Please meet today’s card.

Happy Birthday Flowers by Teri

I made the “guts” of this card (how is that for being descriptive?) with the Blueprints 19 Die-namics. The frame, label and the larger flowers (and buttons and green “leaves”) were all cut with them.

I cut those smaller flowers with the Fresh Cut Flowers Die-namics. I’m a big fan of things that cross over and work together and they just work (style-wise) with the Blueprints 19 Die-namics. That made me happy.

Happy Birthday Flowers by Teri

I die-cut the happy word and then I stamped the “birthday” word. The stamped word was part of a larger stamp from the Terrific Ties stamp set. I set a piece of tape over all the words I didn’t want to ink up. I inked up the stamp, removed the tape and (yay) just got ink on the Birthday word. It’s a fun way to mask!

So that’s what I have for you today. Hope you liked the card!

Be sure to stop by the MFT Blog to see who else from the design team is sharing projects today.

Today’s Card

Hi guys!

Just a card to share today.

Made this one a week or two ago, just for the fun of having fun. Never got around to sharing it.

Congrats Flowers by Teri

The flowers and words are all from the Essentials from Ellen collection of dies and stamps available over on Ellen Hutson’s site.

I die-cut the flowers (from the Bold Blossom dies) from watercolor paper and then colored them with watercolors. Made for a fun look! The mat? Those were cut with the Bold Blooms Matching dies.

The sentiment is a mixture of die-cutting (congrats from the Zipper Panel dies) and stamping (to you from Wish You stamp set).

Congrats Flowers by Teri

Of course, I took the opportunity to add a little gold threat to the card. I think the messy string thing is getting a little old, but I think some designs just call for it. It just helps balance things out.

So that’s what I have. I’ll be back again later, gators. Thanks, as always, for stopping by.