Paper Smooches DT Blog Hop

Hi friends!

Once again, it’s Pep Rally week in the Paper Smooches world and the design team and friends are banding together today to share a sampling of the NEW Paper Smooches JULY release with you!  TWO new stamps and TEN new dies will be available to purchase on June 30th at 8 pm Pacific time. Once our release goes live, you will find our new products HERE.  

To add extra fun to our blog hop…we are offering up a prize! 

The prize – a $25 gift code to choose what you like at the PS online store.
Here are the details:

  • FOUR winners will be chosen at RANDOM from any of the design team blogs and the PS Blog to win the $25 prize.
  • Just leave a comment on any of the design team blogs listed below or the PS blog for your chance to win!  (you do not need to comment on all blogs to qualify but it increases your chances…. woohoo!)
  • Deadline: You have until midnight PT on Sunday, June 28th to leave a comment.
  • Please check the Paper Smooches blog on Monday, June 29th to see if you are one of the FOUR lucky winners.

A couple of our designers are taking a small hiatus to care for different things in their life. Amy Kolling is filling in for Emily and Melissa Phillips is filling in for Pamela.  We are so excited to have them join us in July!

Alice Wertz

Amy Kolling

To increase your chances of winning:

  • Tell us that you Facebooked about our blog hop
  • Tell us that you Tweeted about our hop
  • Tell us that you posted on your blog about our blog hop

(which means that you have up to three “super fantastic” extra chances to win on each blog.)

So enough talk about the hop. Let’s get on with the card. Meet today’s card.

Hey There, Mister Bee by Teri

The bee? He slays me! I made him with the new Build a Bug dies. So fun. The bow is actually from another new die set, Bows.

To give the bee his little face, I cut him body from yellow cardstock and then used the small face die to cut the face into it. I cut a second body from white cardstock and adhered it under the yellow body so his face would be white.

Hey There, Mister Bee by Teri

By the way, I used a couple other Paper Smooches products on my card as well: Frame 1 Die; Sentiment Sampler stamp set and Stars dies.

So that’s what I have got today. Thanks for stopping by. Blog hop days are the best.

School of Design: Quiet/White Space

Hi all!

It’s the last day of Summer School on the My Favorite Things Blog!

Print

And today’s lesson is all about Quiet/White Space.

“White space” stays in the background to make the focal point or the sentiment the unabashed star of the show. And it doesn’t necessarily have to be white!

So let me show you what I’ve got.

Lucky Stars card by Teri

I think it turned out pretty fun!

I cut the large circle with the Cross-Stitch Circle STAX Die-namics. And then I did some double cutting by cutting inside the circle with smaller circle from the Stitchable Dot Circle STAX Die-namics.

Lucky Stars card by Teri

The sentiment stamping was a bit of a challenge. Not going to lie on that. 😉 I stamped the top phrase first on the circle and then stamped it again onto the star. As I stamped on the star, I lined it up so the “my” word landed where it did. After I did the stamping, I adhered the star and “stars” word to the circle. And then I stamped the bottom phrase. I stamped again. You’ll notice my stamping is not 100% perfect. It’s close, though.

Be sure to hit the MFT Blog to see who else is trying out the white space concept today.

And hit the list below for links to the products I used to make this card.

Thanks, as always, for stopping by today!

Die-namics Design Challenge: Shape It Up!

Hi guys!

It’s been a busy week on the old blog-a-roo here, and things aren’t slowing down.

Yep! I’ve got another project to share with you today as I joined my My Favorite Things design team buddies for another challenge. The challenge, you ask? Well, my friends, it’s the monthly Die-namics Design Challenge.

MFT_DienamicsDesign_SideBar

We were challenged this month to make something with MFT’s awesome STAX Die-namics. The STAX dies are cool because they have all kinds of shapes (circles, stars, banners, rectangl, squares, ovals and more). Some are plain and some have special treatments like stitching and piercing.  You can layer them or use them on their own.

So enough yak, here’s the card. Meet today’s card. 😉
Make a Wish by Teri
I cut all those circles with the Cross-Stitch Circle STAX Die-namics. I had originally planned to stack them up and then decided to try something else. I just kinda randomly arranged them onto the card, trying to keep like colors together.
The stars were also cut with some STAX Die-namics. I used the Pierced Star STAX Die-namics, which I must admit stay on  my desk most of the time. Love those stars!
For what you see on the card, I cut two stars and adhered them together. And then I used foam adhesive to mount them to the the card so it looks like they are popping up.
Make a Wish card by Teri
For links to all the MFT products I used on my card, check out the list below.
And be sure to stop by the MFT Blog to see who else is joining in on today’s challenge.

June’s Essentials by Ellen Pin-sights Challenge!

banner-PIN-sights

Hi everyone!

Super excited to be playing along with the June Essentials by Ellen Pin-sights Challenge over in the CLASSroom on Ellen Hutson’s site!

What is the challenge you ask? Well, the Essentials by Ellen Pin-Sights challenge is a monthly inspirational challenge based on a Pinterest Inspired photo that is located on the CLASSroom blog. A random challenge participant will receive a $50 gift certificate to the Ellen Hutson store. To be eligible, participants must use Essentials by Ellen products and they must use the photo badge as inspiration.

50 Store Credit

You know, it’s fun to play… and it’s fun to have a challenge to motivate you to use all those Essentials by Ellen products you’ve been collecting, in my personal opinion. 😉

So here is this month’s inspiration photo.

June

I was inspired by colors and all those glorious circles to make this card.

Hello Love Deer card by Teri

If you look really close at the background, you’ll see a ton of circles. I stamped them all with blue ink and the Bokeh Dots stamp set.

Hello Love Deer card by Teri

It’s not everyday you see a pink laurel wreath, but in my world, you do on  card. 😉 Same thing goes for an orange stag. Wink! 😉 Again, totally influenced by the colors seen in the inspiration photo.

By the way, you might be wondering about the sentiment. I created it by pairing together the Brushstroke Love die with a stamp from the Hello Gorgeous stamp set.

The little pops of gold were added to my card with enamel dots, but they were inspired by that lovely gold dotted pillow.

Alright! So that’s what I have for you. Want to take part in this month’s challenge? Head to the challenge post here to link your projects up!

School of Design: Movement/Flow

Hi all!

Summer School is still happening over on the My Favorite Things Blog today. Today’s lesson is all about Movement/Flow.

Print

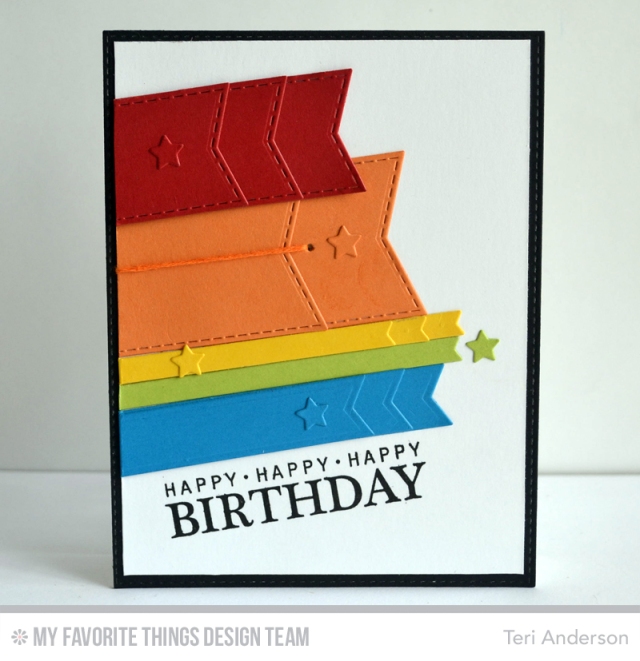
Movement/Flow is the arrangement of the elements on a card to create a sense of motion by using lines, shapes, forms, and textures that cause the eye to move over the design. Creating a visual triangle with sentiment, paper, and focal point is a great way to show movement as well!

Here’s a card I created based on this design concept.

Happy Happy Happy Birthday card by Teri

Check out all those banner pieces. I pieced them together to create the lines to look like they are moving, kinda shooting into the card from the left side.

Some of the banners (cut with the Stitched Jumbo Fishtail Banner STAX Die-namics) have texture. Others that were cut with the Fishtail Flags STAX Die-namics are just layered together to extend the line.

Happy Happy Happy Birthday card by Teri

Be sure to check out the MFT Blog to see who else was inspired by today’s lesson to make a project.

And here’s a list of MFT products I used to make today’s card:

School of Design: Focal Point

Hi guys!

Summer School continues today on the blog for My Favorite Things.

Print

Today’s lesson is all about focal point. Focal point is the main area where an embellishment or image stamp is placed. It typically works best if there is only one focal point on a card.

So here’s a card I made based on the focal point design concept.

Birthday Butterfly card by Teri

Can you spot the focal point? Yeah, it’d be that butterfly and the circles. 🙂

Birthday Butterfly card by Teri

I cut the butterfly with the Flutter of Butterflies – Solid Die-namics dies. I cut a couple butterfly bodies and then stacked them up. To make them stand out, I slightly bent the wings.

The sentiment is from the You’re the Sweetest stamp set. Even though the set’s all about ice cream and other yummy treats, it’s got some phrases that are really great for any style of card.

So that’s what I have for you today.

To see a list of products I used to make this card, look below. And swing by the MFT Blog to see who else is playing along today.

Creative Challenge: Go Overboard

Hi everyone!

It’s time for another Creative Challenge with the My Favorite Things Design Team.We’re going “overboard” this month with sharing things nautical’ish.

Print

So meet today’s card.

Fintastic card by Teri

OK. So it’s not nautical in the beach or lake sense, but there’s water and fish. Might say it’s nautical in an “at home” sense. 😉

I picked up the Fishbowl Die-namics a while back and had been dying to use them. I just hadn’t had the right project in mind, but this challenge provided a good opportunity to do.

I had originally planned to make the fish all one color, but I decided to live on the edge and make each one with two colors. With the addition of the white cardstock, they appear a little more dimensional.

Fintastic card by Teri

The words are from the Fintastic stamp set.  I stamped them (and the little stars) on a banner cut from the Blueprints 25 Die-namics. There’s just something about those little stitch marks on the banner that speak to me. Love that extra finishing touch it gives.

Alright, so that is what I have for you for now. You’ll find a list of supplies and links I used to make this card below.

And be sure to check out the MFT Blog to see who else from the Design Team is taking part in today’s challenge.

School of Design: Rule of Thirds

Hi everyone!

Fun things are happening on the My Favorite Things Blog this week. It’s Summer School time. Each day this week, MFT will be offering some lessons in design.

Print

Today’s is all about the Rule of Thirds. In design talk, it’s about dividing your card into nine equal parts by two equally-spaced horizontal lines and two equally-spaced vertical lines.

So I decided to join the crew in playing along and made this card, which uses the Rule of Thirds concept. Want to see what I came up with? I’d like to introduce you to today’s card.

Thanks Stars Strips card by Teri

If you look close, you can see how it breaks up into the nine parts. And then you could divide it even further.

To give those green and blue rectangles a little bit of pop, I stamped the pattern on them with the Myriad Dot Background stamp. And then to make the stars stand out, I added sequins cut with the Sequins Die-namics on top of each one. I went with all orange cardstock to cut the sequins out. I felt the card just needed some uniformity with the “thanks” word.

Thanks Stars Strips card by Teri

So that’s what I have for you today. You’ll find a list below of all the MFT products I used to make my card.

And be sure to stop by the MFT Blog to see who else from the MFT Creative Team is playing along today.

MFT: New Product Launch

Hooray! It’s time! It’s time! The new release from My Favorite Things is now live.

New Product Launch

Go! See! But come back, k? 😉

Got a couple things to share with you that I created with the new stuff. All of these projects use the new Tiny Stars Background stamp in some way. And they use other stuff. Lots of other stuff too.

Please meet Card #1.

Amazing Butterfly card by Teri


I wanted to do something different with Tiny Stars for this one so I created a patterned paper. And then I also stamped the Tiny Stars Background pattern onto the smaller butterfly (cut with the Flutter of Butterflies – Solid Die-namics).
I also wanted my butterfly to even more different so I stacked up a couple butterflies. A trick for you who try it at home: Go with a dark body for the center! It’s hard to tell unless you look really, really, really close, but I stacked a couple different size bodies up to cover the middle of up the butterfly.
Amazing Butterfly card by Teri
And meet Card #2.
Whole Night Sky card by Teri
I just can’t put down that Abstract Cover-Up Die-namics die. It’s so cool. I die-cut it a couple times from different colors of cardstock and then stamped the Tiny Stars pattern onto some of the pieces.
Whole Night Sky card by Teri
Oh, and the words? They are from the new Count the Stars stamp set. The phrase is one of my favorites from the stamp set. Just plain love it.
Finally, meet Card #2.
Shining Star card by Teri
There’s a lot of Tiny Stars action on this. From the background paper to the squares, I just went to town adding a lot of stars to the card.
To make the sentiment and stamped stars stand out, I added a little color with a yellow pencil.
Shining Star card by Teri
Alright, so that is all I have for you today. I appreciate all of you stopping by. And I hope you like the cards!
Be sure to stop by the MFT Stamps blog to see who else from the design team is sharing today.
And look below for a list of MFT products I used on my cards.
SupplyListBar

MFT Countdown: 1

Hi all!

The debut of the new release from My Favorite Things is so, so close! YAY!

NewReleaseCountdown_Day1

I’ve got a couple more things made with the new stuff to share with you today.

Please say hello to today’s card.

Butterfly Trio card by Teri

Just had a good time here, die-cutting the butterflies with the new Flutter of Butterflies – Lace Die-namics and then adding some color.

I created the background paper with the new Roses All Over Background stamp. Just love it!

Butterfly Trio card by Teri

I can’t wait to use the Roses All Over Background stamp some more. I envision heat embossing it and then doing a little resist with it. It’s such a pretty pattern.

And please say hello to today’s not-a-card project! (Hee hee!)

Butterfly Tag by Teri

I abide by the “leave no butterfly behind” philosophy! I was just messing around with the Flutter of Butterflies – Lace and Flutter of Butterflies – Solid Die-namics and came up with this little butterfly.

For You Butterfly Tag by Teri

Look really close and you’ll see there’s a solid white butterfly body behind those lace butterfly wings. And to color the lace butterfly’s wings, I sponged on a little yellow color and then sponged on some orange color. If you try this at home, always start with the lightest color first and then add the darker colors. It helps with the blending!

So with that, today’s post is a wrap.

Be sure to hit the MFT Stamps blog to see who else is playing today. There’s good stuff to be found, I am sure. 😉

And check out the list below to see what supplies I used on these cards. Remember, all new products will link once the release is live (10 p.m. EST on 6/2/15).

SupplyListBar