Go-to Gal Designer Challenge: Hazel & Ruby

Hi all!

It’s time for another challenge with the Go-to Gals. We challenged each other this time to make something with products from Hazel & Ruby.
What’s the deal with these challenges? Well, every so often we challenge each  to make something (just for the fun of it) with a specific manufacturer’s products. Sometimes, we all play. Sometimes, we all don’t. That’s OK because it’s all about having fun.

Ok. So here’s what I got.

Meet #1.

g2g_hr_thinking1_teri


I created two of the circles by simply punching some of Hazel & Ruby’s wrapping paper with a circle punch. The other ones were created with some of Hazel & Ruby’s Washi tape. I just applied it to cardstock and then cut it out with a punch.

g2g_hr_thinking2_teri

And meet #2.

g2g_hr_thankyou1_teri

I used some of the same supplies to make this one. I also threw on a couple sequins (also from Hazel & Ruby).

g2g_hr_thankyou2_teri

So that’s what I have.

Can’t wait to see what the rest of the crew cooked up.

Be back again later!

Today’s card

Hi again!

Just playing today. Decided to try My Favorite Things’ weekly sketch challenge again. You’ll find this week’s (MFTWSC186) right here.

So here’s the card I made.

mftwsc186_birthday_teri

I shifted things over a little from the sketch, moving the circle and square a little more to the right than the center of the card. I kinda dig that off-kilter look.

mftwsc186_birthday3_teri

I used MFT’s Washi Patterns set to stamp a few random designs on the circle and one of the little flags (both from the Blueprints 16 Die-namics set).

And I went super crazy on die-cutting for this card and cut way too many elements so I decorated up the inside, too.  😉 Here’s what the inside looks like.

mftwsc186_birthday2_teri

That’s about it.

But here are all the MFT supplies I used to make this card:

So that’s what I have for today. Be back later, gators! Thanks, as always, for stopping by.

Today’s card

Hi again all!

Just another day… with just another card.

I was inspired again by My Favorite Things and one of their sketches, specifically this one (MFTWSC185).

mftwsc185_happy2_teri

I followed the sketch pretty close here, other than shifting things over a bit and using the Pinking Edge Circles STAX to cut my circle.

Other supplies I used and how:

* The Tag Builder Blueprints 1 Die-namics to cut the little stars.

* The Happy Die-namics dies to cut the word. And the Happy Everything stamp set to stamp “birthday” underneath it.

* The Confetti Background stamp to stamp the dots on the hot pink strip.

mftwsc185_happy1_teri

Nothing really super duper complicated with this one. But it was sure fun to make!

So that’s what I have for you.

Oh, by the way, I had a guest designer post over on Imaginisce’s blog the other day. That was sure fun! (Thanks, Cari, for inviting me to play and put together a couple cards.)

Here’s a peek at one of the cards I put together for them. You’ll find more cards (and the whole picture of this one) over there.

GoodTimesFrameClose_teri


Be back again soon, y’all!

Today’s card

Hi all!

I’m a little late in getting in on last week’s Weekly Card Sketch from My Favorite Things (MFTWCS184 ), but I had a little time before bed last night and was  in the mood to play.  So here what I made. 🙂

mftsketch_mftwsc184_hello1_teri

There was mostly just die-cutting involved here:

* I cut the flag with the Pierced Fishtail Flags STAX Die-namics.

* I cut the “hello” saying with the Happy Hellos Die-namics.

* And the circle and star were cut with a couple dies from the Blueprints 16 Die-namics.

mftsketch_mftwsc184_hello2_teri

I did squeeze in a little bit of stamping  by stamping the background with MFT’s Romantic Script stamp. Always love that tone on tone look so I used really, really dark pink ink to stamp it on the pink cardstock.

Speaking of challenges, I think I am going to enter this guy in the Moxie Fab World Wonderful Words challenge, too. It’s all about word dies, and since I used one, I think I will link it up. 🙂

Well, I think that is all I have for now. Be back later, friends! Thanks for stopping by.

MFT: July Release Rewind

Hi guys!

Well, I’m back. Back with a few more projects made with the July release from My Favorite Things.

Print

On your mark. Get set. (Insert dramatic pause.) Go!

This is No. 1.

rw11_goodhappy1_teri

A whole lotta fun mixing and matching here. Because… yeah… I dig that. 😉

I created my orange background paper by stamping on the cardstock with the Confetti Background stamp. I even stamped the balloons (which I cut with the Balloon STAX Die-namics). The stamp I used was the Diagonal Stripes Background. In the chaos of desk, sometime during the last couple days, I misplaced my ball of  twine so I created string for the balloons by just cutting a really, really, really thin piece of cardstock.

rw11_goodhappy2_teri

I think it looks pretty close to the real deal! Plus, it’s nice to have a card that is super flat and mailable.

This is Project No. 2.

rw11_happybirthdaycake1_teri

Yep. Another card. 😉

I went crazy with those background stamps again.  This time, I stamped on the yellow paper with the Diagonal Striped Background stamp. And then I made another paper with the Confetti Background stamp for the cake.

One extra fun thing about this card is how I did the “happy” words. I inked up the word (from the Happy Everything stamp set). I stamped it once and then stamped it one more time without reinking. Look really, really really close and you’ll see it.

rw11_happybirthdaycake2_teri

Can you handle another project? Sure hope so because here is Project No. 3.

rw11_happybirthdayballoons_teri

Whew!

I played this one pretty simple by making my own background paper with the Confetti Background stamp yet again. Yep. I might be an addict. 😉

I cut those those balloons with the Balloon STAX Die-namics, and then used the Happy Die-namics dies with the Happy Everything stamp set to create the sentiment.

Ok, we’re hitting the home stretch. Here’s one final project to share with you. This is No. 4.

rw11_happyeverything1_teri

Surprise, surprise. My old friends – the Pierced Fishtail Flags Stax – returned for this one. (Wink!) Love those dies!

I sorta kinda love the look of the happy word. All I did was die-cut it three times and adhere it the words (off-setting them as I went) to the flag.

rw11_happyeverything2_teri

Ok. There you have it! That’s a wrap.

By the way, here’s a list of all the My Favorite Things supplies I used on these cards:

Be sure to hit the MFT Blog to see what other design team members are sharing projects today and to see who shared yesterday, too.

And thanks again for stopping by, guys! See you again super soon!

Go-to Gal Designer Challenge: Fancy Pants

Hi all!

It’s challenge time yet again with the Go-to Gals.

This time, we challenged each other to make something with some (super duper) fine products from Fancy Pants Designs. We had the opportunity to visit Fancy Pants HQ during our Editorial Board meeting this year. Jodi was so nice, showing off some of their new releases and letting us make a card, giving us the full-tour of Fancy Pants Designs and letting us run a bit wild in the warehouse. 😉 There might have been crazy smiles involved… and giddiness. Lots of giddiness.

Enter Exhibit A (aka: Proof).

10154533_10152437295983487_5158966673710873022_n


Aptly captioned after that fun time: “We got Fancy. Thank you, Fancy Pants. ”

(Yes, thank you, Fancy Pants!)

So I’ve got two projects to share with you. Both were made with lots and lots of Fancy Pants Designs goodness.

This is No. 1.

Fancy_ThankYouCard1_teri

fancy_thankyou2_teri

And this is No. 2. This is just a little gift sack. 😉

fancy_bowsbag1_teri

fancy_bowsbag2_teri


Can’t wait to see what the rest of the Go-to Gals have cooked up:

Be back again later, gators!

Thanks for stopping by.

MFT: July Product Launch

And we have lift-off.  🙂

My Favorite Things’ July release is now available.

And I’ve got a couple more projects made with the new release to share with you.

This is No. 1.

julylaunch_happygrid1_teri

I whipped out the Square Grid Cover-up Die-namics once again for this guy. How did I get the one section to be white? Well, I die-cut the grid pattern and then I used my scissors to snip away some of the lines. Then I just placed a piece of white cardstock in the open area.

I once again made my own patterned paper. This time I used the Diagonal Stripes Background stamp to stamp on the pink cardstock panel.

The words and tag were created with the Happy Die-namics and Tag Talk Die-namics. Again, I used the Happy Birthday Background stamp to stamp the text onto the tag. Love seeing text on black cardstock.

julylaunch_happygrid2_teri

And meet #2.

julylaunch_mft_happyhappy_teri

At this point, you are probably not surprised to see that I once again used the Square Grid Cover-Up yet again. 😉 This time, I die-cut it out and then used my paper trimmer to snip off 1/3 of it. Then I refilled some of the open spaces with squares.

I used a lot of other new MFT supplies here:

* Confetti Background (to stamp the dots on the small circle)

* Diagonal Stripes Background (to stamp the stripes on the orange circle)

* Pinking Edge Circle STAX Die-namics (to cut the circles)

* Happy Birthday Background stamp (to stamp the text on the tag)

* Tag Talk Die-namics (to cut the tag)

* Bring on the Cake Die-namics (to cut the candle)

* Happy Everything (to stamp the words at the bottom of the card)

* Office Supplies Die-namics (to cut the paper clip)

julylaunch_mft_happyhappy2_teri

Even though I used a lot of stuff, I think it turned out pretty fun!

Alright, once again, hit the MFT Blog to see what other design team members are sharing projects today.  And thanks, guys, for making this last week super fun! I appreciate all your kind words.

MFT Countdown: 1

A big hello to my crafty peeps!

So here we are again. Got a few more projects to share with you that I made with July’s release from My Favorite Things. (By the way, the new release lands on the MFT site at 10 p.m. EST on July 8th.)

NewReleaseCountdown_Day1

So give it up for project #1.

78_mft_totallyhappy1_teri

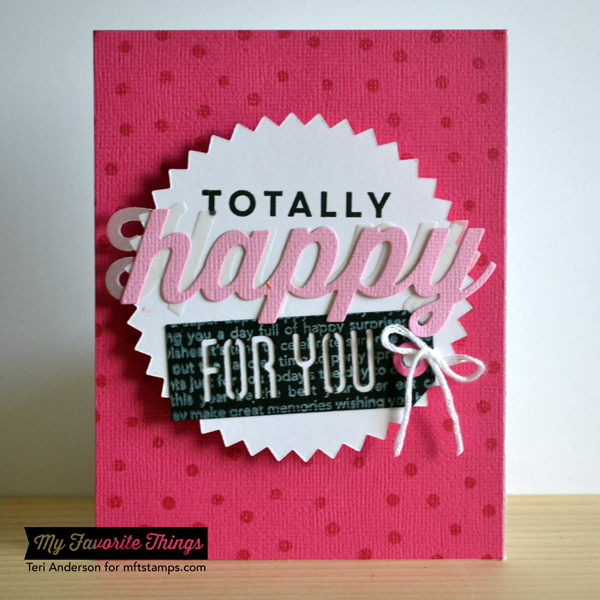
This was pretty fun to make. It looks all simple, but there was a lot of steps involved.

I stamped the pink background paper with MFT’s new Confetti Background stamp. I’m pretty much a fan of anything circle’ish of polka dot’ish so this bad boy had my name all over it! 🙂

Believe it or not, there’s actually two happy words on them. I cut one (that comes as an uppercase Happy) with vellum and then cut a second (using the lowercase happy) from pink cardstock. Both dies are from the new Happy Die-namics set. Great dies! The “totally” stamped word is from the Happy Everything stamp set, which works wonderfully with the dies (or without).

Oh, and that little tag? That’s a new design from MFT too. It’s from the new Tag Talk Die-namics. (By the way, I stamped the words onto that piece of paper with the Happy Birthday Background stamp set.)

78_mft_totallyhappy2_teri

And meet project #2.

78_mft_hb2utag_teri

I had some paper leftover from the tag on the first card so I was like, “You know, I gotta use it! I can’t let that go to waste.” Anybody relate to that?

So I created another tag using the Tag Talk Die-namics. I also used the stars and dotted circle from the Tag Builder Blueprints1 set.

Again, I made my own background paper with the help of the Confetti Background stamp.

78_mft_hb2utag2_teri

Oh, and you might be wondering about that little clip at the top of the card? I cut that bad boy with a die from the Office Supplies Die-namics set that came out in June. Such a practical set.  I have found myself pulling it out a lot.

The products from MFT that I used to make these cards were:

* Confetti Background stamp (available at 10 p.m. EST on 7/8)

* Tag Talk Die-namics (available at 10 p.m. EST on 7/8)

* Happy Die-namics (available at 10 p.m. EST on 7/8)

* Happy Everything stamp set (available at 10 p.m. EST on 7/8)

* Happy Birthday Background stamp (available at 10 p.m. EST on 7/8)

* Tag Builder Blueprints 1 Die-namics (available at 10 p.m. EST on 7/8)

* Pinking Edge Circle STAX Die-namics (available at 10 p.m. EST on 7/8)

* Office Supplies Die-namics

And once again, be sure to hit the MFT Blog to see what the other MFT design team members have put together with July’s release. They’ve tearing it up, making some way cool stuff!

MFT Countdown: 2

Hi friends!

We meet yet again! (Gosh patootin’ yeah!)

NewReleaseCountdown_Day2

So I’ve got another project to share with you. And once again, this bad boy uses some new products from My Favorite Things’ July release. Can you handle it? I hope so. 😉

july7_makeawish1_teri

I went kinda crazy here, using a whole bunch of products from MFT’s July release. (By the way, the release lands at MFT on July 8th.)

So let’s keep it simple and give it to you in list form today:

* Confetti Background Stamp (to stamp on the circle)

* Pinking Edge Circle STAX Die-namics (to cut the circle)

* Bring on the Cake Die-namics (to create the cake)

* Delicious Birthday stamp set (to the stamp the sentiment)

* Happy Birthday Background stamp (to stamp the text on the black paper)

Whew. That was a lot stuff, but GOSH… I had fun!

july7_makeawish2_teri

So that is what I have today. Be sure to hit the MFT blog to see who else from the DT is sharing projects today.

And thanks for stopping by, guys! You are the best!


MFT Countdown: 3

Hey all!

So we meet again. Got a couple more projects to share with you that I’ve made with some of My Favorite Things’ July release.

NewReleaseCountdown_Day3

And here we go. Meet #1.

76_mft_pinkingshout_teri

So this was a fun card to make! I whipped out the new Happy Birthday Background stamp (available July 8th) to stamp the words on the black cardstock. The circles? Cut them with a new MFT product too! I used the new Pinking Edge Circle STAX to cut each of them.

And what about that striped pattern? Well, my friends, that is where things get super exciting. I stamped them with the brand new Diagonal Stripes Background (also available on July 8th).

So check this out. The stamp comes with all these diagonal stripes. So, me being me, I gotta mix things up so I set the circle on it and stamped the stripes. It went kinda like this.

76_mft_2

Well, that’s all super cool but I want my stripes to look more not-diagonal’ish so I turn the circle around… and ta-da!

76_mft_3

Gotta say that this stamp hasn’t seen the last of this girl. 🙂 I can tell you that.

And how about another project?

Meet #2.

76_mft_pinkingbirthday_teri

Again, I used the Diagonal Stripes Background and the Pinking Edge Circle STAX dies. I also pulled out the new Celebrate You stamp set (for the sentiment) and the Square Grid Cover-Up die. (Oh, and I fashioned that bow with a couple dies from the Blueprints 17 Die-namics.)

Going back to that Square Grid Cover-Up die. I cut the die and then snipped off one row to make it a square.

76_mft_1

I thought it looked pretty good on the card.

76_mft_pinkingbirthday2_teri

Here are all the MFT products I used on these two cards:

* Pinking Edge Circle Stax Die-namics (available July 8th)

* Diagonal Stripes Background stamp (available July 8th)

* Happy Birthday Background stamp (available July 8th)

* Blueprints 17 Die-namics (available July 8th)

* Square Grid Cover-up Die-namics (available July 8th)

* Celebrate You stamp set (available July 8th)

* Fishtail Flags Layers Stax Die-namics

By the way, to  see more projects made with the July release, be sure to hit the My Favorite Things blog. You’ll find links to all the MFT designers who are sharing projects today.