MFT Countdown: 3

Hi guys!

Another day. Another day closer to the November release from My Favorite Things. Another day with a new projects from me that were made with the new stuff.

NewReleaseCountdown_Day3

Let’s do this. Meet card #1.

Warm Wishes by Teri

I always dig the coverplate Die-namics from My Favorite Things. I mean, you get a whole background design. Add a little to it and you’ve got a card. Bam. Bam. Boom!

I used a brand new one for this card, the Chunky Chevron Cover-Up. I actually cut it out twice from cardstock so I’d have some extra inner pieces to work with.

Look close and you’ll see I threw caution to the wind and stacked a few of the pieces up on top of each other. I like that it just gives the card a little extra pop.

I also added a few sequins and stars, which were cut with the new Stitched Star STAX Die-namics. One can never really go wrong with stars, if you ask me.

Warm Wishes by Teri

I had a few inner pieces and stars left over so I added this little design to the back of my card. The words are from the Let’s Get Cozy stamp set, which I also used to stamp the sentiment.

Warm Wishes back of card by Teri

And meet Card #2.

Hello Chevron by Teri

I know, this card looks all simple. It took a quite a few steps to pull it off though.

I cut two panels with the Chunky Chevron Cover-Up. I adhered one onto cardstock and then I set the dies from the Basic Stitch Lines Die-namics on top to add the stitched patterns. It looked like this. (Ok, so, word of the warning: This is a legit process photo. No fake staging here so you get not the best color.)

Chevron card step 1 by Teri

After I added stitch lines down all the rows, I set that second Chunky Chevron panel on top, slightly off-setting it an trimmed away the excess. (Again, legit photo ahead. No judging, please… wink!)

Chunky Chevron card step 2 by Teri

I adhered everything to the card and then had my wicked way embellishing the card up… all fancy like. 4

Hello Chevron by Teri

I think it turned out pretty good.

For a complete list of products I used to make these cards, check out the list below. Be warned: The links to the new, new, new stuff will work once the release made live at 10 p.m. EST on Tuesday, Nov. 3rd. Yeah. I know. Big sigh. 😉

And to see more projects made with the new stuff, hit the MFT Blog. The MFT team has been making lots of rocking stuff. (Trust me. I’m a peeker. ;))

SupplyListBar

http://static.inlinkz.com/ppr.jsThanks again for stopping by today, guys!


MFT Countdown: 4

Hello, hello!

We meet again, friends! You better believe I’ve got a couple more projects to share with you! These projects were made with the November release from My Favorite Things, which will be available for purchase on Nov. 3rd. (Woohoo!)

NewReleaseCountdown_Day4

So, yeah. Let’s get on with the show.

Please give it up for Card #1.

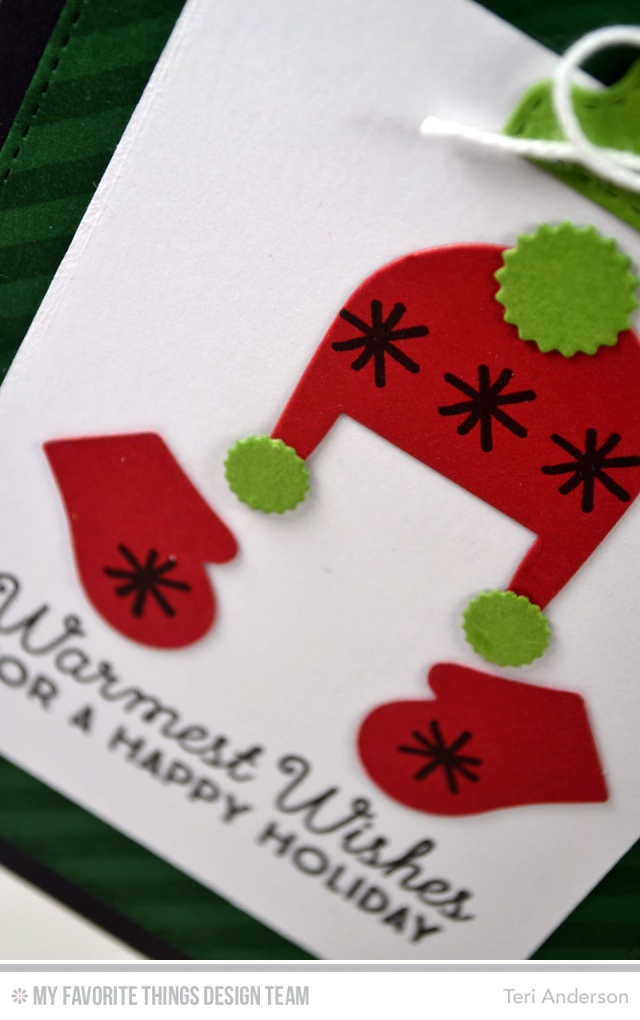
Warmest Hat by Teri

And the crowd goes wild… wink!

See those hats and mittens? Made those bad boys with the new Warm & Fuzzy Die-namics. Such cute dies. If you are old school (and I can be kinda old school), they have this fun paper piecing vibe about them. They are totally fun to play with.

For giggles, I stamped the pattern onto them with the new Winter Warmth stamp set. I felt like they just needed to be a little unique, and the snowflake did the trick.

Warmest Hat by Teri

By the way, I also stamped that green background paper. I did it with the new Bold Diagonal Stripes Background stamp. Let’s cut to the chase, friends. I am pretty sure I will be using this stamp… ALL THE TIME. I love it!

And meet Card #2.

The last card was graphic. This guy is cute… all cute!

Christmoose by Teri

That moose. That sweet moose. He has my heart.

He is from the new Merry Christmoose stamp set. It’s a fun one.

Christmoose by Teri

I went kinda old school again with the coloring here. I stamped and then colored with my color pencils. And then I used odorless mineral spirits to blend the color.

And to give the moose some extra dimension, I adhered him to my card with foam tape. Tape is such a little thing, but it really does add a lot.

So that’s what I have for you today. Be sure to hit the MFT Stamps blog for some links to some killer projects made by other members of the design team with the new release. You. Will. Not. Be. Sad. (<—- Just sayin‘!)

And for links to the products I used to make these projects, check out the list below. And a word to the wise: The links to the super cool, really new products won’t work quite yet. But they will! They will work when the release is made live at 10 p.m. EST on Nov. 3rd.

SupplyListBar

Thanks for stopping by today, friends! It’s always a treat when you do.

Winner, winner of the Holiday II Essentials by Ellen Hop

Quick. This just in.

There’s a winner from this blog, my blog, in the Holiday II Essentials by Ellen Blog Hop!

That would be Cindy S at 8:37 pm on October 20th “Such cute cards. Thanks…”

Cindy, swing by this post on the CLASSroom for the scoop on how to claim your prize.

And a huge thank you to ALL of you who swung by over the last week! I sure appreciate your kind words.

If you didn’t catch the hop, stop by this post for links to everyone who took part. Lots of inspiring cards and techniques were shared!

MFT Countdown: 5

Hello, hello!

It’s time to start counting down to another release from My Favorite Things! Hip, hip hooray!

NewReleaseCountdown_Day5

It’s a good one, you guys! And, man, I am fired up to share with you some projects made with the new stuff over the next couple days.

So let’s this countdown party started!

Meet card #1.

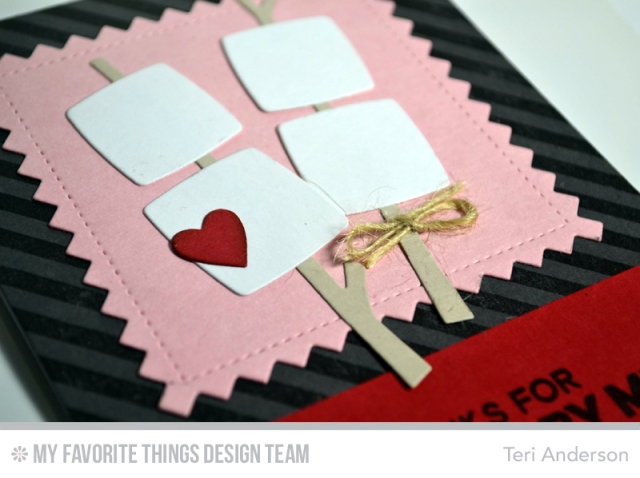
Like a Marshmallow by Teri

One of the new products from November release that I really dig are the new Toasted Marshmallows Die-namics dies. They are just fun! Add to it, the new Get Toasty stamp set (that has all kinds of marshmallow-inspired phrases) and you’ve got a fun combination.

So, for this first card, I wanted the marshmallows to really pop so I cut them out of a piece of white craft foam. The cool thing about foam is it gives that whole marshmallow-like look when cut. To make them look like they came right from the fire, I sponged on a little Black Licorice ink onto them.

Like a Marshmallow by Teri

I though the “Like a Marshmallow” phrase was a fun one to use on this card. To keep with that love theme, I did cut a couple hearts with the Mason Jar Die-namics and add them to the marshmallows. I was going for more cute symbolism than realism. I think it works!v 😉

And meet card #2.

Sticking by Me by Teri

I followed a somewhat similar design to the first card, although I went with flat marshmallows. I cut them this time from plain old cardstock. And I didn’t add any flames.

To give my marshmallows a more personalized touch though, I added a heart and a some twine. Little details like that also help to bump up the cute factor.

Sticking by Me by Teri

Alright! So that’s what I have for you today!

For a complete list of supplies I used to make these cards, check out the list below. (Fair warning: Links to the new products will work once the new release is made live on Nov. 3rd at 10 p.m. EST.)

And be sure to swing by the MFT Stamps blog to see projects form the rest of the design team.

SupplyListBar

http://static.inlinkz.com/ppr.js

Paper Smooches Design Team Blog Hop

Hello friends!

It’s Pep Rally week once again in the Paper Smooches World, and the design team is here today to share a sampling of the NEW Paper Smooches NOVEMBER release with you!  TWO new stamps and TEN new dies will be available to purchase on October 31st at 8:00pm pacific time. Once our release goes live, you will find our new products HERE.  

To add extra fun to our blog hop…we are offering up a prize! 

The prize – a $25 gift code to choose what you like at the PS online store.

Here are the details:

  • FOUR winners will be chosen at RANDOM from any of the design team blogs and the PS Blog to win the $25. prize.
  • Just leave a comment on any of the design team blogs listed below or the PS blog for your chance to win!  (you do not need to comment on all blogs to qualify but it increases your changes)
  • Deadline: You have until midnight PT on Sunday, November 1st to leave a comment.
  • Please check the Paper Smooches blog on Monday, November 2nd to see if you are one of the FOUR lucky winners.
  • Alice Wertz

To increase your chances of winning:

  • Tell us that you Facebooked about our blog hop
  • Tell us that you Tweeted about our hop
  • Tell us that you posted on your blog about our blog hop

(which… hot dog…  means that you have up to three extra chances to win on each blog!)

So enough hop talk. Let’s get on with the card. Sound good? 😉

Missing You by Teri

I used the brand new Sweet Escape stamp st to make this little scene. I also used the new Sweet Escape Icons dies, which coordinate with the stamp set.

It was a fairly straight forward card to make with a little stamping and a little scene making…. and being done. Actually, that is the beauty of the new Sweet Escape set. If you are a fan of making scenes, this stamp set is for you. It’s got three cute little scenes and a few elements to add. Stamp, die-cut and… bam… you’re done. It’s that easy.

Missing You by Teri

The set has a few different sentiments that work with all the scenes pretty well.

Alright! So that’s what I have. I’ll be back again later, gators. Thanks, as always, for stopping by!


Holiday II Essentials by Ellen Blog Hop!

unnamed (5)
Hello all! A big hearty welcome to the Holiday II Essentials by Ellen Release Hop! If you have been taking part in the hop, you should have arrived from the blog of sweet Sandy Allnock. If you are just stumbling onto this post, welcome!
I’ll be showcasing several of the new stamp sets and dies on my post today!
And, yay!!! I also get to give away an Essentials by Ellen stamp set!  The winner may chose ANY  Essentials by Ellen brand stamp set (maximum value $15) currently in stock at Ellen Hutson.com  To enter my giveaway, please leave a comment on today’s post with a valid email address by October 27th!
There is also a crazy good Grand Giveaway in the CLASSroom!  To enter, be sure to leave a comment there, also by October 27th, with a valid email address; winners will be announced at the CLASSroom on Friday, October 30th!
Alright, so let me show you what I’ve got!
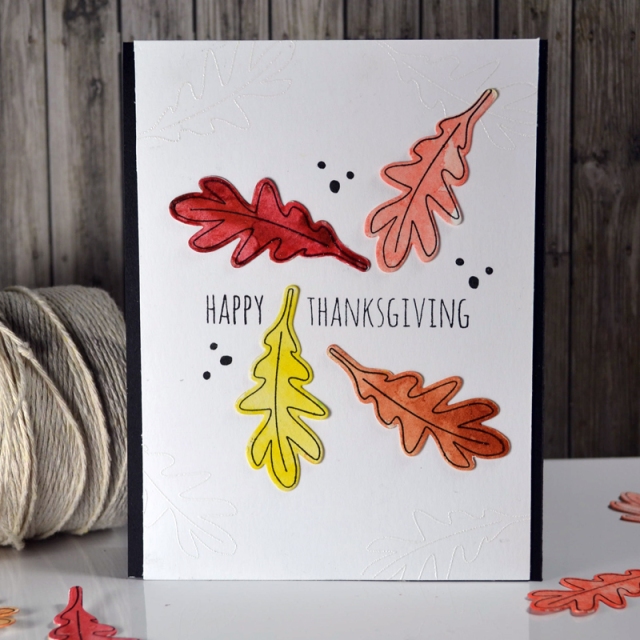
First up is this snazzy number, using the new Autumn Acorns dies with the Autumn Acorns stamp set.
Happy Thanksgiving card by Teri
I kinda went crazy making the leaves. I die-cut the leaves from watercolor paper, applied watercolors to them and let them dry slightly. Then spritzed them with water to give them a molted look. I let them finish drying and then stamped on top.
If you look on the card closely, you’ll see I also stamped the leaf a couple times and embossed it onto my background.
Happy Thanksgiving card by Teri
The dots are actually some dots stamps that are included with the Autumn Acorns stamp set. I just thought they just made a nice accent for the card so I stamped them a couple times. 😉
I created so many leaves as I made that first card that I made a bonus project to share with you today. I made this little wreath to share with you. I think it would be fun to decorate a kid’s room with or even use as a place setting decoration on a Thanksgiving table.
Happy Thanksgiving Wreath by Teri
To keep the leaves on the wreath (and from falling off), I used hot glue. 😉
And here’s one more card to share with you today.
Santa's Flight card by Teri
I created this little scene with the new Santa’s Flight stamp set + the new Tis the Season dies (and coordinating Tis the Season stamp set).
I always get really excited when you can mix different products together.  When I saw the Santa in the Santa’s Flight, I thought how perfect it would be to create a little scene with.
Alright! So that’s what I have for you!
The next stop on the hop is the blog of the wonderfully kind, Laurel Beard! Take it away, Laurel!
And if you get lost during the hop, please visit the CLASSroom blog for a complete list of all the designers taking part in today’s fun!
Happy blog hopping! And thank you so much for stopping by today!

MFT Creative Challenge: Christmas Countdown

Hi everyone!

It’s time for another challenge with the My Favorite Things Design Team.

Creative Challenge

Our challenge this time? To make come up with some kind of way to count down to Christmas!

I don’t really have anywhere on my walls to add a big piece of home decor so I challenged myself to go small and make an advent calendar that could blend in somewhat with other holiday decor. My solution? To make an advent calendar tag book that could be hung on the Christmas tree!

Check it.

Advent Calendar book by Teri

The book was fairly easy to put together, once I decided what it was going to be.

Each page is actually a tag cut with the Tag Builder 2 Blueprints Die-namics. They are all bound together with a little ball chain hanger. A binding ring would have done the trick too.

Advent Calendar book by Teri

Each page looks a little different. Some of them I cut into with the Tag Builder dies. And some I decorated with the Lucky Stars Die-namics and sequins.

Advent Calendar book by Teri Advent Calendar book by Teri Advent Calendar book by Teri

I used the Bottlecap Numbers to cut a number to add to each page to help with my countdown efforts.

I left the pages blank on the backside for my little countdown book, but I think it would be fun to write on them. Imagine writing Christmas memories or activity prompts, like “wrap presents”, “visit Santa” or “bake cookies.”

Like I said, I made this so it could be hung on a tree. Here’s a little peek at how it looks on a tree. 🙂

Advent Calendar book by Teri

But being so small, it could easily be added to the wall and hung with a hung onto a nail or pushpin.

Want more countdown ideas? Hit the MFT Blog for links to the other MFT designers who completed this challenge.

For clickable links to the supplies I used to make my advent calendar, check out the list below.SupplyListBar

MFT: Handmade Tag Extravaganza

Hi all!

Have you swung by the My Favorite Things Facebook Page and Instagram profile this week? They are having a handcrafted holiday celebration of sorts. Lots of opportunities to share your holiday thoughts and win some MFT goods!

Today, the celebration is stopping by the MFT Blog with MFT designers sharing all kinds of holiday tags.  Holiday tags are fun to make (and useful) so I couldn’t resist getting in on the challenge. 🙂

Meet tag #1.

Holiday Cheer Tag by Teri

And meet tag #2.

Merry Christmas Snowman Tag by Teri

I created both of these tags with the Tag Builder 4 Blueprints Die-namics and Winter Wonderland stamp set (and coordinating Die-namics) + a couple other MFT products.

Each tag follows the same formula with a circle cut out of each tag and replaced with an inner circle to showcase a little winter scene.

The tags felt like they needed just a little something special so I added the combination of sequins (some pre-made and some die-cut) to them. In a way (and not super literal way), they kind of remind me of snow and ice.

Stop by the MFT Blog to find links to all the other My Favorite Things Creative Team members who are sharing tags today.

And for clickable links to the products I used to make today’s tags, check out the list below.

SupplyListBar

http://static.inlinkz.com/ppr.js

Creative Construction with Blueprints: Homespun Holidays

Hi guys!

Hooray! It’s challenge time once again with the My Favorite Things Design Team.

MFT_CreativeConstruction_SideBar

Our challenge this time?

“There are few things more inviting during the hectic holiday season than cozying up under a well-worn quilt with a warm cup and inviting book. Join us this month as we recreate that comfortable feeling in paper form with the homespun elements included in Blueprints 20.”

And so I did just that. 😉 I created a holiday card with Blueprints 20.

Meet today’s card.

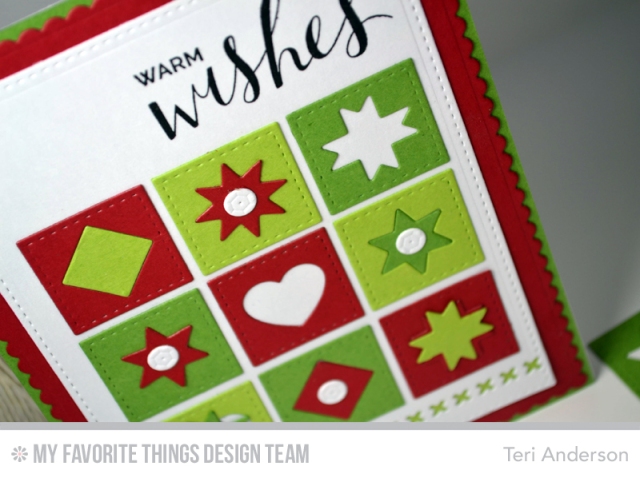
Warm Wishes Quilt by Teri

I went deep on the holiday theme, going with a lot of green and red. I’ve been doing so many non-traditional colors for holiday cards that it made for a nice challenge.

The design of my card was greatly inspired by one of the free sketches for this set of Blueprints. The original sketch was horizontal and only included a couple blocks. I flipped the sketch and I went hogwild and opted for a bunch more blocks.

Warm Wishes Quilt close by Teri

I also did some different layering with the quilt blocks, purposely setting the wrong shape on the bottom left one and stacking up two shapes in the bottom right one. I think it made things a bit more visually interesting.

So there you have it! To see who else from the MFT Design Team took on today’s challenge, hit the MFT Blog.

And for a complete, clickable list of products I used to make this card, check out the list below.

SupplyListBar

Clean + Simple Christmas Challenge

Hi guys!

I’m back with a quick card to share with you. I was inspired by the Clean + Simple Christmas Challenge this last week on the Simon Says Stamp! Challenge Blog to make this little card just for the fun of it.

Merry Christmas Greetings by Teri

I used mostly older products from Simon Says Stamp! (Christmas Trees and Holiday Frames dies & Handwritten Sentiments and Holiday Layered Trees stamp sets). Plus, I used some paper from the old DIY Christmas collection from Simple Stories + some pretty sequins from Pretty Pink Posh.

It’s a pretty straight forward card. Die-cut a frame. Add a tree + cardstock. Pop on a star. Do a little stamping. Be liberal with sequins.  Add patterned paper. You get the idea. 😉 Just felt good to have a little fun.

Alright! Over and out. I’ll be back later, gators.