MFT Countdown: 5

Hi everyone!

Hooray! The countdown to another awesome product release from My Favorite Things kicks off today. (Because it needs to be said, “Woo to the hoo! Yeahhhh!”)

NewReleaseCountdown_Day5

And I’ve got a card to share with you today that I made with some of the new stuff that will go on sale on May 5th.

So meet today’s card!

Bow Ties are Cool

Just had some fun here, mixing together a bunch of the new products.

I cut the bottom base, the little flags and the dots with the new Blueprints 25 Die-namics. And then cut those rectangles with the Cross Stitch Rectangle STAX Die-namics. Love the STAX Die-namics for layering.

Bow Ties are Cool

And those ties? Oh my gosh. So fun! I die-cut two bases with the Terrific Ties Die-namics and then stamped the patterns on top with the coordinating Terrific Ties stamp set. I considered plopping them on toothpicks so they’d look like a photo prop, but I resisted, desiring to keep the card a little more masculine.

I did however adhere them to my card with foam adhesive. I really love the extra dimension the foam gives elements.

Want to see more cool things made with May’s new products? Hit the MFT Stamps blog.

SupplyListBar

MFT: April Ingenious Inking Challenge

Hi everyone!

I’m joining up with the My Favorite Things Design Team today in sharing the results of this month’s Ingenious Inking challenge.

MFT_IngeniousInking_SideBar

We were challenged this month to layer color on color with any technique at our disposal! Talk about a wide open challenge!

I decided to go with some masking (and resisting) and whipped up two cards to share with you.

Meet card #1.

Hello Circles by Teri

Hello Circles by Teri

And meet #2.

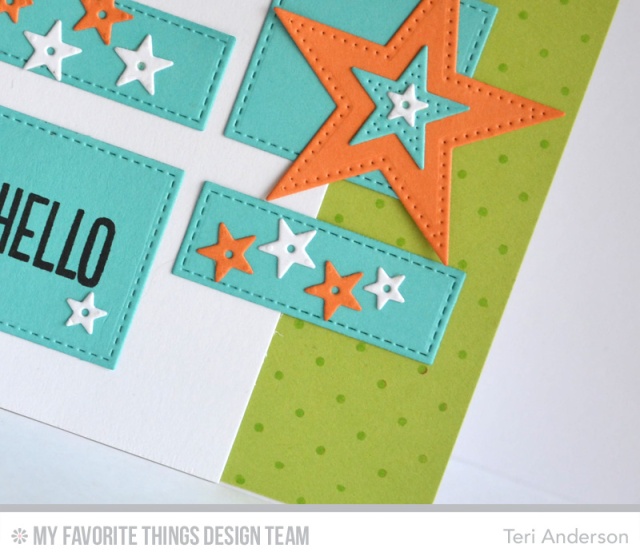
Hello Star by Teri

Hello Star by Teri

For both of these cards, I heat embossed the Simply Circles Background Stamp pattern onto white cardstock with white embossing powder. I used sticky notes to mask off part of the pattern and then sponge different ink colors over the pattern. I’m guessing I used no less than 10 sticky notes per card to do the masking to create the stripes. It was time consuming, but I think the results are pretty darn cool.

For the second card, I lived on the edge, die-cutting a star with the Pierced Star STAX Die-namics out of one of my ink up papers. I really like how it turned out.

So that’s what I’ve got. Here’s a list of MFT products I used to make my cards:

Be sure to visit the MFT Stamps blog to see who else from the design team is sharing projects today. On, and be sure to check out Monday’s post. Our team has grown! 😉 Hooray!

Simon Says Stamp! Falling For You Blog Hop

fallingforyouhop

Hello all!

Super stoked to be joining some of my most favorite’st crafty folks in celebrating the “Falling for You” release from Simon Says Stamp! with a fun mega blog hop today. You should have arrived here from the blog of  my girl, Amy Rysavy.  (You’ll find the next stop at the end of my post.)

So I’ve got a couple cards to share with you today.

First up is this snazzy number!

Keep Smiling card by Teri

I stenciled that circle pattern with the new Circle Dots stencil. Sorta kinda… a whole lotta… dig it.

Keep Smiling card by Teri

I used three different ink colors with the stencil. The process looked a little like this.

Stencil inking close up

By the way,  I gussied up the card with a couple products released previously by Simon Says Stamp! –  the Mini Stars dies and the Hand Lettered Encouragement stamp set.

And this is card #2.

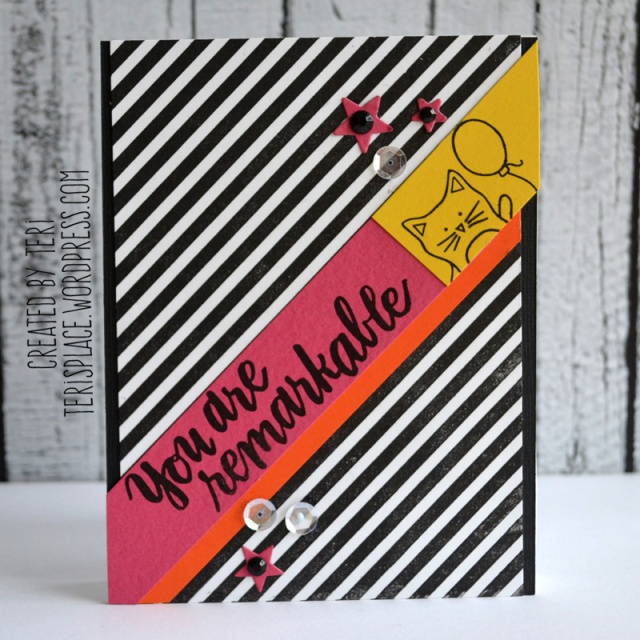
You Are Remarkable card by Teri

I created the background for this guy with the Diagonal Stripes cling stamp. Stripes? Yes, please. I’m a fan.

My first inkling was to make a super bold and graphic card but I wanted this card to have a little bit of cuteness to it so I added the cat and balloon, which were stamped with the new Baby Party Animals stamp set.

You Are Remarkable card by Teri

And once again,  the Mini Stars dies and the Hand Lettered Encouragement stamp set came out to play. 😉

Next stop on the hop is the blog of my pal and buddy, Mary Dawn Quirindongo! Just click here to get to her blog! Take it away, Mary Dawn!

By the way, if you get lost during the hop, be sure to hit the Simon Says Stamp! blog for a complete list of hoppers. And as you hop today, be sure to  comment. Someone will be selected from each stop on the hop at random by the good folks at SSS! to receive a Simon Says Stamp Prize. The random selection by Simon happens on April 28.

Thanks for stopping by today!

Paper Smooches DT Blog Hop

Hi all!

It’s Pep Rally week once again in the Paper Smooches world, and the crew is banding together today to share a sampling of the NEW Paper Smooches MAY release with you! (Woot!) TWO new stamps and TEN new dies will be available to purchase on April 30th at 8 pm Pacific time. Once our release goes live, you will find our new products HERE.  

To add extra fun to our blog hop…we are offering up a prize! 

The prize – a $25 gift code to choose what you like at the PS online store.

Her are the details:

  • FOUR winners will be chosen at RANDOM from any of the design team blogs and the PS Blog to win the $25. prize.
  • Just leave a comment on any of the desiegn team blogs listed below or the PS blog for your chance to win!  (you do not need to comment on all blogs to qualify but it increases your changes)
  • Deadline: You have until midnight PT on Sunday, April 26th to leave a comment.
  • Please check the Paper Smooches blog on Monday, April 27th to see if you are one of the FOUR lucky winners.

A couple of our designers are taking a small hiatus to care for different things in their life. Amy Rohl is filling in for Emily and Jennifer McGuire is filling in for Pamela.  We are so excited to have them join us in May!

To increase your chances of winning:

  • Tell us that you Facebooked about our blog hop
  • Tell us that you Tweeted about our hop
  • Tell us that you posted on your blog about our blog hop

(which means that you have up to three extra chances to win on each blog)

Alright, so let me show you what I’ve got!

Celebrate Circles card by Teri

This was sure fun! I used the new Ring Trio die to make that center shaker style element.

Celebrate Circles card by Teri

What’s a little hard to tell is I got all fancy like with the die.

I die-cut the circles out of a white cardstock panel. I got rid of the circles and adhered the panel to a piece of acetate. Then I die-cut the circles out of black cardstock and adhered them right onto the acetate, creating a window of sorts for the shaker.

Celebrate Circles card by Teri

Worked pretty dang good. Then I strategically placed circles in the bottom two circle windows. I put a lot of foam tape around the top circle and added the sequins to it.

By the way, that sentiment on my card? It’s from the new Birthday Bash stamp set. Birthday stamps are always good to have.

So that’s what I have for you. Thanks for stopping by today. I’ll be back again soon, friends.

Today’s card

Hi all!

Just a card to share today that was made for the fun of having fun… and getting messy! 😉

Gold Hearts Hello by Teri

So I did something really different here. I created those hearts with a stencil and a foil transfer sheet … and… wait for it… rubber cement! Yes, seriously. I totally did!

So this is what I did. I set the Hearts Background stencil from My Favorite Things onto a piece of cardstock and then I just brushed on rubber cement. I let it dry until it mostly dry but still a wee bit tacky. You should know this was a really, really, really fast process.

Then I just set a piece of foil transfer onto the rubber cement (Google the phrase if you aren’t sure what I’m talking about… k?)  and used my trusty burnishing tool (also known as a spoon from my kitchen) to burnish the gold foil onto the rubber cement.

The end result? What you see!

Gold Hearts Hello card by Teri

I used the same technique to add the silver foil to the hello word (cut with the Happy Hellos Die-namics from My Favorite Things). Obviously, no stencil needed for that. I just brushed the rubber cement on and brushed it good.

And, just for good measure, when things were all said and done, I added a few gold sequins to the card. Because… if you are going bold and super shiny… you might as well pile it on good, right? 😉

Be back again later.

Thanks for stopping by,  y’all.

MFT Creative Challenge: Fantastic Florals

Hi all!

It’s Creative Challenge time again with the My Favorite Things Design Team. Our challenge this month? Creative something with florals!

Print

Flowers? Yep. You can bet I’m in. All in. 😉 So here’s what I made.

Happy Flower Trio by Teri

I just plain had fun cutting some flowers and leaves with the Fresh Cut Florals Die-namics and creating a little scene. I will admit there’s no real rhyme or reason here. I just kinda eyeballed things and adhered the flowers down when I thought things looked good. Sometimes, you just gotta go with it. 😉

Happy Flower Trio by Teri

By the way, something I am really digging lately is creating the look of “faux” dry-embossing.

So I did that for the background of this card. I cut the houndstooth pattern with the Houndstooth Cover-Up Die-namics from gray cardstock. And then I adhered it to a gray panel cut from the exact same gray cardstock.

So that’s what I have for you today.

Here’s a list of MFT products I used to make this card:

And, once again, be sure to hit the My Favorite Things Blog to see who else is sharing projects today.

MFT: Decor and More Alphabet Die-namics

Hi everyone!

Surprise! The good folks at My Favorite Things are releasing a new super huge, super cool new alphabet today called the Decor and More Alphabet.

This Die-namics dies are big and bold letters… and are perfect for home decor projects, as well as projects that you want a little extra pop. I also dig that you can buy them individually so you can do specific words you want to make.

I made a little something with one of the new letter dies to share with you.

I thought these dies would be really fun to use for making things to entertain with… like for a dinner party! So I created this little pocket to put silverware in.

Print

Just kind of a fun way to make a place setting look like a little more… fun!

I cut the rectangle panel out with the Blueprints 23 Die-namics and T monogram (from the Decor and More Alphabet) out of it.

Print

The base of my pocket is just a vertical card that I stitched the edges up with my trusty sewing machine and then flipped over.

The flowers were created with the Fresh Cut Flowers Die-namics. I think the sizing just makes them great to pair with the big Decor and More Alphabet letters.

Here’s a list of MFT products I used to make my pocket:

And be sure to hit the MFT Blog to see who else is sharing projects today… and to learn more about the new dies.

Be back again later, gators!

MFT: Shakers Gotta Shake

Hi all!

So My Favorite Things is a doing some fun stuff this week on the MFT Blog, sharing all kinds of fun ideas for shaker cards. Are you new to the shaker thing? Made them for awhile and wanting some fresh ideas? You are going to find a whole lot of great info over there. I highly recommend checking it out.

Print

Today’s focus is on making shakers with word dies, and I thought it sounded like a fun challenge so (yep) I totally decided to join the fun.

So here’s a word die inspired card I made!

Print

It was so fun to make this guy! I don’t think I’ve ever made a word shaker before…. or if I have, I just don’t remember it.

I cut a 5 1/2″ x 4 1/4″ panel of white cardstock and die-cut the friend word with the Friend Die-namics die into it. And then I was super sneaky! I cut a 5 1/2″ x 4 1/4″ panel of acetate (or plain old transparency) and adhered it under it to give it the window look.

Now, I had to be really, really, really sneaky. I had to do something about the ends. So what did I do? I totally cut two strips of Razzle Berry cardstock and adhered them on the right and left sides of the Friend panel.

Friend Shaker Card by Teri

Sneaky, huh? Hee hee hee (<—- written in a totally evil laughing kind of way)!
Rather than using traditional sequins, I die-cut some with MFT’s Sequins Die-namics and placed them behind the window.

I should admit that if you ripped up that panel, you would would find a lot (A LOT) of foam tape behind it.  😉  And, you know what? I would totally do it again! Hee! It was fun!

So there you have it.

Here’s a list of MFT supplies I used to make this card:

And be sure to hit the MFT Blog for more “shaker-licious” action. 😉

MFT: Creative Construction with Blueprints

Hi all!

I’m joining the My Favorite Things design team again today for another Creative Construction with Blueprints challenge.

MFT_CreativeConstruction_SideBar

This time, we are featuring ways to use the scallops from the Blueprints dies. I’ve said it once and I’ll say it again: I love the Blueprints Die-namics. The cool thing about them is you get a bunch of different dies with each set, plus MFT provides a free printable set of sketches for each Blueprints set, sharing some ways you can use them.

So I decided to use Blueprints 8 for my card today. This set has a lot of great elements, and I love that the scallop fits across the rectangle.

Without You Friend by Teri

So make that rectangle element, I die-cut the rectangle and stamped onto with the Diagonal Background stamp. I am a fan of stripes… what can I say?! 😉

Then I die-cut the friend word (also from the Blueprints 8) and then die-cut the scallop three times. I wanted those scallops to have a little pop so I stacked them up, letting the white ones pop from the bottom.

Without You Friend by Teri

For this card, I actually stayed pretty close to one of the sketches for Blueprints 8, changing out just a few elements and adding a few of my own personal touches.

Ok. So there you have it. 🙂

Here’s a list of MFT products I used to make this card:

And be sure to stop by the MFT Blog to see who else is taking part in today’s challenge.

And thanks for stopping by today, guys! I always enjoy it when you do!