UnbeLEAFably Fun Cards

Hi, friends!

Alright. So I might be pushing it on the title of this post, but I wanted to share with you a trio of cards I created with the latest STAMPtember stamp set from Simon Says Stamp! Releasing today is the new Deco Fall set by Paper Smooches. It’s a sweet little set with leaves, a pumpkin, an acorn and a few phrases. You’ll find it and all the other STAMPtember products right here.

I really wanted to focus on the leaves for these cards and challenged myself to make three different (but somewhat similar) cards.

Stamped Fall leaf cards by Teri | Terisplace.wordpress.com

For all three cards, I lined up several of the leaf stamps on my MISTI and then inked them up with three different colors. For this first one, I stamped the leaves twice, once on white cardstock and once on a strip of kraft cardstock. Then I lined them up and assembled the card.

TeriAnderson-DecoFallStampSet-2

This card is probably the most basic of the three with me only stamping my row of leaf stamps once onto the card. That plaid pattern at the bottom? Created that in coordinating colors with Paper Smooches’ Buffalo Check stencil and good ol’ inking. TeriAnderson-DecoFallStampSet-3

I created this final card by stamping row of leaf stamps once on kraft cardstock. Then I rotated the panel and stamped them a second time on the opposite side of the panel. The sentiment strip? I simply cut a piece of white cardstock, stamped one phrase with orange ink and then stamped a second phrase on top with black ink.

By the way, since I really wanted the leaves to shine on these cards, I restrained myself from adding too many embellishments to the cards. I purposely kept things pretty simple by added stitches, thread and sequins. Such a light but nice finishing touch they add.

That is it for me today. I hope you’ve enjoyed checking out these cards. I’ll be back again really soon with some more projects to share with you!

A Christmas Card + a Sunny Studio Alert!

Looking for my 4th Birthday Sunny Studio Blog Hop post? It’s two posts down. 🙂 

Hey, guys! It’s never too early to get started on Christmas cards. I don’t know about you, but I sure hate waiting to the last minute to make them. I’d much rather spread out my card making efforts over the year and then just pull cards from my stash out at Christmas.

Today’s card features the mini light bulb die that Sunny Studio is offering with orders until their supply runs out. I just love this little light.

A Christmas card by Teri | terisplace.wordpress.com

I cut it multiple times from white cardstock and then used my markers to add colors to the bulb and base. Look really close at each bulb and you’ll see some extra shading added to each one.  The “string” is a piece of twine I adhered right onto my card and then placed the lights along it.MerryChristmasBulbs-teri-close

The white cardstock panel they are placed on was dry embossed with their new Buffalo Plaid embossing folder. It’s really cool, I think, how it looks when embossed on white paper.

The sentiment was created with words and phrases from the Merry Mice stamp set. Really, I could have used words from any Christmas stamp set, but I just happened to have that stamp set sitting on my desk so I used it. How is that for a “real life crafting” confession? Wink.

Alright! That’s it for this card. Don’t forget. Today is the last day to take part in Sunny Studio’s 4th Birthday Blog Hop. Get hopping by checking out my post here. So many fun cards.

Thank you for stopping by. It’s always such a treat when folks do. Thank you.

A Little Bit of Halloween Fun

Looking for my Sunny Studio 4th Birthday Blog Hop post? it’s the post right below this one!

Hi, friends! Shake it, shake it off… or something like that.  🙂

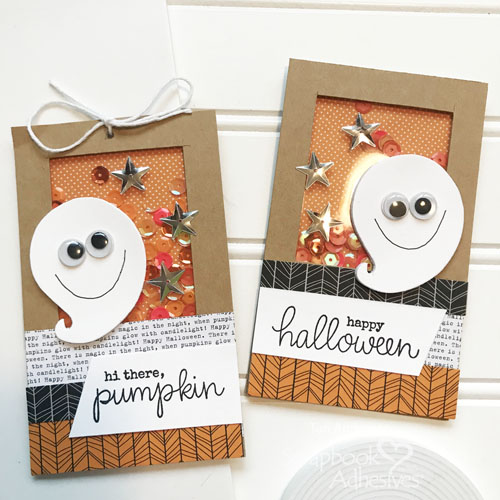
I’m  up over on the Scrapbook Adhesives by 3L blog with a new tutorial! I’m showing how to make a shaker card, as well as a coordinating shaker tag, that would be perfect to add to a Halloween treat.

A Halloween Shaker Card and Tag by Teri | terisplace,wordpress.com

These two little shakers took a little bit of time to make, but they would be easy to reproduce with supplies you have. I’d sure be tickled if you’d check out the post.

By the way, if you want more Halloween paper craft inspiration, don’t miss this post as well. You’ll find a sweet little Halloween card I put together. You’ll also get a tip for holding stencils in place while you use them to apply ink to paper.

A Halloween card by Teri | terisplace.wordpress.com

See you again soon, friends!

Sunny Studio 4th Birthday Blog Hop

4th Birthday Blog Hop Banner (3)

Happy, happy, happy birthday to Sunny Studio Stamps!

Super happy today to be joining some wonderful crafters in celebrating the 4th birthday of Sunny Studio Stamps! A big hello to all of you! If you have been blog hopping, you should have arrived here from the blog of Francine Vuillème. I’m Teri. And if you are just joining the hop, welcome! (The next stop on the hop is the blog of Rachel Alvarado.)

Sunny Studio’s Winter release is Sept. 27th, but in honor of Sunny Studio’s 4th birthday, all of their Winter release products are available for pre-order! You’ll find all the new products right  HERE.

Also, Sunny Studio is offering free shipping within the USA and a mini light bulb die on all orders (or a $4 discount + a free mini light bulb die on international orders) + a free enamel pin on orders over $50 through September 30th. (The pin is so, so cute!)

4th Birthday Blog Hop Graphic (1)

Bonus Lightbulb Die with Order (2)

I’ve created three cards with the new products to share with you today.

This first card is a, well, a little cheesy! Wink!

CheesyChristmasMiceCard-teri

Ha! Just kidding. But it sure was fun to make a sweet little scene with these mice and tree stamps from the Merry Mice stamp set. I also used the coordinating Merry Mice dies and Very Merry 6×6 paper.

A handmade Christmas card by Teri | terisplace.wordpress.com

To give the background paper a little extra something, I added some white dots to some of the snowballs with white Nuvo Crystal Drops. It’s subtle but I like it adds just little bit of texture to the card.

I really like making scenes when I stamp so this second card features, well, another scene! 🙂

MerryLittleChristmasHouses-Teri The neighborhood and snowy hills were stamped with the Scenic Route stamps and die-cut with the Scenic Route dies. I applied glitter along the snowy hills to add a little sparkle to this scene.

I also used an embossing folder (the brand new 6×6 Buffalo Plaid one) to dry emboss the white cardstock behind the scene. MerryLittleChristmasHouses-Teri-Close

This last card features yet another scene. This one was created with the new Feeling Frosty stamp set and Feeling Frosty dies. (One creative note: The sentiment was created with words from the Merry Mice stamp set.)

MerryLittleSnowmen-teri

I once again used paper from the Very Merry 6×6 paper pack.

MerryLittleSnowmen-teri-close

These little snowpeople are just so cute. I actually stamped and die-cut about a dozen of them. I colored them all in and then just fit as many as I could on my card. Needless to say, they’ll be surfacing on several more cards in the next few months. Mark. My. Words.

Alright! That’s what I have!

Be sure to leave a comment on my post (as well as the rest of the blog hoppers’ posts). You could win a $25 gift card on my blog, as well as each of their blogs! Comments will be taken through Friday, September 27th 11:59 pm PDT. Winners will be announced on the Sunny Studio blog on Tuesday, October 1st, and Mendi (the sweet soul behind Sunny Studio) will email all the winners their shopping codes.

Don’t forget! Next stop on the hop is the blog of Rachel Alvarado. Take it away, Rachel!

And here’s the complete blog hop list, just in case you get lost. 🙂

Thank you again for stopping by today! It’s such a treat!

Paper Smooches September Blog Hop

Hi, friends! Let’s hop! It’s Paper Smooches Blog Hop time once again! The gang’s all here  And the gang is banding together to share a sampling of projects made with the NEW Paper Smooches September 2019 release with you!

  • 2 NEW STAMP SETS
  • 4 NEW DIES
  • 2 NEW STENCILS

Eight new products will be available to purchase here at 10 am Central time on September 7th. Hooray!

To add extra fun to our blog hop…there is a prize!  The prize – a $50. gift code to use at the PS online store.

Here are the details:

+  TWO winners will be chosen at RANDOM from any of the blog links below

+ Leave a comment on any of the blogs listed below (you do not need to comment on all blogs to qualify but it will increase your chances of winning) 

+ Deadline: You have until midnight Central time on September 8th to leave a comment.

+ Please check the Paper Smooches blog on September 9th to see if you are one of the TWO lucky winners.

Paper Smooches blog

Guests:

Teri Anderson

Ways to increase your chances of winning:

  • Tell us that you Facebooked about our blog hop.  If you don’t already like the PS FB page, please do here.
  • Tell us that you Tweeted about our hop (follow PS on Twitter – https://twitter.com/papersmooches)
  • Share our blog hop on Instagram @papersmooches
  • Tell us that you posted on your blog about our blog hop

(which means that you have up to four extra chances to win on each blog…. can I get a woohoo?)

Alright! So let’s get on with the project.

With Gratitude card by Teri | terisplace.wordpress.com

Created this one with a couple new products. Made the background with new Buffalo Plaid stencil. Simply plopped the stencil on orange cardstock and then sponged dark orange on top.

The leaves were cut with the brand new Linked Leaves die. It’s so dang fun. I cut it a couple times from white cardstock. I stacked them on top of each of each other and then used markers to add some color to the inner pieces.

TeriLinkedLeavesDie-2

For a little extra pop, I added some dots and lines with a white pen. I also added some white thread behind the leaves. Always love that look.

Alright. That’s all I have for today. Thanks for stopping by! I’ll see you again.