MFT Countdown: 3

Hello, hello!

We meet again! Woot! 🙂

Got a few cards to share with you today. And, yes, shocker! 😉 I’m again using some of the cool new products that My Favorite Things will debut on Feb. 3rd. (Ooh! So, so close!)

NewReleaseCountdown_Day3

On your mark. Get set. Go.

This is card #1.

Hey There card

So I used the new Ride the Wave Die-namics to make those waves. They are totally fun. You get five dies in the set and they make these awesome waves that you can use a little bit of… or a whole lot of.

Print

I stamped the words and the polka dots (on the yellow wave) with the help of the Wavy Greetings stamp set.

One thing I learned while using the Ride the Wave Die-namics is it was helpful to number them on the back so I could remember what dies fit together to make wavy element like I did for my first card.

Ride the Wave Die-namics from My Favorite Things

I also put a little bit of washi tape on them, all toward the bottom.

And this is card #2.

Just Because card

Rather than making a bunch of waves that lined up, I threw caution to the wind and randomly adhered waves to my card. You might say I channeled my inner freestyle design loving ways. 😉

Just Because card

I once again used the Wavy Greetings stamp set to stamp on the waves. I used it for the words and the stars.

Also, the little star I stamped in the middle of the die-cut stars was from the stamp set.

Here’s a list of MFT products I used to make these cards:

And be sure to swing by the MFT blog to see who else from the design team is sharing projects today. I’ll be back again tomorrow. (<—- Imagine that with an Arnold voice.)

MFT Countdown: 4

Hi all!

I’m back with a couple more cards made with some of the fun new stuff My Favorite Things will be debut on Feb. 3rd.

NewReleaseCountdown_Day4

Shall we get started? 😉

OK. You win. Hee!

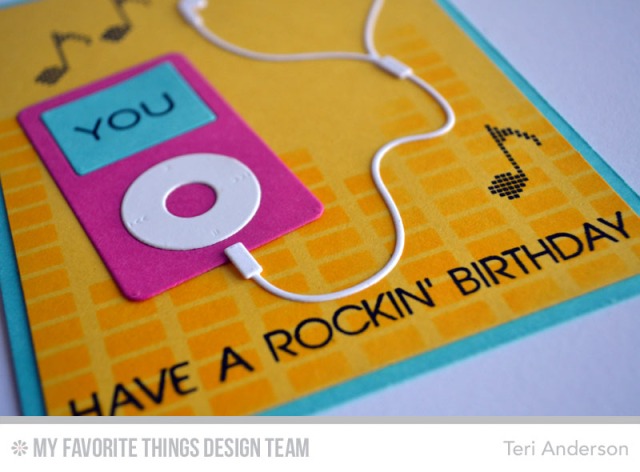
Rockin' Birthday card

I had a good time playing with a couple new products for this one: the MP3 Player Die-namics; the Equalizer Stencil and the Keep on Rockin’ stamp set.  I stenciled the equalizer pattern onto the background paper by setting the stencil down and then just sponging on some Lemon Drop ink with a plain old cosmetic sponge. Easy peasy.

Rockin' Birthday card

This one might seem a little familiar. I used some of the same products to make it.

Just a Note card

One of the fun things about the MP3 Player Die-namics is they come with a baby player and a big player. I thought it would be fun to bring them together so that’s what I did for this card: one baby player and one big player. 🙂

Just a Note card


And once again I used the Equalizer stencil to sponge an ink pattern on the background paper. It was kinda fun to go girly girl with this card and use a soft shade of pink rather than the bright bold colors I am so fond of.

So here is a list of supplies from MFT I used to make these cards:

And that’s what I have for you today. Be sure to hit the MFT blog to see who else from the design team is sharing projects today.

Hope to see you again tomorrow.

MFT Countdown: 5

Hi all!

It’s time yet again for another countdown toward another awesome release from My Favorite Things.

NewReleaseCountdown_Day5

And I’m geeked to share a couple cards with you today that I made with some of the new products. So let’s do this.

Meet card #1.

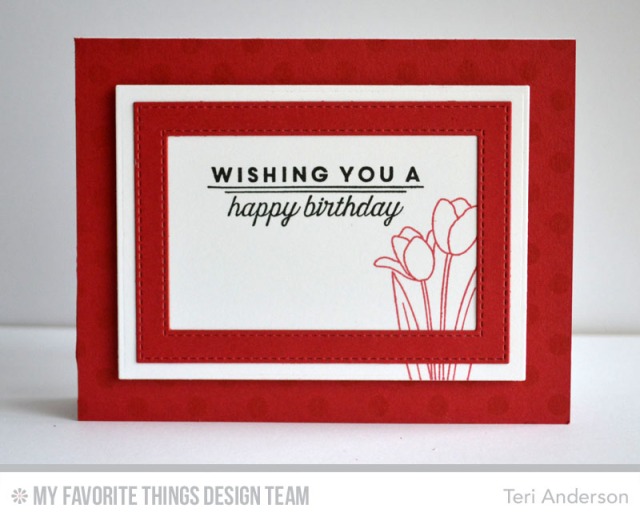
Wishing You card

The tulips and words are from the new Spring Tulips stamp set, while the rectangle frame (and white rectangle) were cut with the new Stitched Rectangle Frames Die-namics. They, along with all the rest of the new things, arrive on Feb. 3rd at My Favorite Things.

Wishing You card

I created an inside of the card, trying to mimic slightly the look of the card front.

Wishing You card -- inside

This time, I used a different tulip and saying from the Spring Tulips stamp set.

And here’s another card I made with the Spring Tulips stamp set and Stitched Frames Die-namics.

Thinking of You card

I used the coordinating Spring Tulips Die-namics to cut out the flower. And then (… hold your breath, friends..) I used markers to color the flower in! (Woohoo! I used markers! YAY!)

Thinking of You card

To make the flower pop, I once again used foam adhesive to stick it on my card.

Here are the MFT supplies I used to make these cards:

Be sure to check out the MFT blog to get more sneak peeks of the new products (and to see who else from the design team is sharing ideas today)!

I hope to see you again tomorrow!

Paper Smooches DT Blog Hop

Hi all!

It’s Pep Rally week in the Paper Smooches world, and the design team is banding together today to share a sampling of the NEW Paper Smooches February release with you! FOUR new stamps and EIGHT new dies will be available to purchase on January 31st at 8:00pm pacific time. Once our release goes live, you will find our new products HERE.  

To add extra fun to our blog hop…we are offering up a prize! 

The prize – a $25 gift code to choose what you like at the PS online store.

Here are the details:

  • FOUR winners will be chosen at RANDOM from any of the design team blogs and the PS Blog to win the $25. prize.
  • Just leave a comment on any of the design team blogs listed below or the PS blog for your chance to win!  (you do not need to comment on all blogs to qualify but it increases your changes)
  • Deadline: You have until midnight PT on Sunday, February 1st to leave a comment.
  • Please check the Paper Smooches blog on Monday, February 2ndto see if you are one of the FOUR lucky winners.

To increase your chances of winning:

  • Tell us that you Facebooked about our blog hop
  • Tell us that you Tweeted about our hop
  • Tell us that you posted on your blog about our blog hop

(which means that you have up to three extra chances to win on each blog)

So enough hop chit chat. 😉 Here’s what I have to share with you!

Easter Blessings card

I created this card with the brand new Easter Blessings stamp set.  The crosses and the words are from the set.

To make the cross background, I heat embossed all the crosses with white embossing powder onto a panel of white cardstock. I let the embossing powder cool down and then brushed pink, purple and green watercolors over them. I used a paper towel to remove the color that pooled up over the crosses and then just let the panel dry until I was ready to use it on a card.

Easter Blessings card

I cut the banner out with the Streamers dies. I wanted the banner to look curved so I used two layers of foam tape in the middle of it and one layer on the ends. I like how it gives the banners just a little bit of extra dimension.

Thanks for stopping by today all!  I’ll be back again later.

Today’s card

Hi all!

Ever have an idea and just want to run with it? That’s the story of today’s card.

Love To You card

It all started because I was playing around with paint splatter for fun and made this background. And then I got to thinking about my stash of Essentials by Ellen dies and stamps… and then kinda started thinking I could make a Valentine’s card.

So I just kinda started grabbed things. Challenged myself. And this is what I came up with.

Love To You card

I think it’s pretty fun! I mean, how often do you see a pink stag? Yep. Not often. 😉

I’ll be back again later, friends. Have a great day!

MFT Creative Challenge: Wear Your Heart On Your Sleeve

Hi all!

Hooray! It’s time for another Creative Challenge with the My Favorite Things Design Team.

Print

The challenge this time is all about hearts…. lots and lots of glorious hearts. Hearts (and stars & circles) are pretty my favorite design elements so, of course, I had to get in on it. So yeah. I’ve got a couple cards to share with you.

This is No. 1.

XOXOXO card

Just plain love the Pierced Heart STAX Die-namics so I totally whipped them out for this card (and for the next two you’ll see). 😉 Look really close and you’ll see I stacked a couple hearts on top of each other here.

XOXOXO card

My old friend, the Blueprints 20 Die-namics, came in super handy for cutting the rectangle and scalloped rectangle background panels the hearts are mounted on.

Sending You All My Love card

I wanted to try something different here. I stamped brushstrokes this time with the Jumbo Abstract Art stamp set and set the hearts on top of them. To give them a little bit of pop, I adhered them with foam dots.

Sending You All My Love card

I dig how they look kinda like they are just floating there.

Print

For this guy, I cut a bunch of hearts and then kinda just layered them together, allowing a little bit of all the hearts to show.

You Are Loved card

It’s a different look. I’m excited to try it with a different shape at some point.

So that’s what I have for you today.

Here’s a list of MFT products I used to make these cards:

Be sure to hit the MFT blog to find out who else from the design team is sharing projects today. I think you are going to “heart” what they cooked up. (Hee!)

See you again soon. Thanks for swinging by, guys!

MFT: Release Rewind

Hi all!

I’m squeaking in with a few more cards made with the January release from My Favorite Things.

Print

On your mark. Get set. GO!

Print

Ta-da!

So this is card #1. I created the heart panel by sponging Bubblegum ink through the Hearts Background Stencil.

Print

The words are from the new I Love You More stamp set, while the hearts were cut with the Pierced Heart STAX Die-namics. Oh, and that small heart with the pattern? Yep. I stamped the pattern on it with the Damask Background stamp.

And here’s card #2.

Print

I once again used that Damask Background stamp set.

Again, those Pierced Heart STAX Die-namics made an appearance again. This time, I die-cut them from the same pink cardstock and then stacked them up. I sorta kinda (a whole lotta) dig that layered look.

Print

The words are from the I Love You More stamp set.

I also used the Sequins Die-namics, Blueprints 20 Die-namics and Stitched Rectangle STAX Die-namics.

So that’s what I have. To see more projects made with the new release, visit the MFT Blog. Lots of other design teamers are sharing projects today.

MFT: January Launch

Hi all!

Hooray! January’s new release from My Favorite Things is now available.

Print

I’m totally geeked to share with you a couple cards I made with new Level Up stamp set and Game Controller Die-namics (and a few other goodies from the new release).

This is card #1.

Print

The new Game Controller Die-namics are so, so fun. Rather than trying to make a controller that looked just like one one would use, I just kind of ran with it and made all the buttons white. Hey, it works!

Print

And then I added a couple hearts cut with the Heart Puzzle Die-namics. And those stamped words? They are from the Level Up stamp set.

Print

I added a few more stamped words and heart to the inside of the card.

And this is card #2.

Print

Again, I just ran with it. This time, I cut the controller from white cardstock and then created the buttons from red cardstock.

I created the heart pattern on the pink panel by sponging ink through the Staggered Hearts stencil. Easy peasy, people. EASY!

Print

I mimicked the pink panel for the inside of the card. I just stamped a different phrase from the Level Up stamp set.

Print

Be sure to hit the MFT blog for links to more awesome posts from the design team today.

MFT Countdown: 1

Hi everyone!

It’s so, so, so close to January’s release from My Favorite Things.

NewReleaseCountdown_Day1

I’ve got two more cards to share with you today that I made with some of the new products.

This first card uses the Fluttering Hearts Cover-Up Die-namics (arrives on 1/6 at MFT with the rest of the January release). That die is probably one of my favorite products from the release. You get these beautiful steel die and and it has all these heart shapes. That, in itself, is really cool, but then cut a piece of paper with it and fold the hearts. You get this cool 3-D effect.

Print

I just love it!

For this card, I cut used the die to cut two panels – one from red cardstock and one from pink cardstock. And then I sliced a little of the pink panel off and adhered it to the red panel to make this card.

Print

The sentiment is from the new Smitten With You stamp set. I’ve gotten quite a bit of mileage out of this set as I’ve worked on projects with this new release. It’s got so many great phrase combinations in it. You know me. Anything with mix and match possibilities makes this girl super happy!

Print

And this second card also uses the new Smitten with You stamp set. I also used the new Heart Puzzle Die-namics dies on it.

Print

I also used the Blueprints 20 Die-namics and Sequins Die-namics to cut some of the elements for it.

Print

So that’s I have today. Be sure to check out the MFT blog for more inspiration and release sneak peekage.

And, by the way, all the new stuff lands at MFT on the 6th.

MFT Countdown: 2

We meet again, friends!

It’s another day. It’s another day closer to January release goodness from My Favorite Things.

NewReleaseCountdown_Day2

Hooray!

Let’s do this.

Print

I was up to my mixing and matching ways here!

I created the sentiment by mixing together the new Straight to the Heart Die-namics with the new I Love You More stamp set.

And then things got crazier! I added other things to the equation: the Tiny Hearts Background stamp (which arrives at MFT on 1/6); the Sequins Die-namics; the Pierced Fishtail Flags STAX Die-namics and Stitched Rounded Rectangle STAX Die-namics.

Print

I think it all turned out pretty dang cool.

And this card #2.

Print

To make the little heart arrow, I cut the arrow twice with the Straight to the Heart Die-namics. I cut on in half and adhered it on the top and got what you see!

Print

Kinda fun, huh?

So here’s a list of MFT supplies I used to make these cards:

Be sure to check out the MFT blog for more inspiration and release sneak peeks! It’s a good one, you guys. So good!

See you all again tomorrow.